3D printing in the medical field, particularly dental, is on the rise. Very quickly. Printing nightguards, splints, temporary crowns, models, and more is becoming common place.
Also on the rise are 3D printed dentures and partial dentures. In 2022 the estimated market value size is $2.52 billion. By 2030 it is forecasted to rise to $15.9 billion. Of this, 38% is done within the US, the market leader in digital dentistry in general.
Factors such as growing geriatric populations and recently developed materials being introduced attribute to this. While there are many different types of 3D printers, DLP, LCD and SLA types are the most common in dentistry.
Graphy Resin TFDH Denture Base is the world's first 3D printable biocompatible flexible denture material. It can be can be used with both DLP and LCD printers.
Digital dentures have exploded into the scene in the past 5-10 years. First to arrive was subtractive manufacturing, or milling them from a puck of material. Following the advances in milling came printing - we finally have started utilizing additive manufacturing, better known as 3D printing, which builds the denture from a liquid resin, curing it layer by layer.
In our experience, partial dentures are on the rise with a demand for more. The largest generation, (the “baby boomers”) are growing older and are needing partial or full dentures. These people tend to have more money set aside or coming in from retirement and pension plans for health costs. In turn, we see a spike in partials and implants compared to leaving missing teeth or edentulous areas in the mouth.
With the price of 3D printers declining, continual vast improvements in available materials, and COVID slowing or even completely bringing work lives to a halt, many dental professionals took it as an opportunity to learn and master some new materials with 3D printing.
After doing much research about 3D printing, taking many classes, workshops, and speaking to some of our mentors, we determined it was time to learn and hopefully conquer printed partials and dentures.
In this article we will cover our experience with Graphy Denture Resin.
Who is Graphy?
When doing my research, one of the companies that stood out to me was Graphy. This company was established in South Korea back in 2017, so it’s relatively young. Their main focus has been developing industrial resins, as well as medical and dental resins. They also developed their own curing machine, the Tera Harz Cure, but they are yet to develop their own 3D printer.
Instead of focussing on making a 3D printer, the company makes resins for third-party use. They make a lot of different types of resins. The company claims that all their dental materials are non-toxic and hypo-allergenic.
They have multiple dental resins for use in both clinic (Tera Harz series) and laboratory (S-Plastic series). Admittedly, their names and labelling system is quite unintuitive, so allow me to break down their dental line-up for you:
- Direct Aligner is the first material for direct printing of clear aligners. It comes in two colors Tera Harz TC-85 (white) or Tera Harz TC-85DAC (clear).
- Permanent C&B (TC-80DP) for manufacturing of permanent crown and bridge prosthetics. On their website, they claim it might replace zirconia. Bold claim.
- Surgical Guide (SG-100 or S-Plastic SG-100) for sugical guides obviously.
- Denture Base (THD or Tera Harz THD) can bond to Graphy TC-80DP teeth.
- Flexible Denture (TFDH or Tera Harz TFDH or TFD) is generally indicated for manufacturing of partial dentures. It is a valplast-like solution.
- Model (S-100M or S-Plastic S-100M) for manufacturing of dental models. Comes in gray and beige.
- Castable (SC-130 or S-Plastic SC-130) for printing models that will be used in the casting of metal prosthetics.
- TE-Series (Tera Harz TE-Series) clear, flexible and elastic material for manufacturing of mouthguards or nightguards.
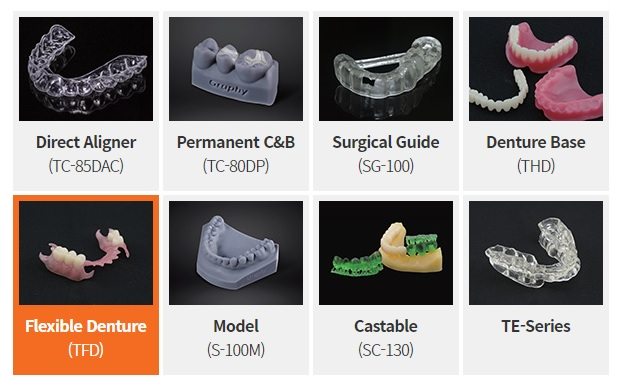
The line-up of printable dental materials by Graphy.
We will eventually test some of these other materials in the future but for now, our focus is on the Graphy Flexible denture resin. After waiting for some time for a flexible denture base material, Graphy Tera Harz Flexible Denture Base (TFDH or TFD) finally became available. This material did not disappoint.
Getting and Using Graphy
The Flexible Denture Base resin (TFD for short from this point on) was released to the US in September 2022. Originating in Korea and spreading to Europe and South America, it took some time to get this resin in The United States. After calls and emails to multiple US distributing companies, DentCore was the only distributor able to supply us with this resin at the time.
A European distributor, FEP Shop, also has them in stock. The company did state in an email that they do not have a lot in stock, so it would be easy to assume they have not had a big rollout in the US yet, but we imagine it will be coming soon. Many dentists in South America, Europe, and Korea like working with it, but the data and feedback is limited.
It should be noted that Graphy TFD did not come with a Standard Safety Datasheet or instructions of any sort. My first two prints were simply to test the material and play with it. After receiving the manufacturer's instructions, they were followed.
The only thing in the manufacture that was done differently is we smooth the print lines before giving the final extra layer of resin and final curing. Instructions did not say to do so, but we like to use this time to add some extra anatomy to teeth and base. We also do not have a nitrogen generator, like Tera Harz Cure (curing machine) does. For this reason, we cured in glycerin to remove the oxygen-inhibited layer.
What is Graphy Flexible Denture?
Graphy claims to have developed the world’s first biocompatible 3D printed flexible denture material. While Graphy TFD is flexible, similar to Valplast or DuraFlex, it does have noticeable differences.
First, this material is exclusively meant for 3D printing. On the other hand, Valplast is a polyamide thermoplastic - a nylon which can be 3D printed as well as injection moulded. If you want to 3D print it, you must have a filament printer, which is a type of technology that is not as commonly used in chairside dentistry. That is what makes Graphy TFD resin a great alternative since most dentists will likely invest in a DLP or SLA printer.
The ability to use the material depends on if the 3D printer and software is a closed system or an open system. A closed system means the company will test and verify the material of its partners and make them available for their printers, but not all resins can be used. With an open system, you manually enter all the specs for the resin: layer thickness, lift speed, exposure time etc.
With Graphy Fexible denture material it is only recommended to be printed at 100 microns, we are hopeful in the future it will be able to be printed at 50 microns. This resin is available in white, clear, light pink, pink, and coral. Graphy does suggest using their denture teeth (TC-80DP) for best results. Graphy’s denture teeth resin is not a flexible resin.
“Tera Harz TFD is a high elasticity material, has a higher flexure strength and higher elongation than conventional thermoforming resin, so it is resistant to external shocks.” – Graphy website
Indications and Contraindications
This material is indicated for partially edentulous patients. We have not tested it on a full arch. Indications also include elderly patients, patients with metal allergies, those who have a small oral cavity (as the printed resin can be thinner than a traditional acrylic partials), and patients with lots of erosion because it will supposedly not wear as hard on the abutment teeth compared to a metal base partial (MBP).
These types of partials are indicated for patients where bilateral undercuts are present, utilizing them instead of getting hung up on them when trying to seat. This resin is of great use when a traditional MBP would not be suitable, due to the undercuts interfering with the path of insertion.
It is also a great option for interim partials while waiting for an implant to be placed and restored. Because of its flexible nature and quick turnaround time, patient acceptance tends to be higher. This appliance can be made and delivered in two appointments, compared to three to five with a traditional lab workflow. This also greatly reduced the overhead chair time and lab fees. Being able to delegate at least the post-processing to a lab tech or dental assistant frees up the doctor's time too.
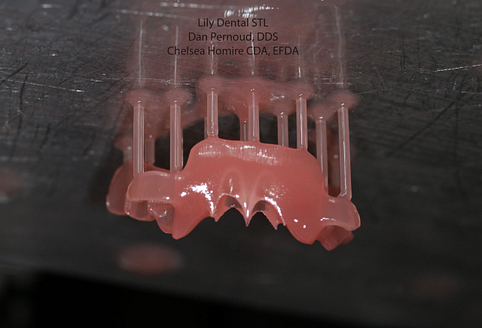
Freshly 3D printed partial denture base on a build platform.
Contraindications for a flexible base partial include those who want a sturdy or hard partial, and those missing most of their posterior teeth. It should also not be used when a patient presents with a bilateral edentulous distal extensions.
It is important to note that digital scans must be near perfect. Any sort of tissue movement or incorrect scan data can create a distorted 3D model and thus a poor fitting partial denture.
iDD offers free training in the fundamentals of intraoral scanning.
Claim your free training by clicking the button below.
Designing the Partial Denture
When designing our first partials, we set the teeth up virtually in Blue Sky Bio and then built the partial by hand in Meshmixer using Dr Cory Glens method. We have since upgraded to exocad. The manufacturer's instructions state that prints should have supports around the vestibule, with minimal in the intaglio. This lessens the chance that when removing supports you will change the fit of the appliance. This is a fundamental technique that we have already done when printing dentures and partials previously.
The manufacturer instructions also state that the supports should never be in the tooth sockets, which can disrupt the ability to seat the denture teeth into position completely. These are all common denture-printing strategies.
Graphy states the supports should be a contact diameter of 0.4mm if available. If supports can be printed in this way using your specific printer, then the supports can easily be removed by hand.
Using SprintRay’s RayWare 3D printing preparation software, we used the setting of high density and medium strength. The supports were easily removed by hand. Printing an upper partial usually takes about one hour and twenty minutes on a SprintRay Pro95.
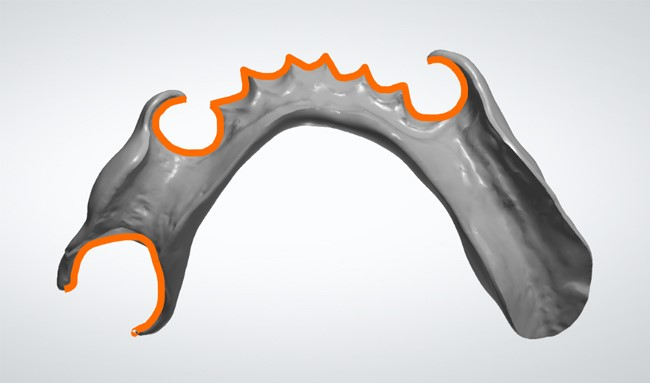
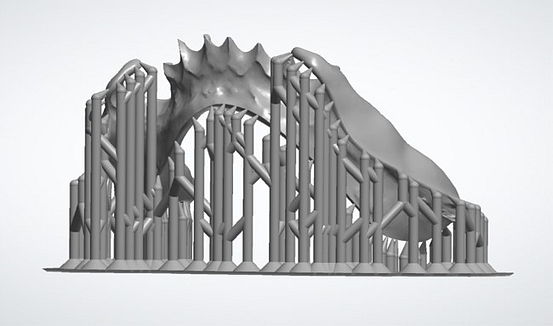
When designing a partial denture, it is important to use teeth undercuts and embrasures to engage the material and thus create better retention for your printed partial denture.
Graphy recommends placing the supports near the border area and avoid areas that might affect fitting.
Washing the Printed Partial Denture
After printing, the post-processing of this material is different compared to traditional 3D printed resins. Instructions state to remove the print from the build plate, place it in IPA alcohol and use an ultrasonic cleaner for 30 seconds.
When we were testing this material our first print broke because this material is flexible. Learn from our mistakes and take care when removing it from the build plate so that you do not break the prosthetic.
Instructions state 30 seconds is all that is needed in the alcohol-ultrasonic bath. Using a small ultrasonic we had, we simply placed a glass dish in the bottom, filled it with IPA, and turned it on for 30 seconds.
Do not place the denture in a Ziploc bag and place it into your regular sterilization ultrasonic. Doing this risks contamination as the alcohol can make tiny holes in the bag and leak. Instead, place the restoration in a glass mug of alcohol, and then place the mug in the ultrasonic cleaner with a few inches of water in it. The resin does seem to come off fairly easily and quickly with virtually no leftover resin after washing.
Curing the Printed Partial Denture
Graphy suggests using their cure machine, the Tera Harz Cure 2 (or THC 2) UV curing system. They do note on their website that the nitrogen generator is optional and used specifically for removing the oxygen-inhibited layer. If 3D prints are not cured in glycerin or with nitrogen, it will leave a small layer of uncured material.
This renders the material NOT biocompatible unless you remove the oxygen-inhibited layer. Not only is uncured resin a lung and eye irritant, it’s also toxic, smells terrible, and can have negative effects on the patient. This includes but is not limited to tissue sloughing, terrible taste, contact dermatitis, throat irritation, and more.
Removing the oxygen-inhibited layer is crucial, but very easy. The print can be submerged into any clear liquid that does not contain oxygen (don’t use water). Technicians use all kinds of things including vegetable glycerin, KY jelly and ultrasound jelly. Simply fill a clear bag with glycerin and cure in it. Nitrogen curing machines also achieve the same thing. The point is, d whatever can be done to simply remove the oxygen-inhibited layer to ensure it is safe for patient use.
The THC 2 curing unit LED wavelength is 405 nm, with an LED power output of 200W, and reaches a peak temperature of 35 degrees Celsius. This means any machine that reaches 35 degrees Celsius and has a wavelength of 405nm can cure this particular resin. After washing, cure for 5 minutes. If using a Tera Harz Cure 2, it is set at level 1.
If using a Sprintray ProCure 1, create a custom cycle at 30 degrees for 5 minutes. ProCure 1 is what we used to cure. Once again, prints should be cured in glycerin to remove the oxygen-inhibited layer. The print is not biocompatible until the oxygen-inhibited layer is removed.
It should be noted that the ProCure 2 only gets to 385nm. This means that it does not reach the manufacturer guidelines. We used our ProCure 1 and seemed to have no issues. Material was still flexible and had no tackiness of any kind.
After the final cure, polish any trace of supports left behind. Manufacturer’s instructions explain that you should smooth the outer surface of the denture with a denture pad. We used a simple acrylic bur and found the material adjusts easily with an acrylic bur.
3D printing guidelines state that 3D printed materials (even those called biocompatible) are not biocompatible until they are cured, the oxygen-inhibited layer is removed AND the print has been washed. This removes any trace of uncured resin or any traces of alcohol. We washed our final partial denture with soap and running water twice. I also personally like to use a toothbrush to get in the intaglio surface, rather than just washing the outside.
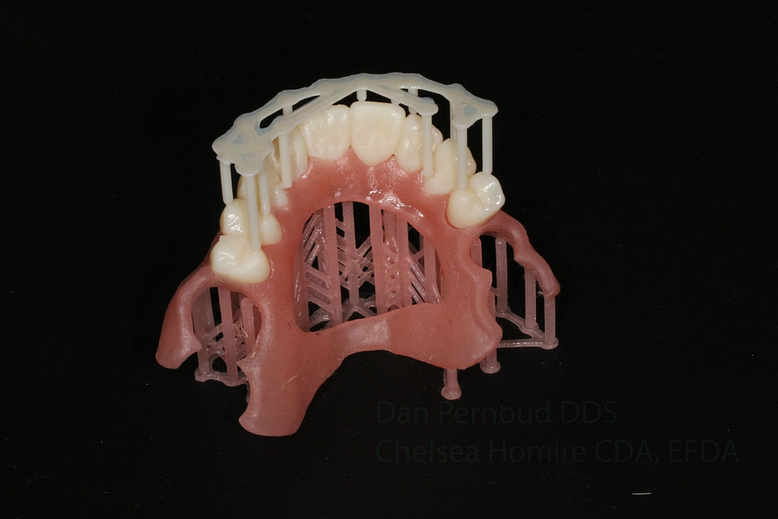
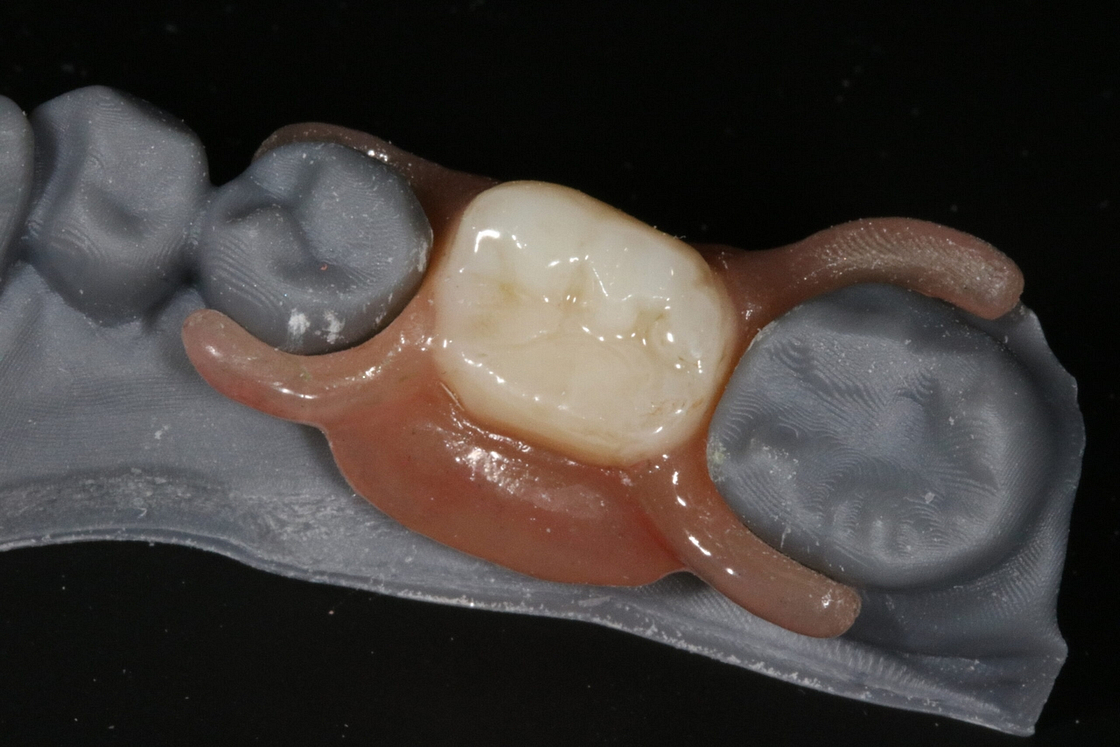
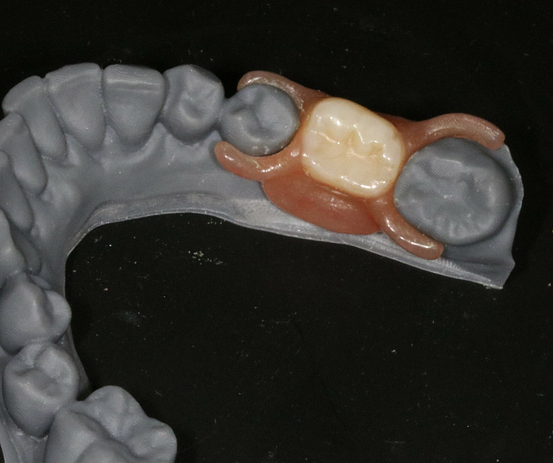
Printed 3D printed partial denture with denture teeth also printed and in place.
Setting Teeth and Final Polish
The manufacturer’s instructions state to seat the denture teeth in place before the final polish. The workflow is quite straightforward and outlined below.
Graphy’s advises to apply a pea size amount of the denture base resin into the tooth sockets and place the printed teeth into place. Always push hard to ensure correct seating.
They also state to use a cotton tip to remove any excess resin. We did not like the idea of using a cotton tip applicator, as this risked getting some of the cotton fibers into the resin and adhering to the print. We used a paper towel or just a clean gloved finger instead. Then cure to secure the teeth in place.
After this, you’re supposed to place a thin layer of the resin all over the base of the partial, using a gloved hand or a brush. This gives a nice shiny appearance. Commonly called candy coating in dental 3D printin spheres. Cure again for 3 minutes.
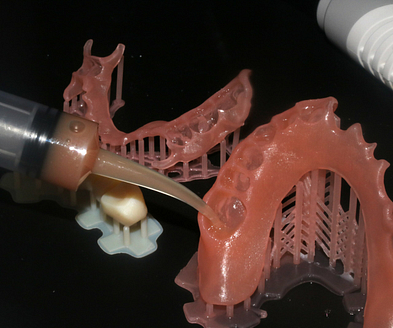
Applying denture base resin into the sockets before pressing the printed teeth in place.
We kept the staining and glazing the surface of the partial denture base to a minimum (e.g with OptiGlaze). The instructions did not include any details about glazing or polishing the outside of the base. It simply instructed to attach the teeth and give an all-over coat of base resin for a shiny even coat.
For this reason you will note in the pictures that staining is minimal. It’s important to note that a flexible partial cannot be glazed as the glaze layer will just break away. Just for testing we placed glaze all over, cured and flexed the partial,. The end result is what you expect - it did crack off right away.
For the first few partial dentures we made, we smoothed and polished the denture instead of adding a fresh layer of liquid uncured base resin to the surface. This gave a great shine, but it was not as shiny as when we added an all-over resin coat.
For the teeth you can add some stain and glaze (once again the base cannot be glazed). We used the OptiGlaze Color Kit for tooth characterization. This kit included a wide variety of colors and two different glazes to use. This kit can be used on any 3D printed material and is a commonly used for resin/composite characterisation.
After adding any characterisation to the teeth we then cured in glycerin once again. It is important to note that if you are submerging and not using gas to remove the oxygen-inhibited layer, you should cure for 3 minutes first to give an initial set. Then finish curing 3 minutes submerged. If you place a coated print in glycerin, it will displace and ruin the characterisation.
This can be considered a benefit of nitrogen-curing devices like the Tera Harz Cure unit. They are more convenient and fast because it cures the oxygen-inhibited layer without the need to submerge in a clear, oxygen-free liquid.
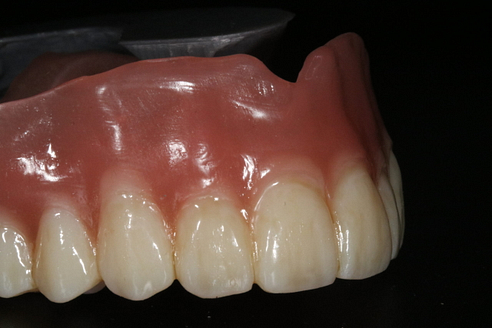
The result after applying characterisation to the partial denture teeth.
The longevity of OptiGlaze on 3D printed prosthetics is debated. Instead of using OptiGlaze some dental professionals will only use liquid UV resin to give an all-over shiny top coat for their long-term appliances (rather than glazing).
Moving on, the manufacturer's instructions for this resin state to polish off supports and place resin all over for a shiny appearance with no mention of any glazing kits. Our polishing protocols for almost all 3D prints involves polishing away any print lines with ScotchBrite polishers and two rounds of shine and high shine polishing bars.
After removing all the print lines with the ScotchBrite polishers, we use red and then green Hatho polishing bars with a muslin rag wheel. Polish thoroughly with both compounds. These bars were originally made for polishing acrylic but we discovered they do a great job with 3D prints as well.
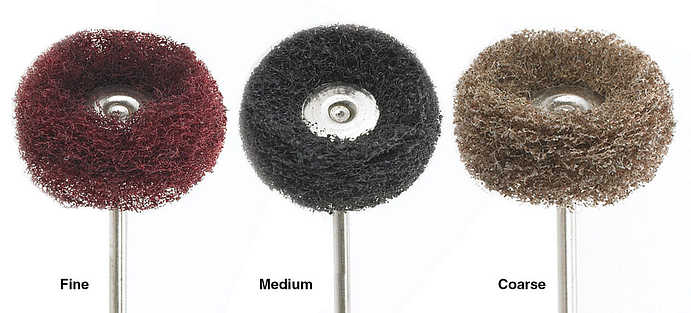
We then remove any residual polishing paste with a Dr Thompson’s hair bur. The manufacturer instructions do not state the need for an all-over polish, but the printed partials look even nicer after doing so in our experience.
After polishing we washed the denture at least twice with soap and water so no residual resin or polishing paste is leftover. If prints are not washed, they may have a terrible smell and taste. The very few times we did not wash the 3D prints (the early days when we didn’t know better), some patients returned stating the taste was so bad they were unable to wear it.
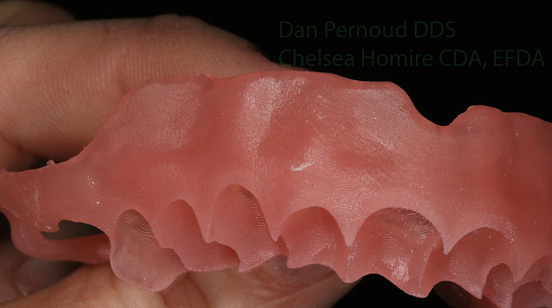
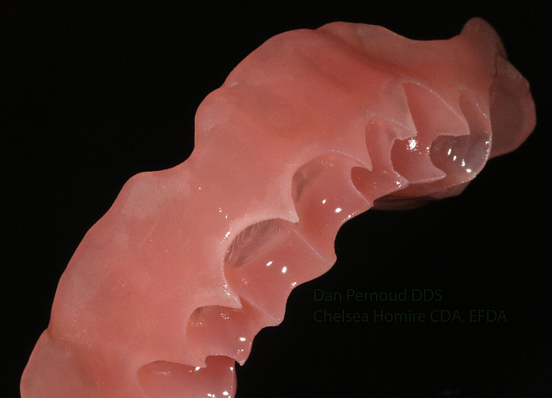
Before and after polishing print lines off with ScotchBrite polishers.
Overall, the processing of the denture base and teeth was straightforward and quite standard compared to other 3D printables. This material adjusts very similarly to acrylic, so it is very easy to work with compared to Valplast or Duraflex. You can adjust it without having to use special burs. A simple acrylic bur will do the job easily. Additionally if any designed clasps become distorted or loose, you can adjust them. Put the denture in water at least 176 degrees fahrenheit, sit for 1 minute and mold. Run under cold water to set.
Limitations
Like any material, Graphy TFD does have its limitations. In our experience this material does became brittle easily if over-cured. Studies have shown that brittleness of 3D printables appears most often after three cures.
It should be noted that all clasps and connector bars should be at least 3mm thick. The thinner the straps or connectors are, the higher the chance they will fracture. We redesigned several dentures after learning this.
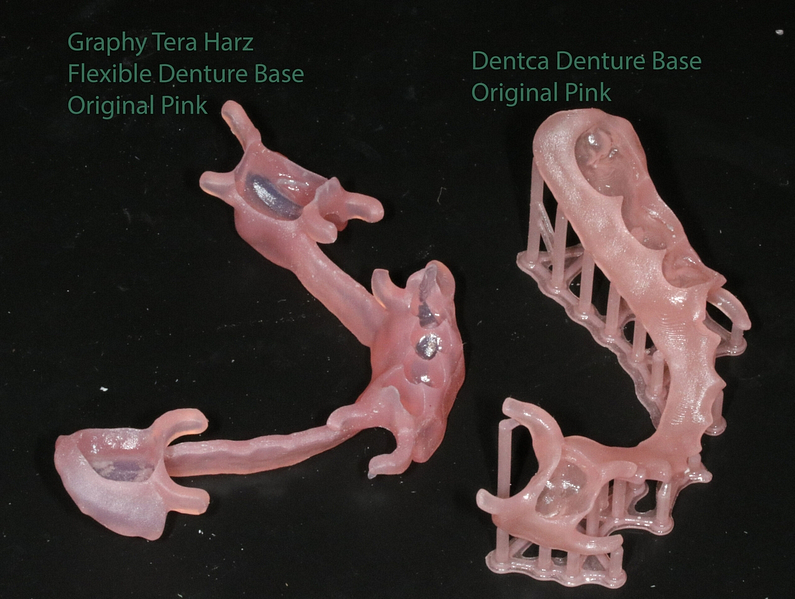
The material does have a slight translucency to it, especially compared to traditional pink acrylic. Like all printed denture bases, it is not nearly as opaque as an acrylic denture. Comparatively, it is not as translucent as Dentca Denture Base in shade Original Pink.
Patient Response
For the handful of these completed and given to patients, and then surveyed a month later, we received no complaints.
Patients reported enjoying the flexibility and not having an appliance with metal framework or clasps. No negative responses have been reported to us, including no allergic reactions or ulcers. Obviously, it is important to make sure the denture fits well before sending the patient home as to not get sore spots confused with an adverse reaction.
Graphy TFD is also great for patients who do not have great dexterity and may struggle to remove a rigid partial denture.
Only time will tell how this material hold up in the long term which has been a point of debate for 3D printed dentures for some time.
In Comparison
Graphy TFD only has one main competitor - Senertek. Their denture resin has the highest flexural modulus at 3,200 MPa. Graphy’s is a close second at 2,850 MPa. Flexera from Desktop Health is a slightly flexible material at 2,325 MPa.
Other denture bases like Dentca (2,00 MPa) and Pro3Dure High Impact Base (2,000 MPa) have proven to have their place but are not flexible. Dentca has also had some reports of being quite brittle and fracturing.
When it comes to flexural strength, Dentca and Pro3Dure came in last at 70 and 65 MPa respectively. It should be noted, those are generally intended for full denture bases, not partials. Flexera's flexural strength comes in at 72 MPa. No surprise that Selenrek comes in at 110 MPa and Graphy just behind at 100 MPa.
Graphy TFD has proven to be flexible, though not as flexible as Valplast. Desktop Health’s Flexera is slightly flexible and very strong, a favorite among Einstein printer users.
Take note that some technicians use a flexible night guard material (as opposed to a denture base resin) as the base for a flexible partial denture. In the short term, it has its uses. With that said, from experience, we have observed that flexible nightguards tend to wear faster and turn yellow compared to an actual denture base resin.
Conclusion
At this time, the the Graphy TFD flexible denture material is very new and has limited scientific data or resources about its long term use. In our experience we have been happy with the results so far with multiple successful outcomes, at least in the short term. The material is as it claims to be - a flexible printed denture base resin.
At this time, the company seems to be focusing all their effort on their direct print aligners materials. We are hopeful that the next big push will be their denture resins with much more availability, testing, and testimonials.
With the handful of cases we have had experience with, we have been happy with results. There seems to be minimal shrinkage after post-processing, the printed dentures fit very well with little to no adjustments needed, and designed clasps fit snugly and have shown no signs of coming loose or breaking.
We look forward to learning more about this material and sharing with you our long-term reviews of how these 3D printed dentures cope in the oral cavity.
That is everything for this review. Please share any comments or questions you have about 3D printing dentures below.

