3Shape, CAD/CAM, Clinical Cases, Implants, TRIOS, Workflows

Dental Implant Treatment from Start to Finish using 3Shape TRIOS

In recent years, dentistry has undergone a remarkable transformation, largely driven by the rapid advancement of digital technologies. 

From intraoral scanning and 3D imaging to computer-aided design and manufacturing (CAD/CAM), these innovations have revolutionized how dental professionals diagnose, plan, and execute treatments. 

Among these groundbreaking technologies, 3Shape has emerged as one of the most useful parts in our practice. 

Their scanners are excellent for implant cases, and the Unite software is a powerful tool for streamlining dental workflows, particularly in implantology.

This case study aims to showcase the huge impact digital dentistry can have on your workflows.

This article is not sponsored in any way by 3Shape.

I wanted to demonstrate how we use 3Shape Unite software to plan and complete dental implant treatment. 
About the Author

Dr Byron Park

Dr Byron Park is a general dentist combining 10 years of experience in general dentistry and a passion for digital dentistry. He works as a dentist and educator with the iDD team in Wellington, New Zealand. Byron has particular interests in the latest digital dentistry tools such as dynamic navigated dental implant surgery, jaw motion capture and artificial intelligence in diagnosis of dental radiographs. 

Patient Background

The patient, a male in his 60s, presented with multiple dental issues, including missing and cracked teeth and a bony defect in the area of a previously extracted tooth.

Over the years, the patient had experienced multiple cracked teeth, which had led to various complications and treatments. In 2021, the patient reported hearing a loud crack while eating, after which tooth 24 became tender to biting pressure. 

Upon examination by his previous dentist, a vertical root fracture was diagnosed, necessitating a surgical extraction. The procedure, which involved removing the buccal cortical bone, left the patient with a bony defect in the area of the extracted tooth.
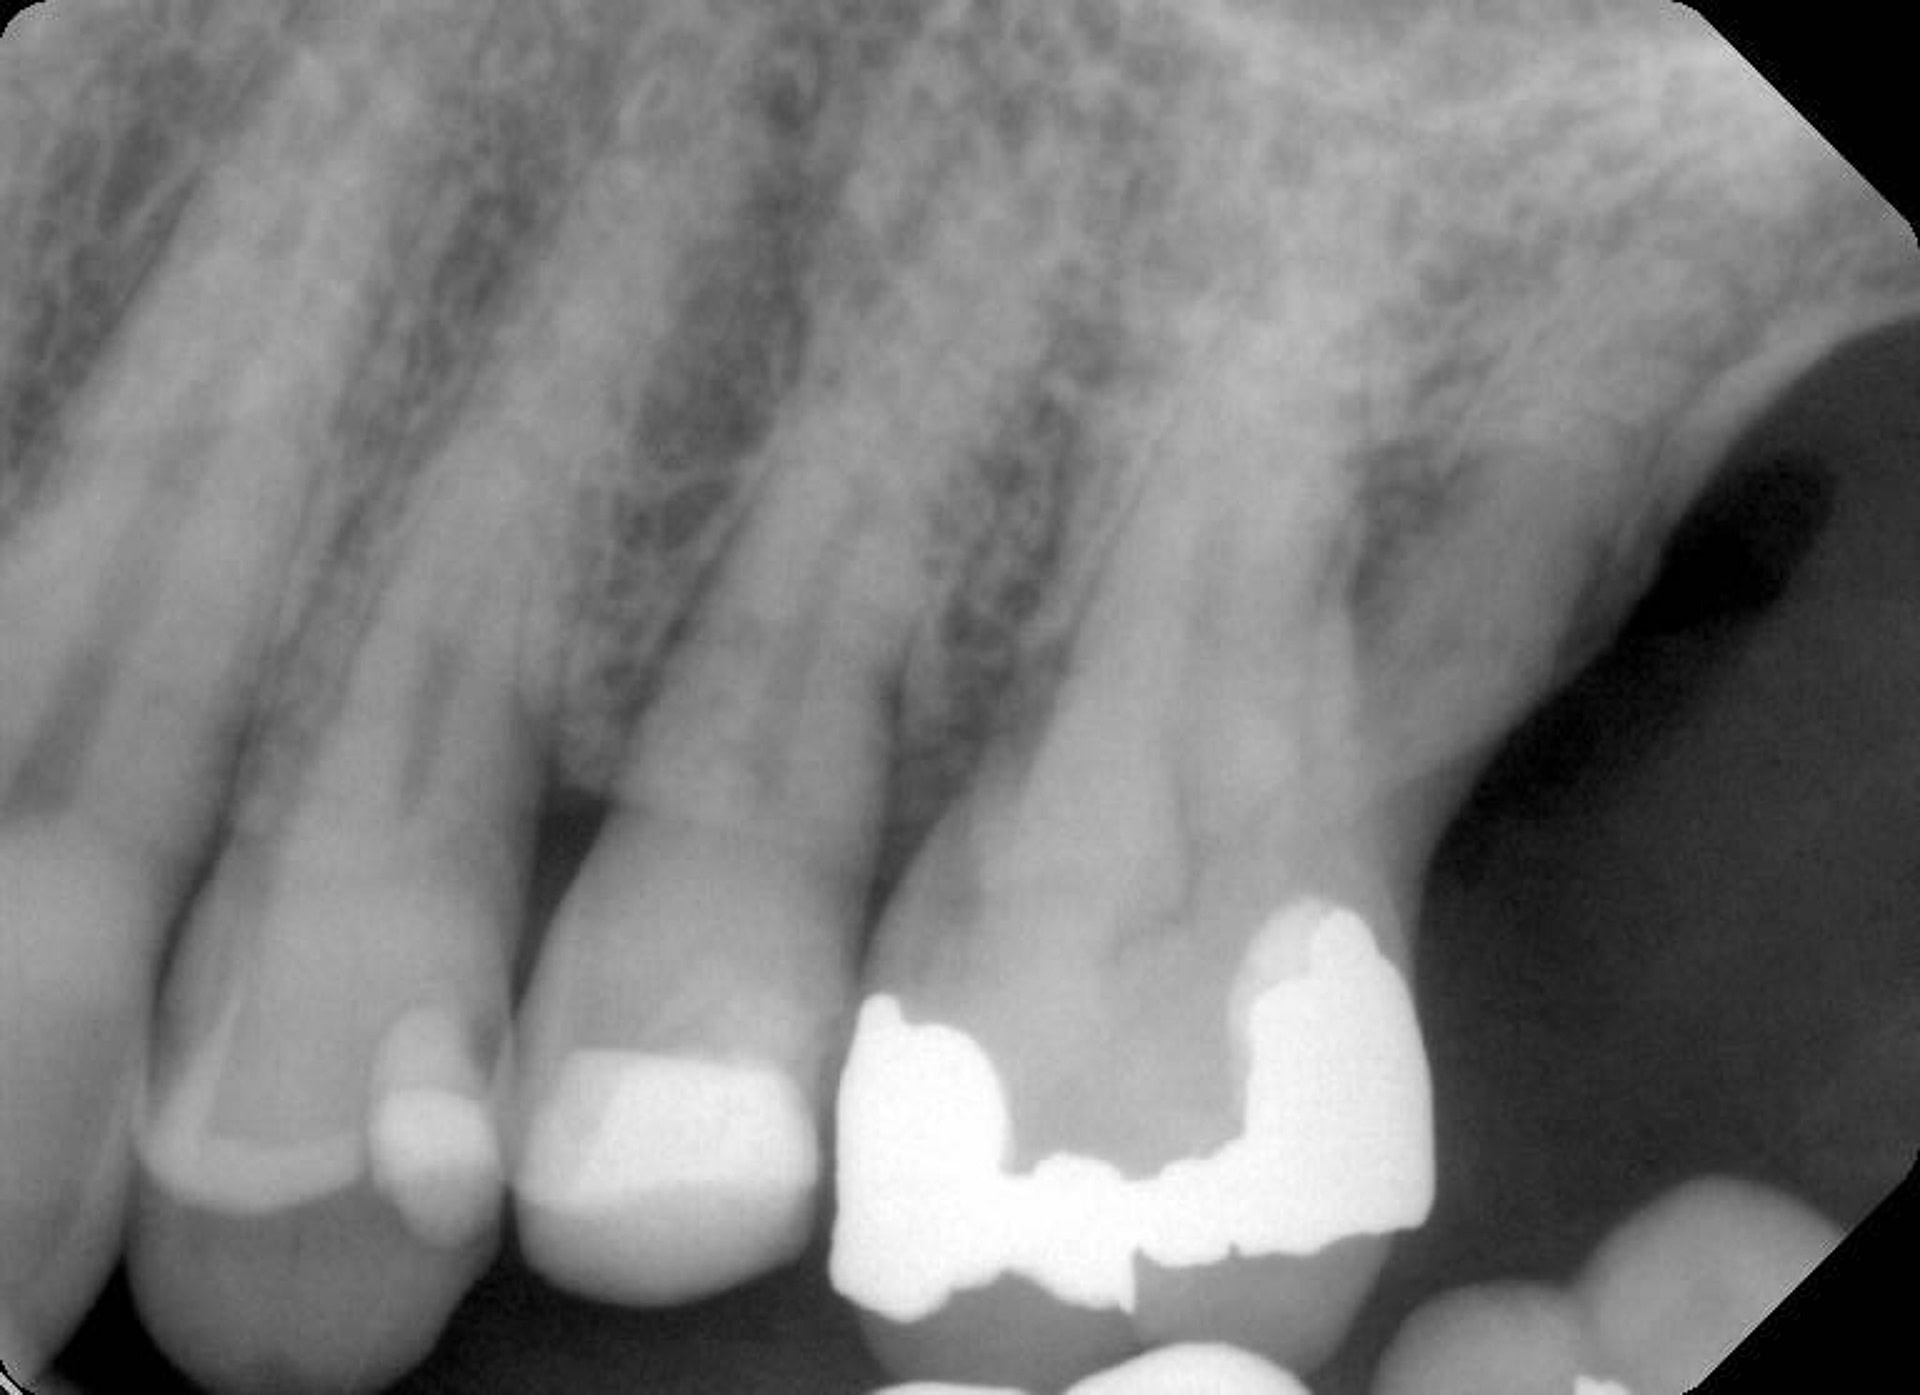
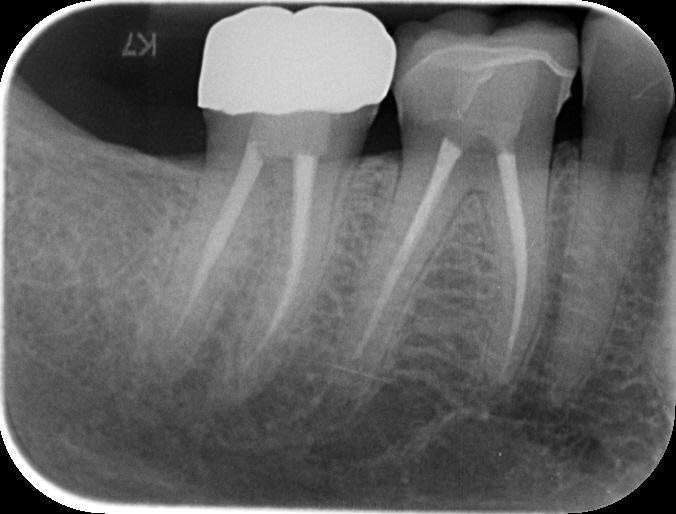
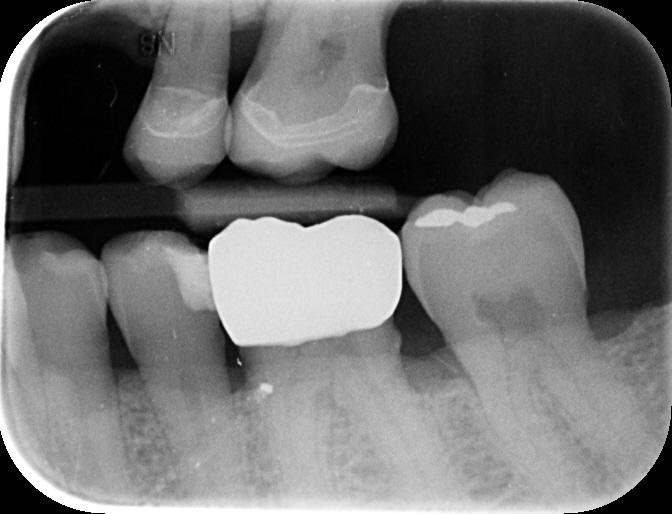
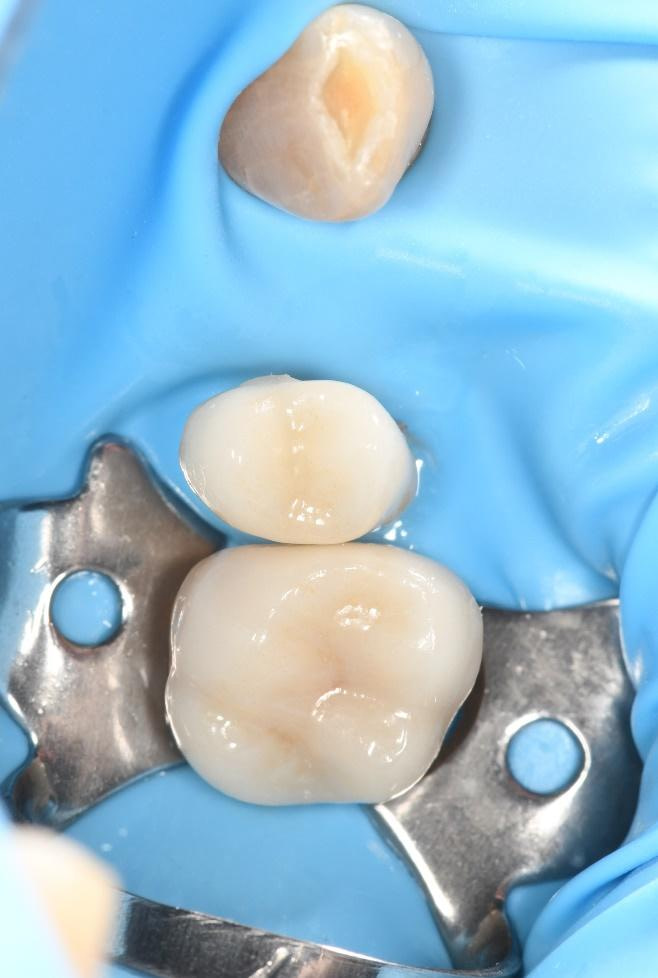
His previous dentist retired, and the patient visited me for the first time as an emergency visit due to symptomatic irreversible pulpitis from a cracked tooth (46). Root canal treatment on tooth 46 was completed, and a crown placed.
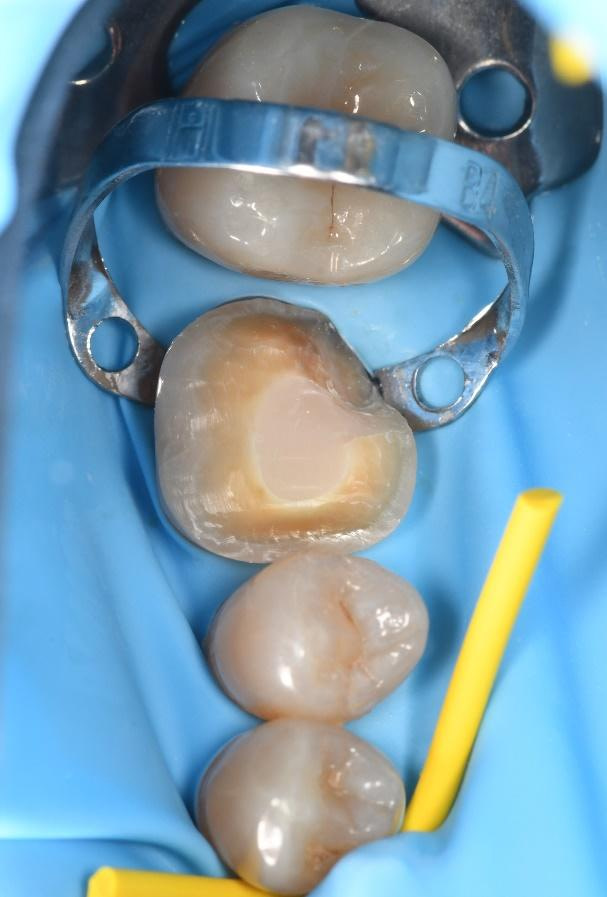
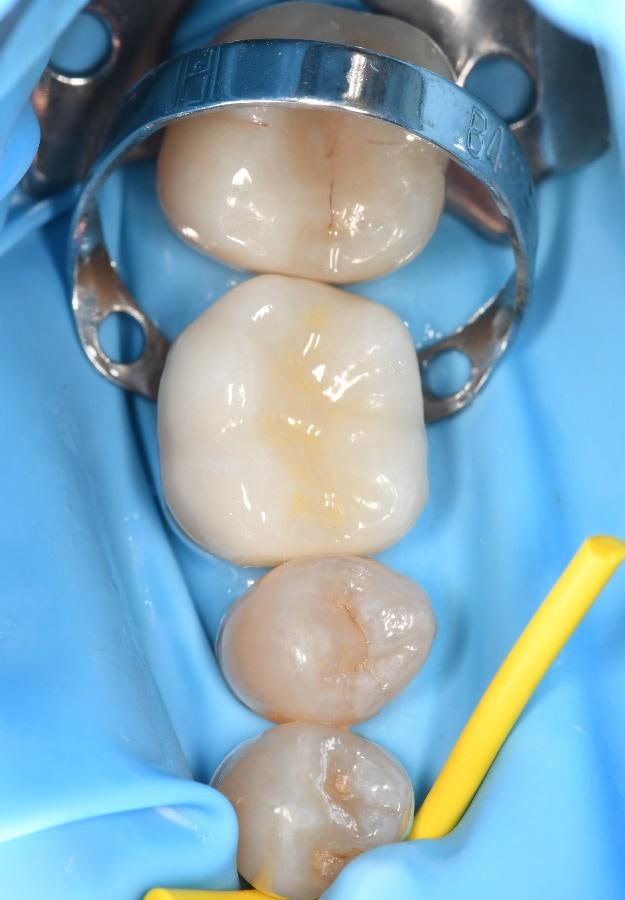
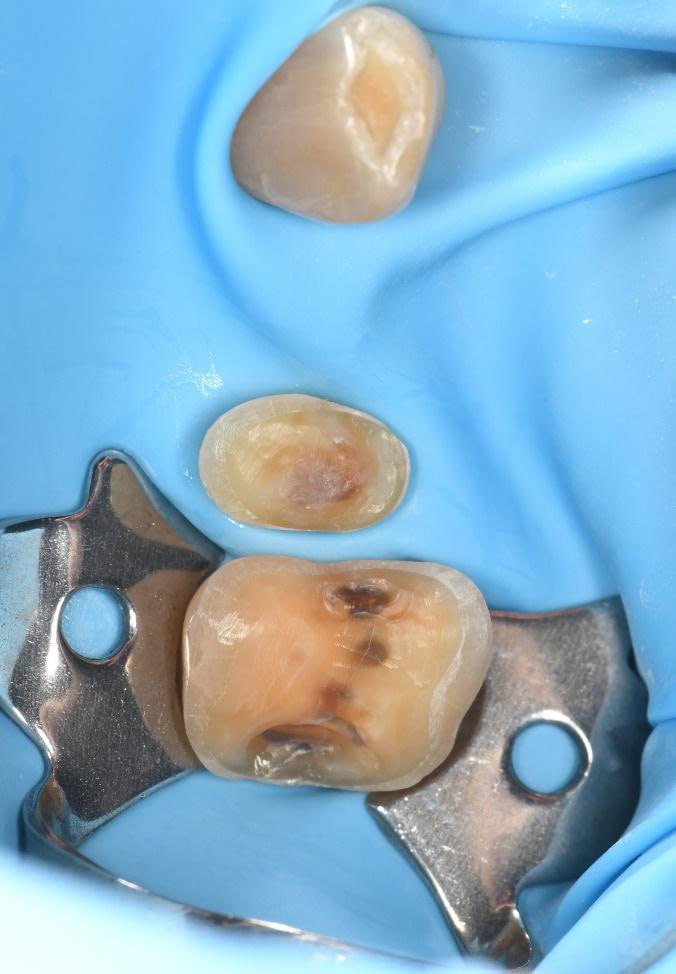
Upon completing a comprehensive examination, it was revealed that teeth 25 and 26 were also cracked, and the patient expressed interest in replacing the missing tooth 24. 

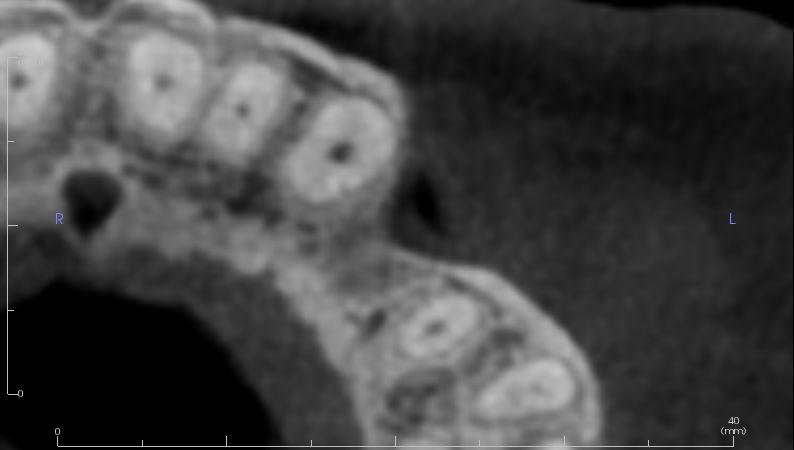
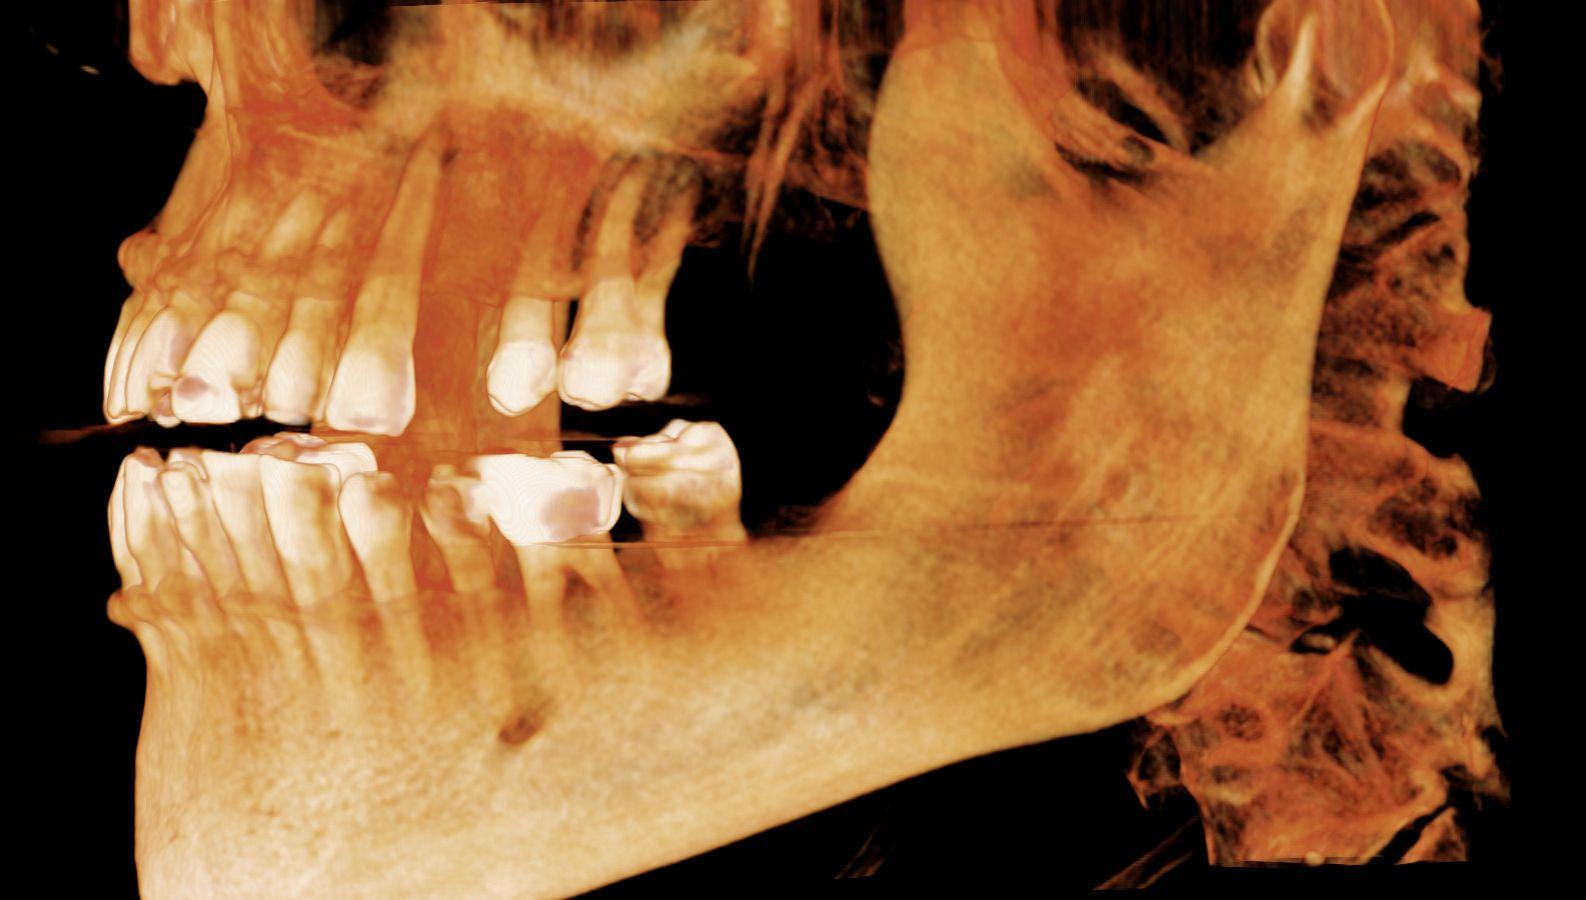
To better understand the patient's overall dental health, a full mouth CBCT scan was taken, confirming the presence of a bony defect in the area where tooth 24 had been surgically extracted.
Treatment Planning

Following the patient's initial consultation and the discovery of additional dental issues, I conducted a thorough full mouth examination. The findings of this examination, combined with the CBCT scan results, provided a comprehensive picture of the patient's oral health status and allowed for the developing a personalized treatment plan.

The treatment plan consisted of crowning teeth 25 and 26, replacing missing tooth 24 with a dental implant, and placing a bone graft to replace lost bone tissue and provide a stable foundation for the implant.
The Digital Implant Workflow

3Shape Unite is a powerful digital platform that integrates a wide range of diagnostic and treatment planning tools, allowing dentists to create highly detailed, patient-specific virtual models of the oral cavity. 

By combining data from 3shape TRIOS intraoral scans, CBCT imaging, and other diagnostic sources, TRIOS enables practitioners to visualize and create treatment plans in a fully digital environment.

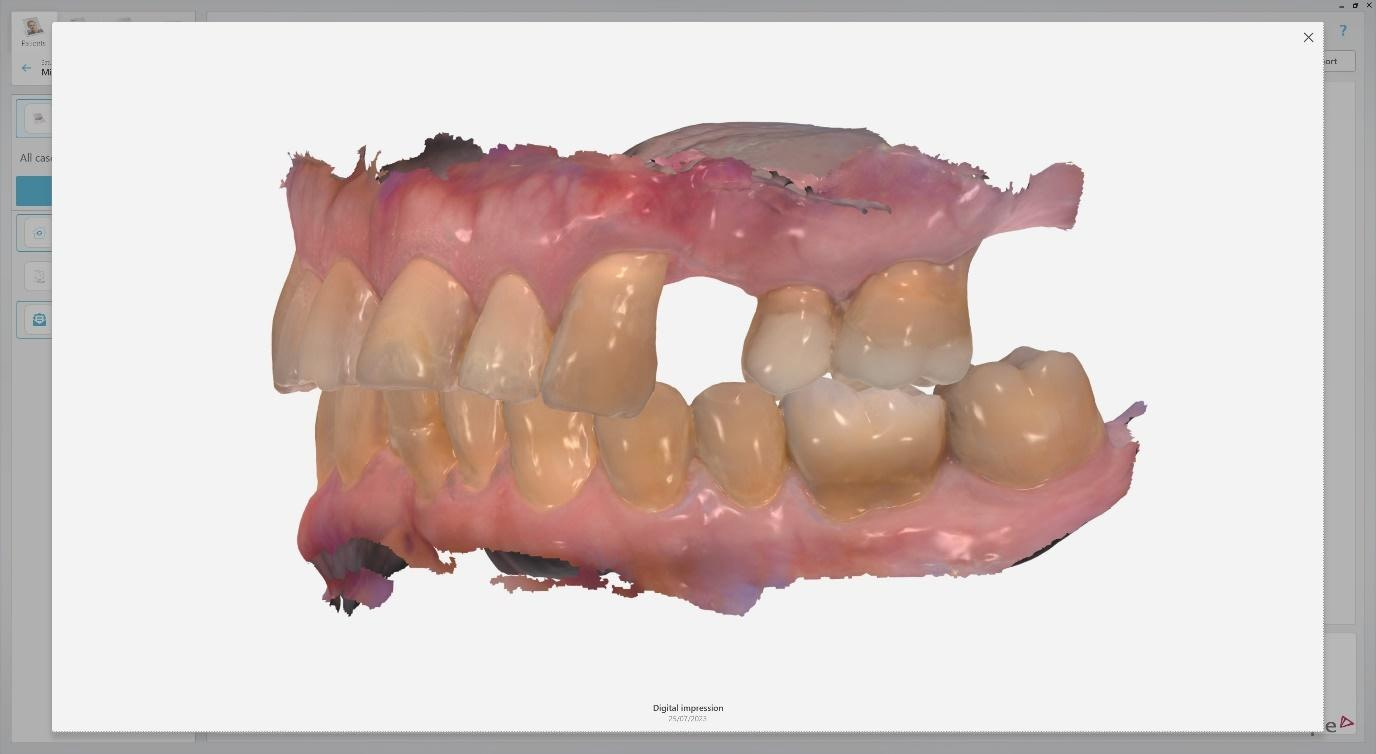
Intraoral scans were completed using the Trios 4 intraoral scanner and a H8 x D 15cm craniofacial field CBCT was taken.
Surgical Phase

The surgical phase of the implant treatment is a critical step in ensuring the success and longevity of the final restoration. 

I utilized 3Shape Implant Studio, a module within the 3shape Unite Platform, to plan and execute the surgical procedure.

Pre-surgical planning began with acquiring high-quality diagnostic data, including TRIOS intraoral scans and CBCT imaging. The data was imported into 3Shape Implant Studio, where I designed a virtual crown for tooth 24 and planned the precise positioning of the implant, considering critical factors such as sinus proximity, adjacent roots, bone density, and the location of the bony defect.

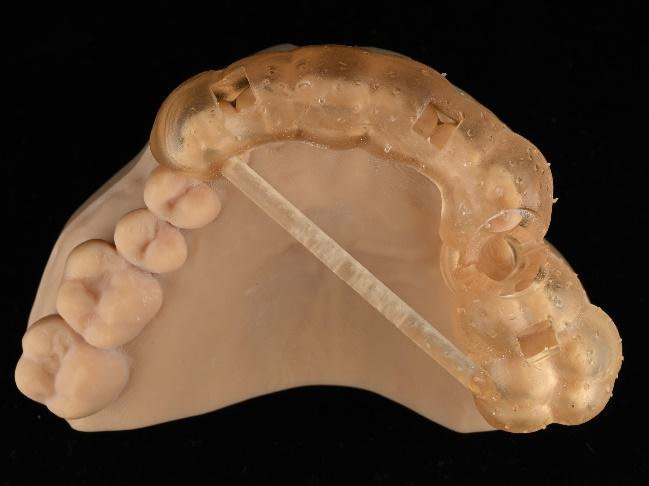
A custom surgical guide was designed and 3D printed, incorporating all the critical information from the virtual planning. The implant surgery was performed under local anesthesia, with the surgical guide firmly in place to ensure accurate implant placement. Bone grafting was performed to address the bony defect and promote optimal healing.
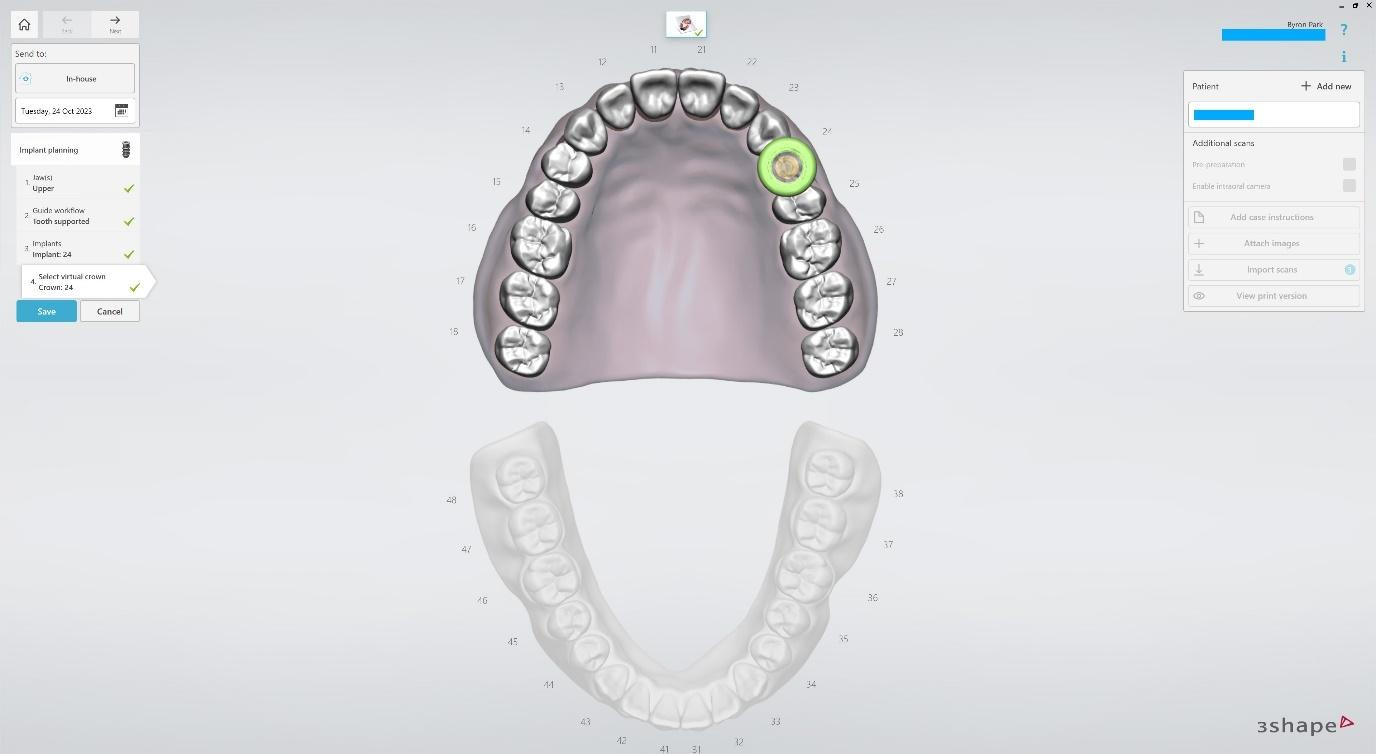
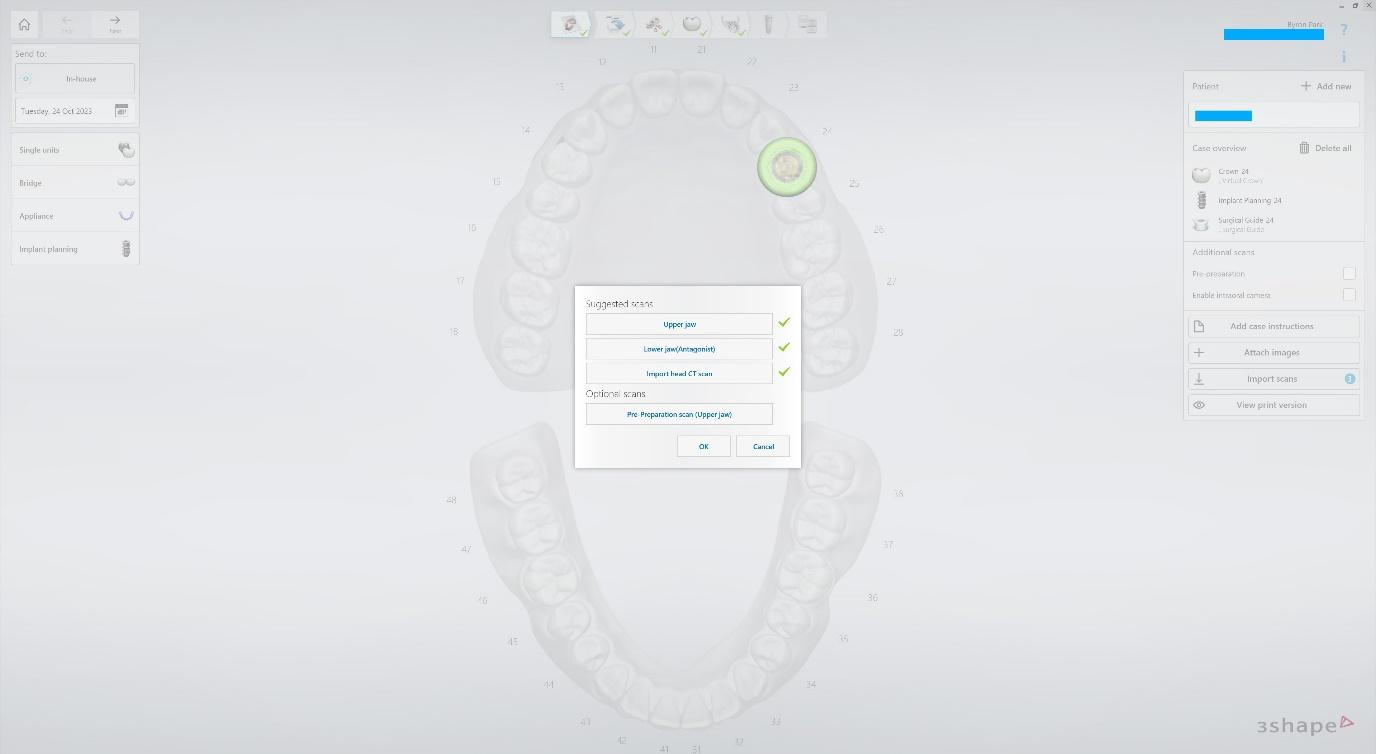
Create a New Case in Implant Studio and select the indication Implant Planning. The tooth-supported guide and virtual crown options are selected. TRIOS intraoral scans and CBCT imported.
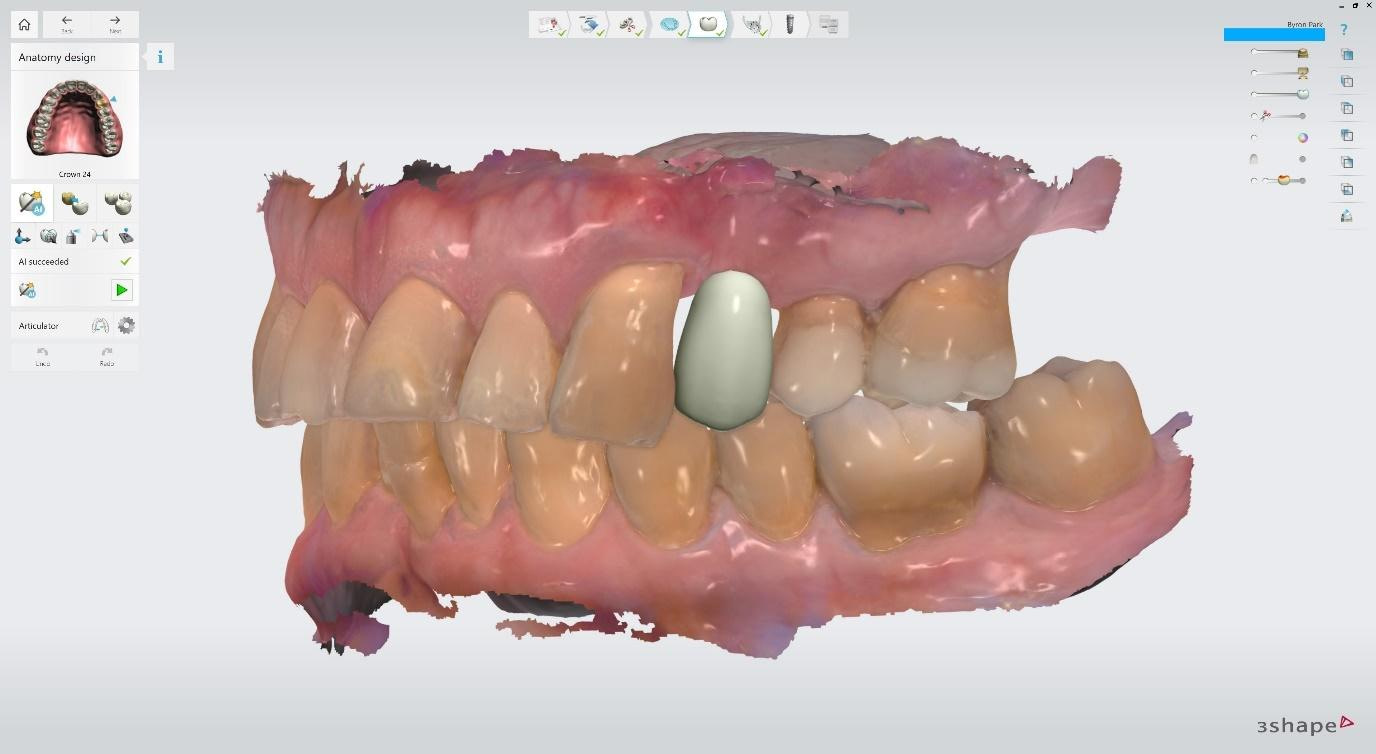
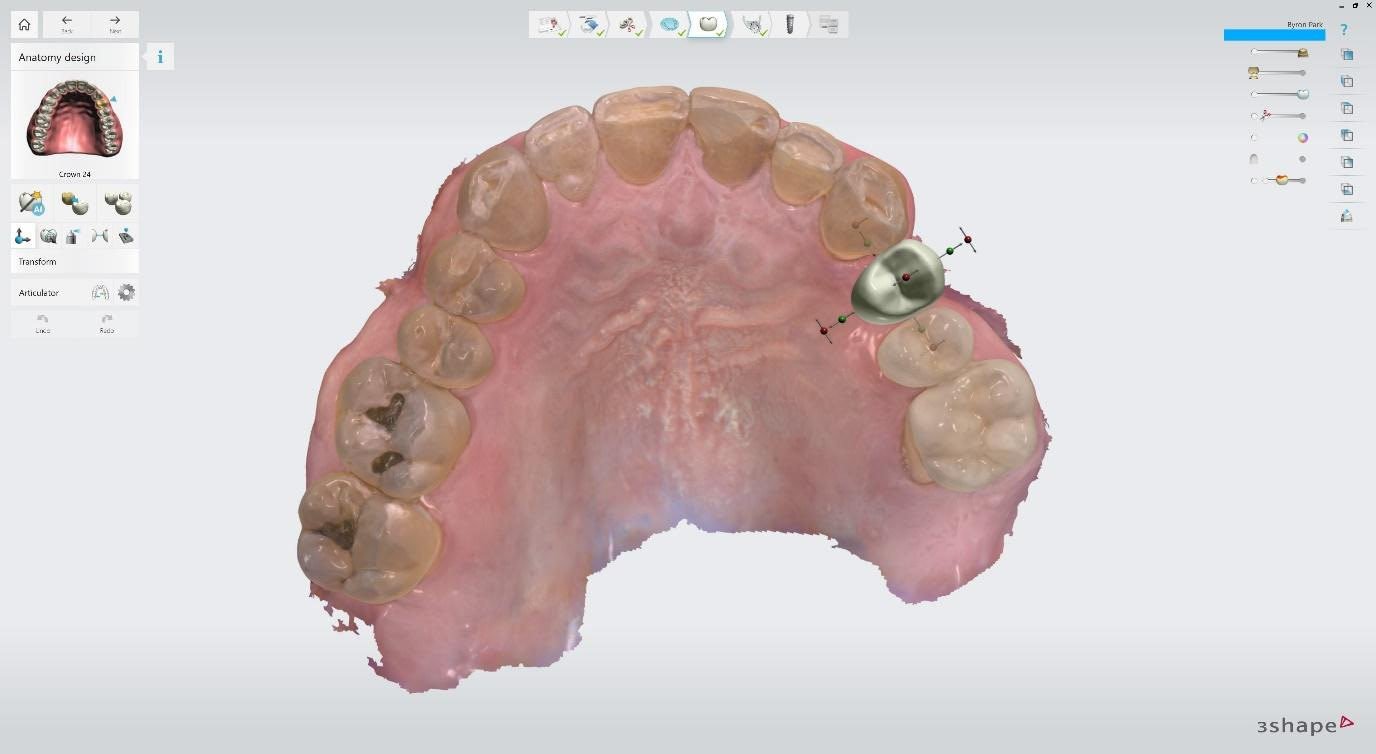
Virtual crown design before implant planning is begun. Restorative-driven workflow ensures that the final crown will be both aesthetic and functional. The implant is planned to fit the restoration, not the other way around. The AI Design tool automated most of this virtual crown design. Transform and Morph tools were used to tweak the anatomy.
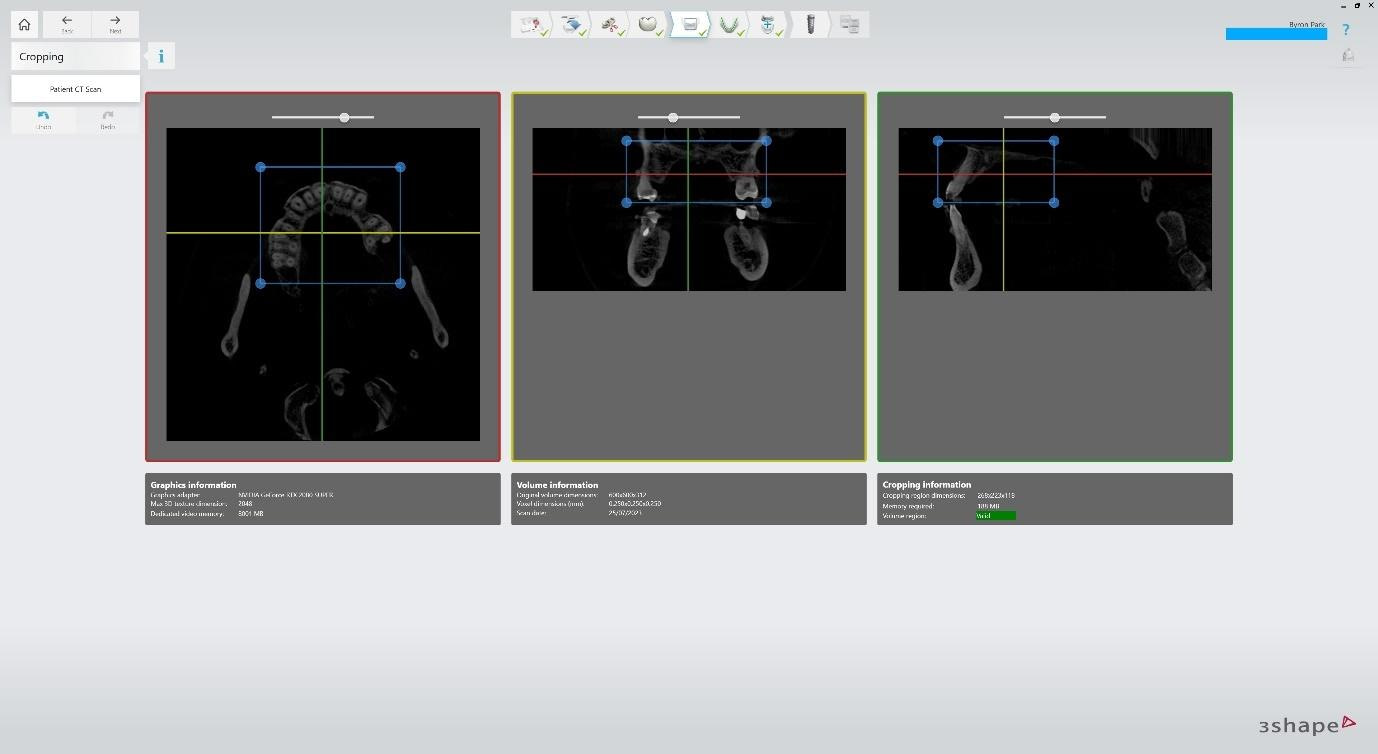
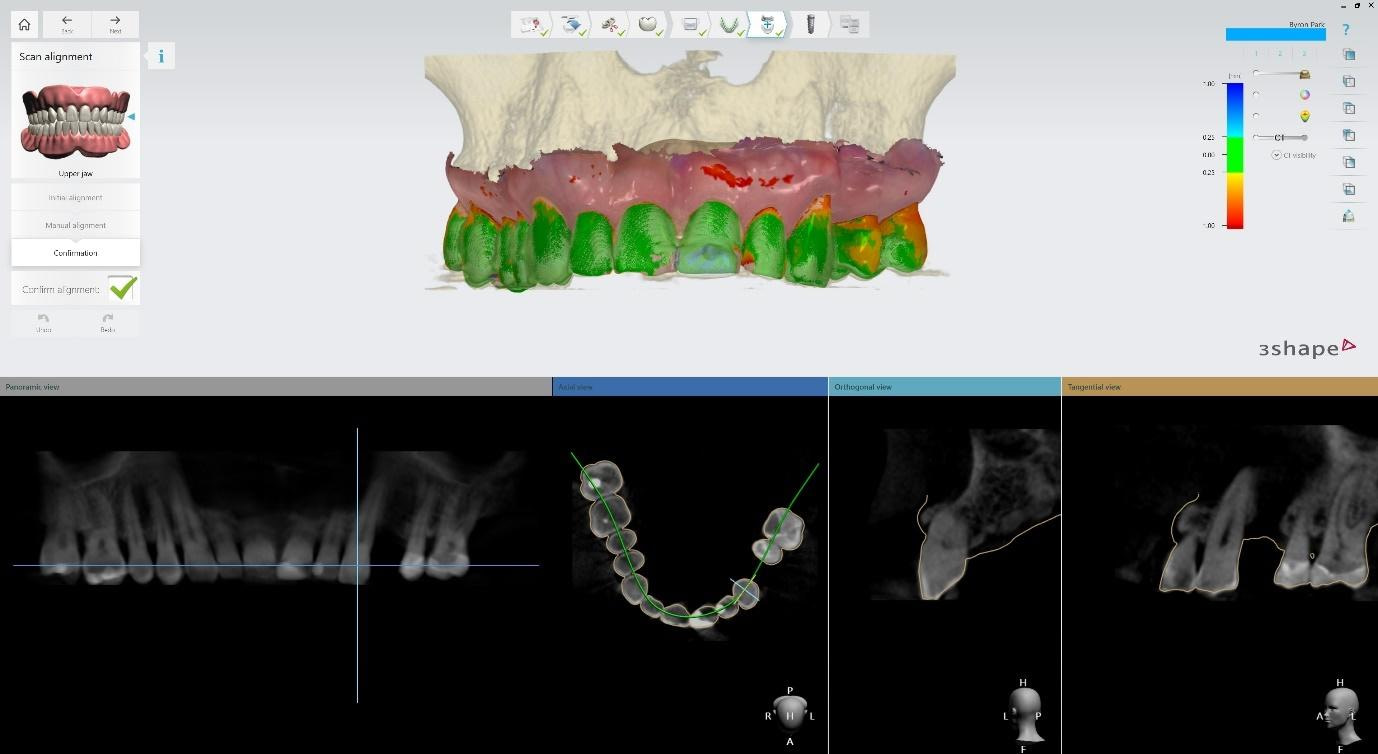
The CBCT is cropped down to reduce the load on the computer processor. The upper jaw intraoral scan is aligned with the CBCT. Initial alignment is automated. Alignment is checked using the proximity colour indicators above (Green colour across the teeth is good). Check the superimposition of the intraoral scan over the CBCT dicom (Yellow scan outline should closely match the teeth).
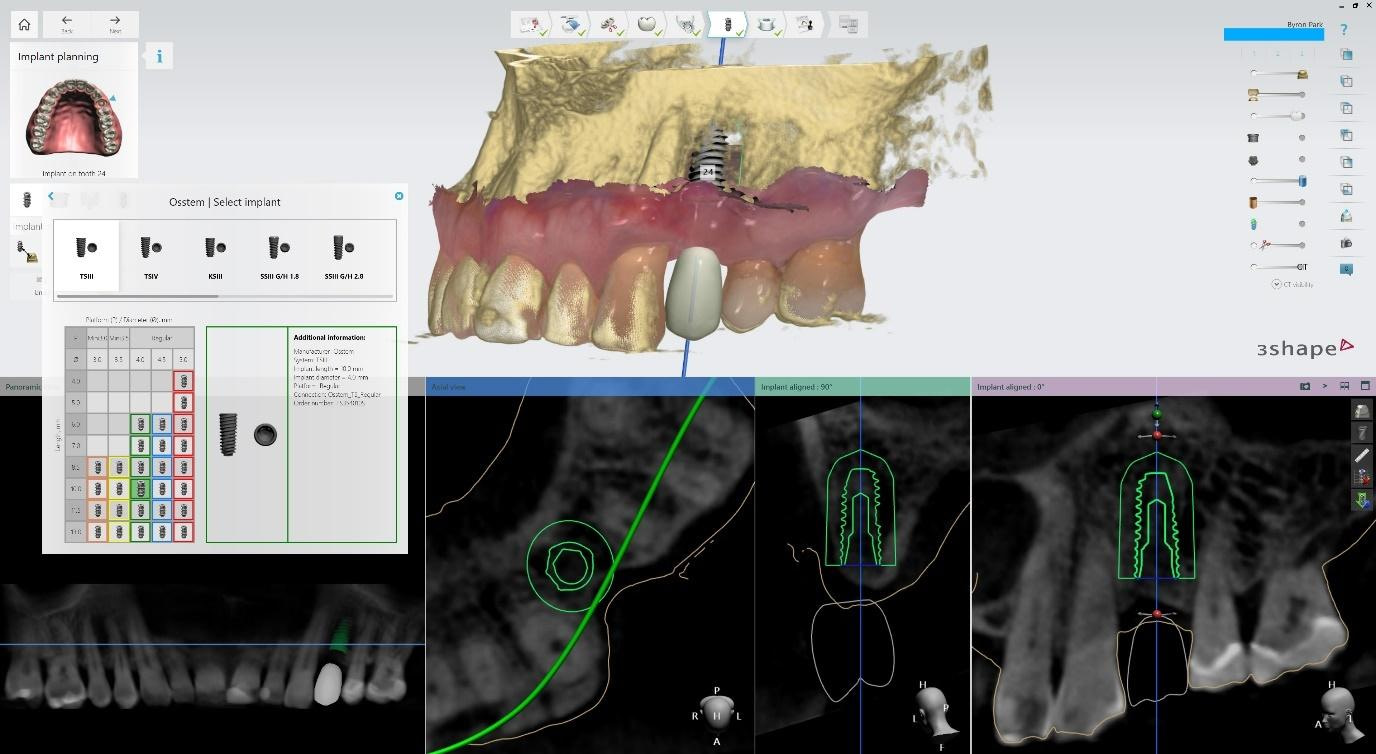
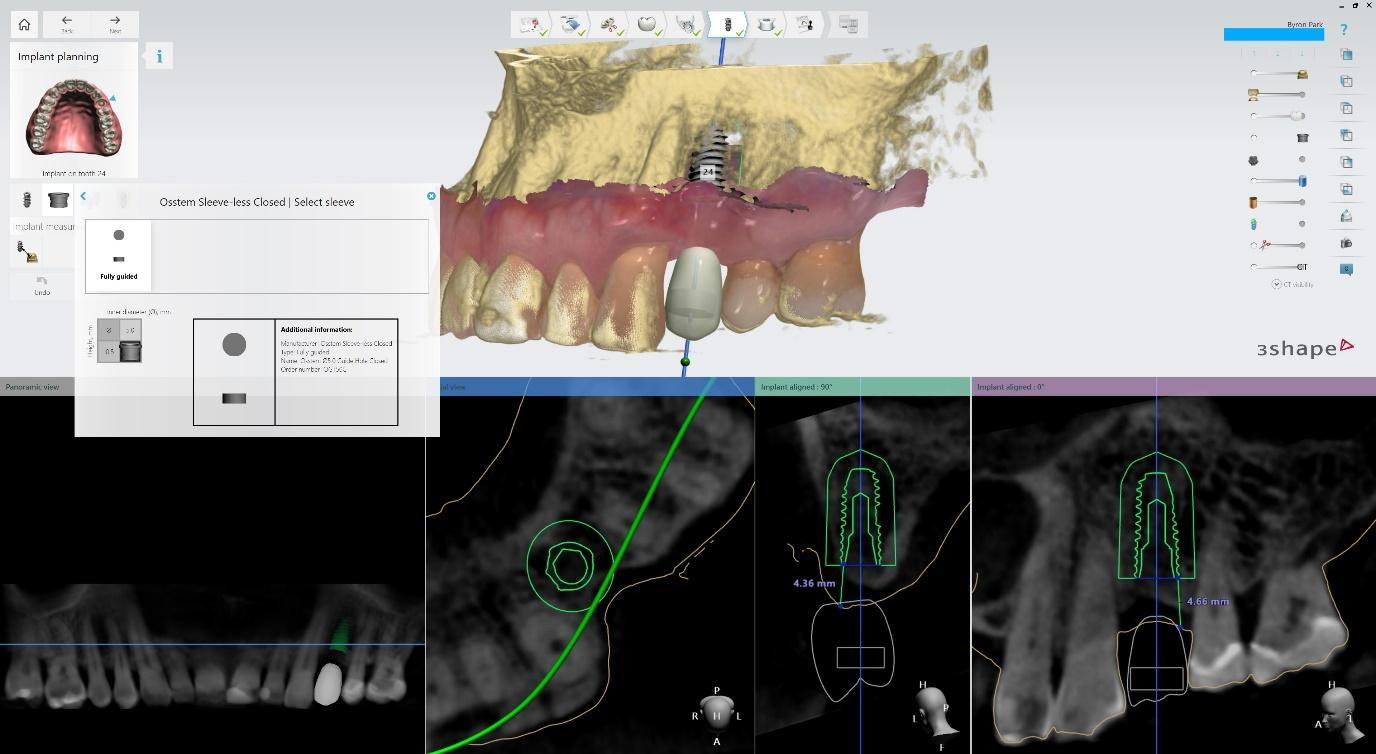
The implant is selected from libraries (downloaded freely in the Implant Studio settings). Brand, model, diameter, length. Position, angulation, and depth are adjustable. I aimed to place the implant within the native bone, planning to augment the ridge defect with a bone graft. Measurement tools used to plan implant platform depth at least 4mm from tissue level, in accordance with zero bone loss concepts. The sleeve is selected and can be visualised to ensure it does not intersect/collide with the jaw scan. In this case, I selected a Sleeveless design for simplicity of manufacture (no metal sleeve is required in the 3D-printed surgical guide).
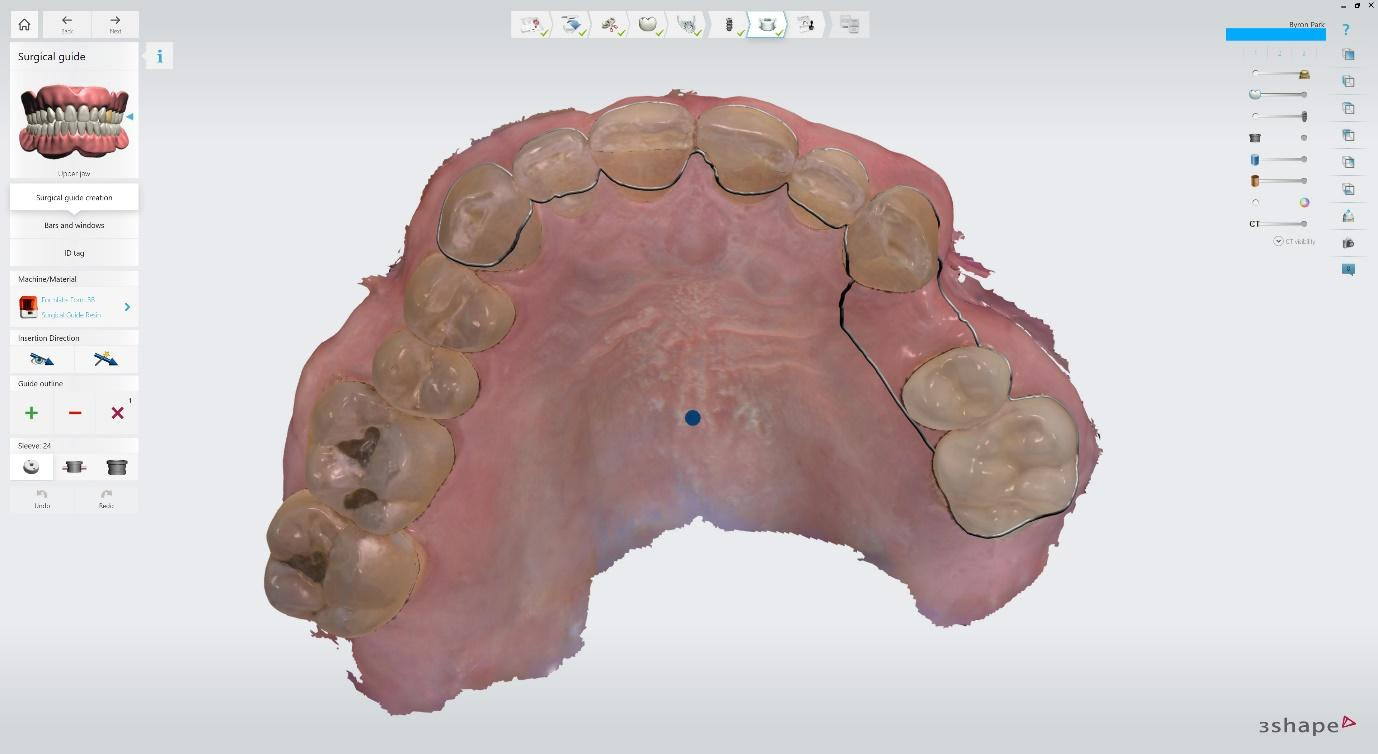
Surgical guide design starts with selecting a practical path of insertion that minimises undercuts. The outline traced determines which tooth/gum surfaces the guide will be supported by.
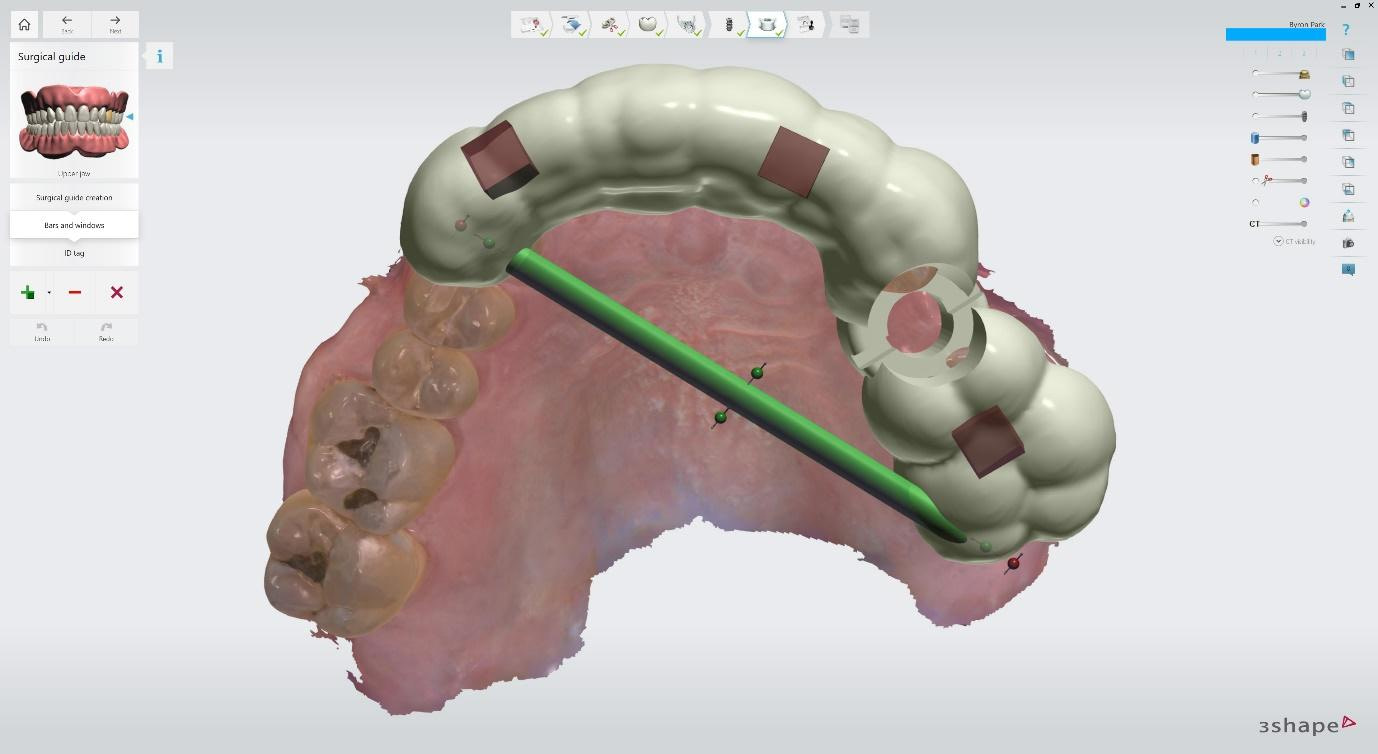
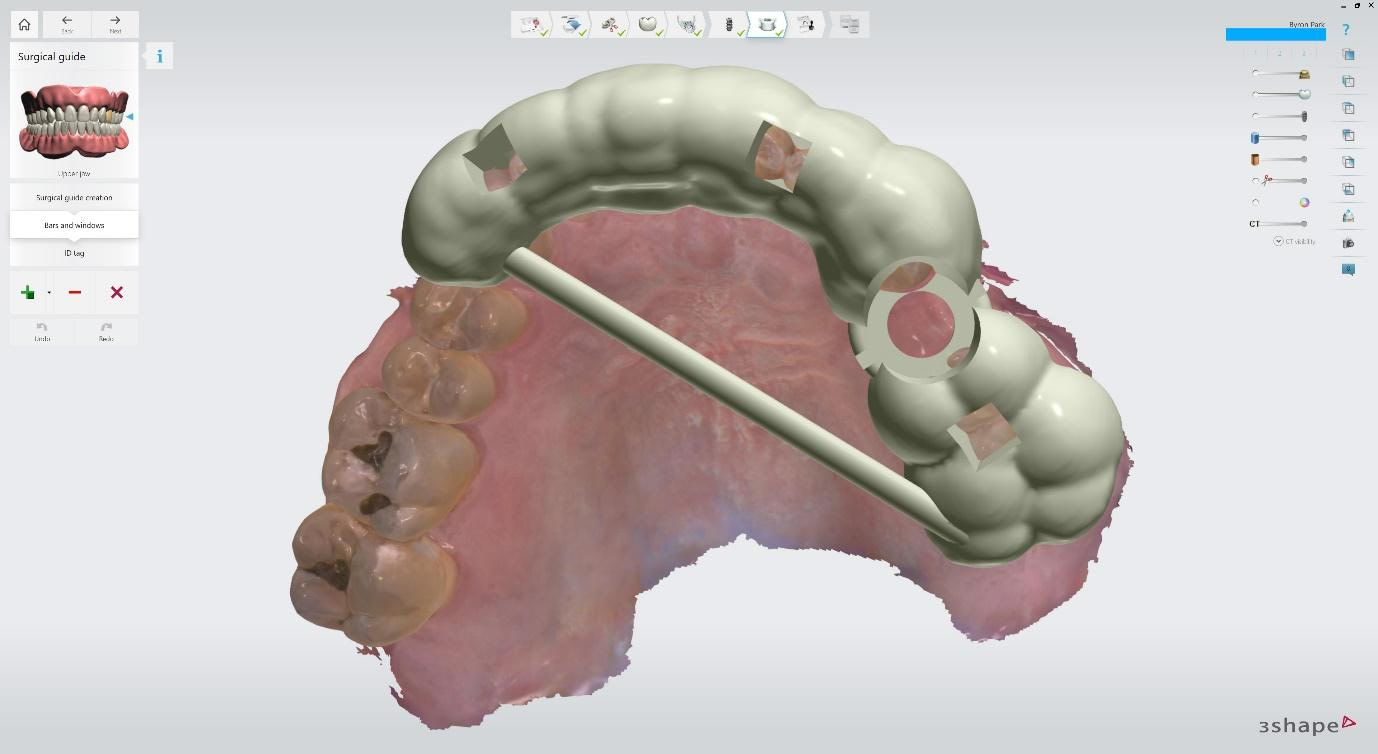
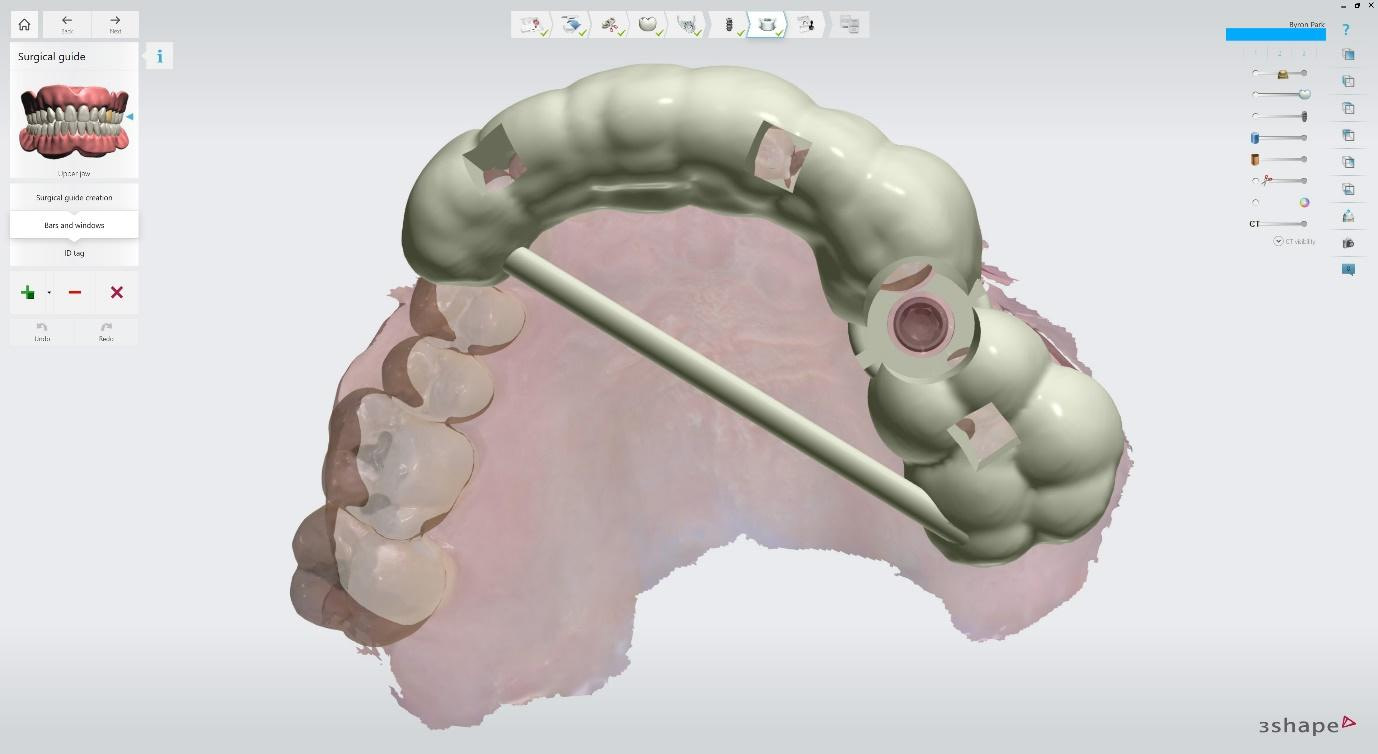
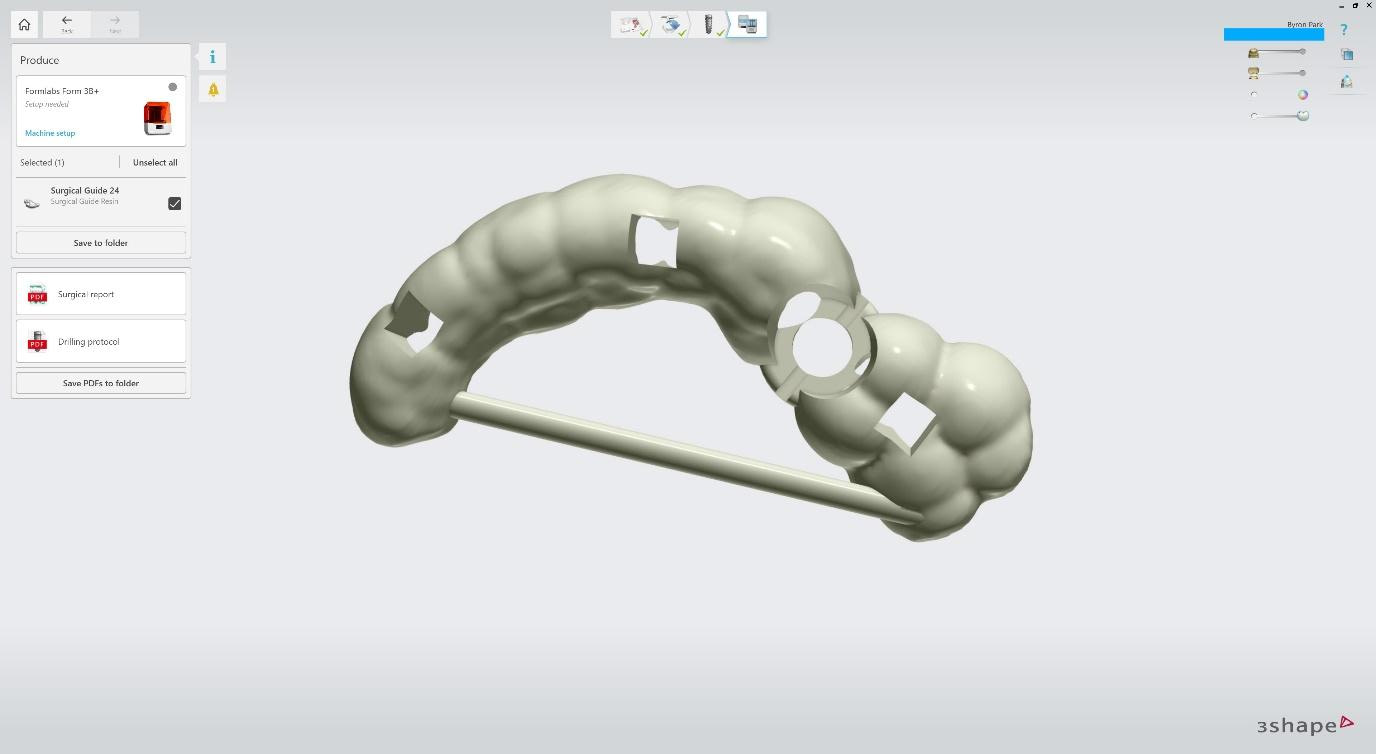
A support bar (round or rectangular) can be placed to increase the stiffness and strength of the guide. Viewing windows can be cut out of the guide. These will help the clinician to visualise whether the guide is fully seated or not. ID tag with the patient’s name or code can be placed on the guide.
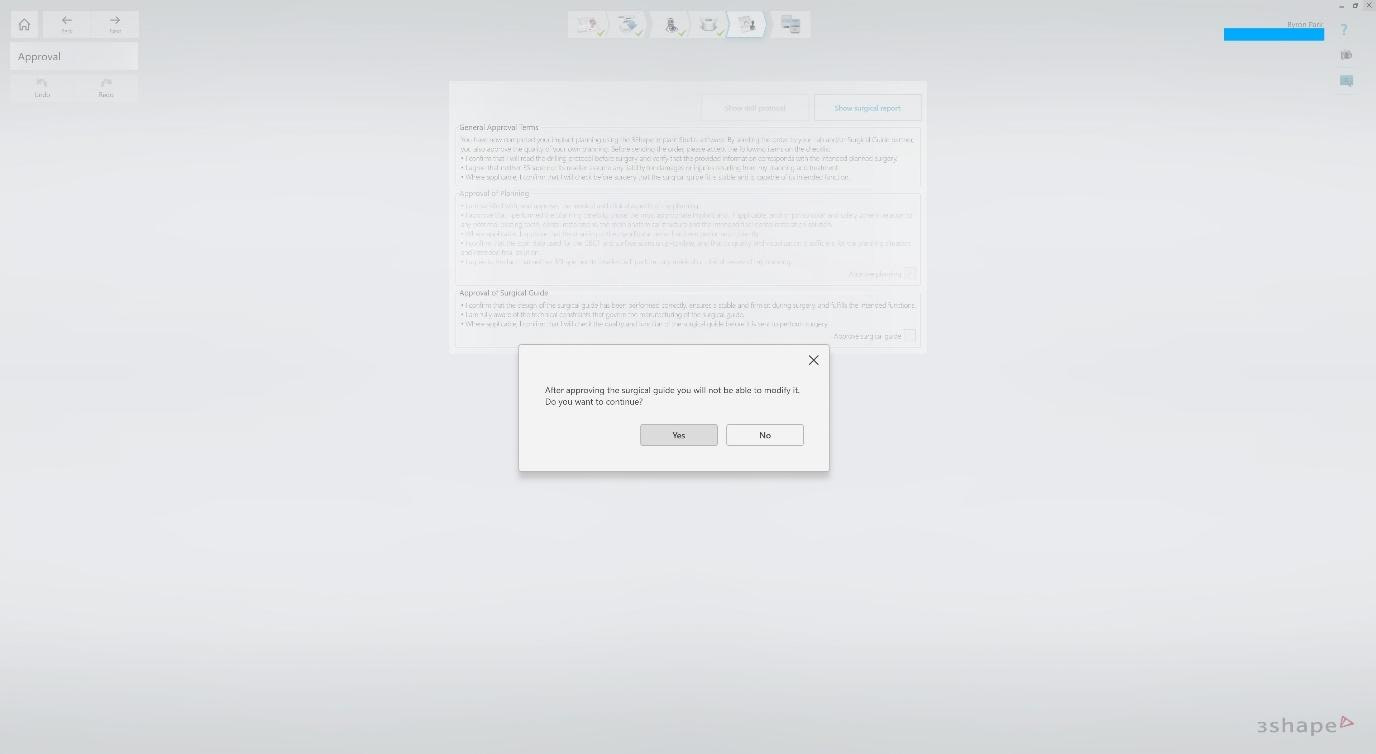
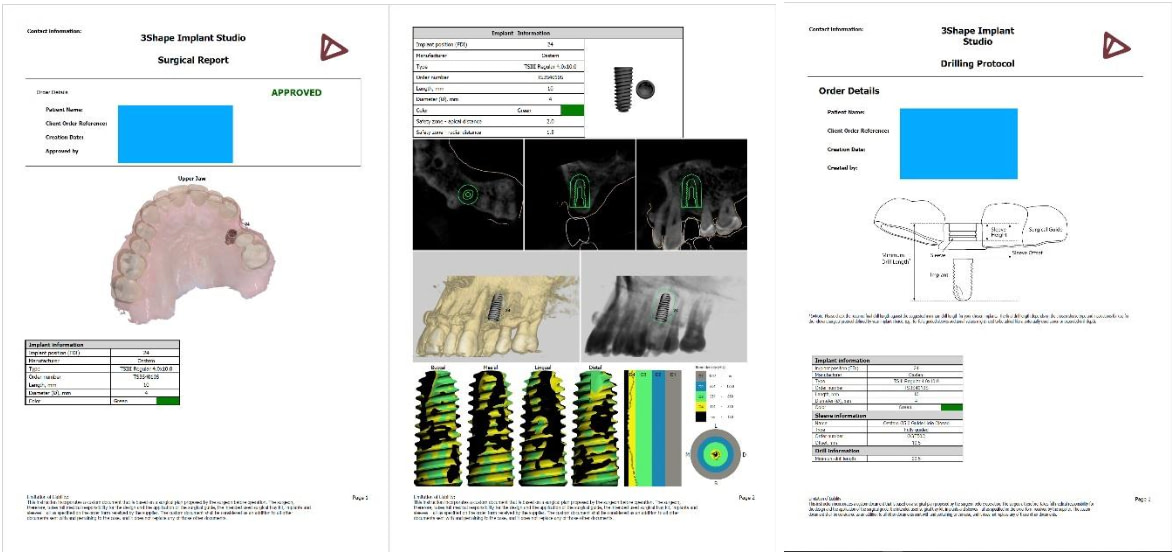
You must confirm the Approval of Planning and Approval of Surgical Guide before proceeding. This locks the case, and you can no longer alter the surgical planning or guide design. From here, you can download the surgical guide STL file and a PDF of the surgical report and drilling protocol.
These reports contain the implant information and the sleeve offset distance. The PDFs can be imported into the patient’s file in the dental clinic as a legal record.
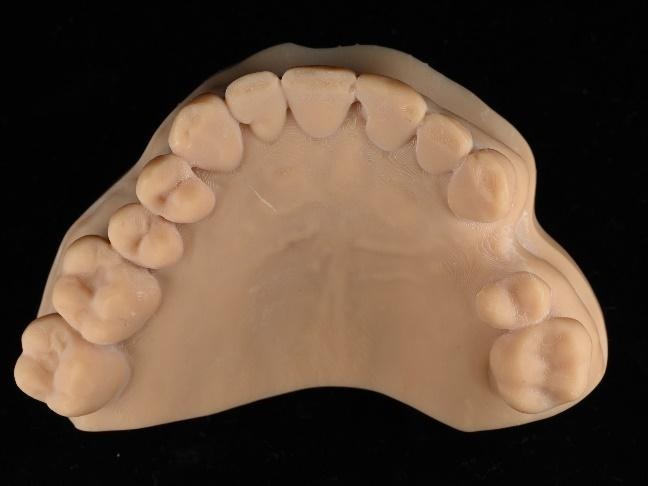
Model 3D printed on NextDent 5100 and Surgical Guide printed on Formlabs Form 3B+ with Surgical Guide resin.
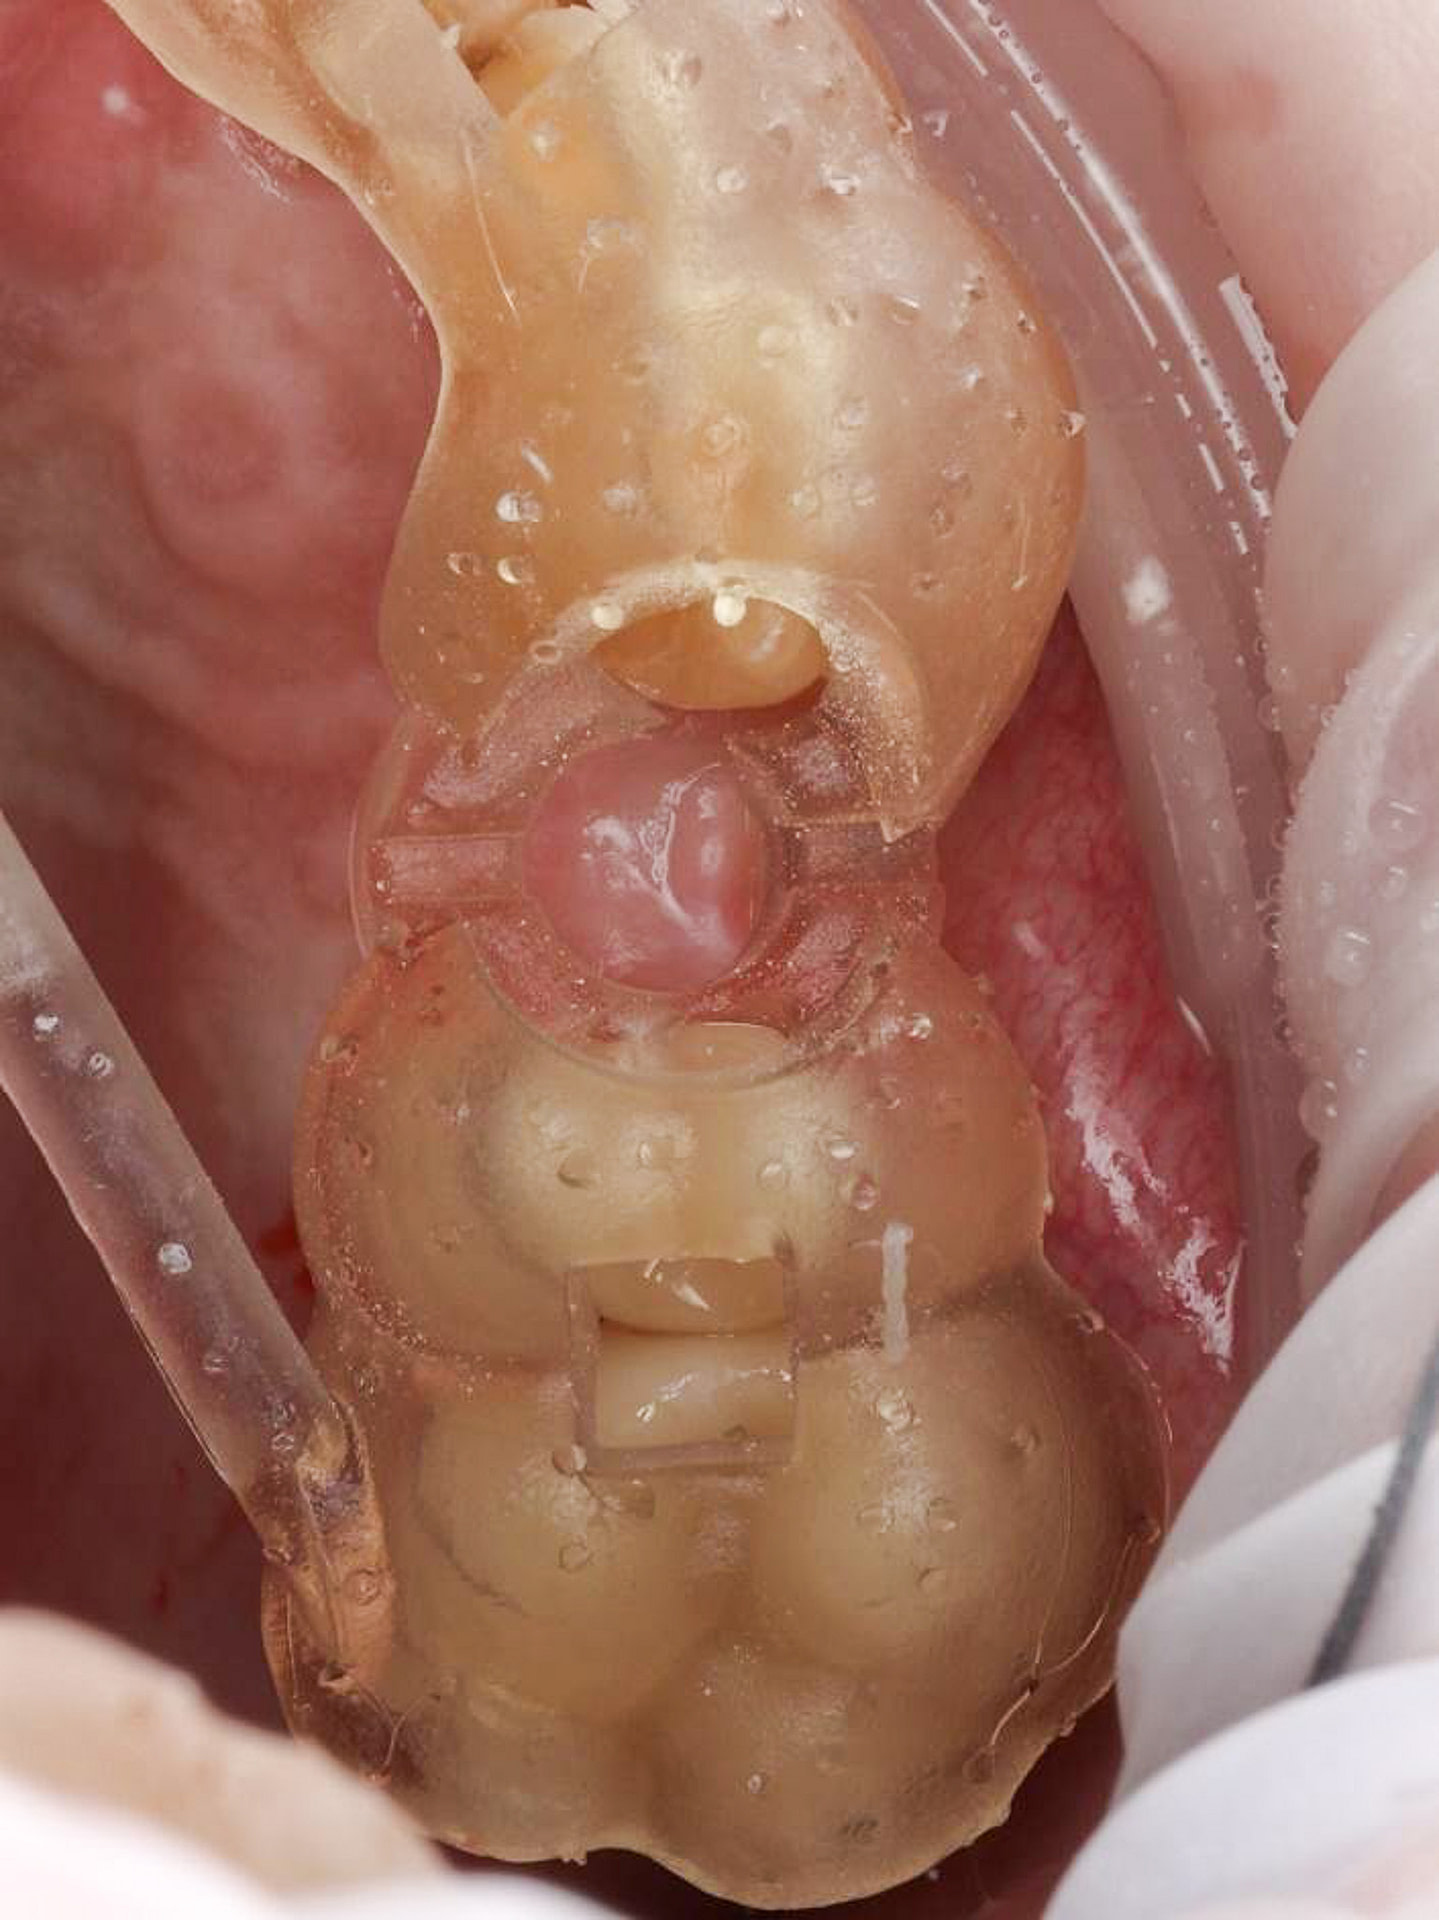
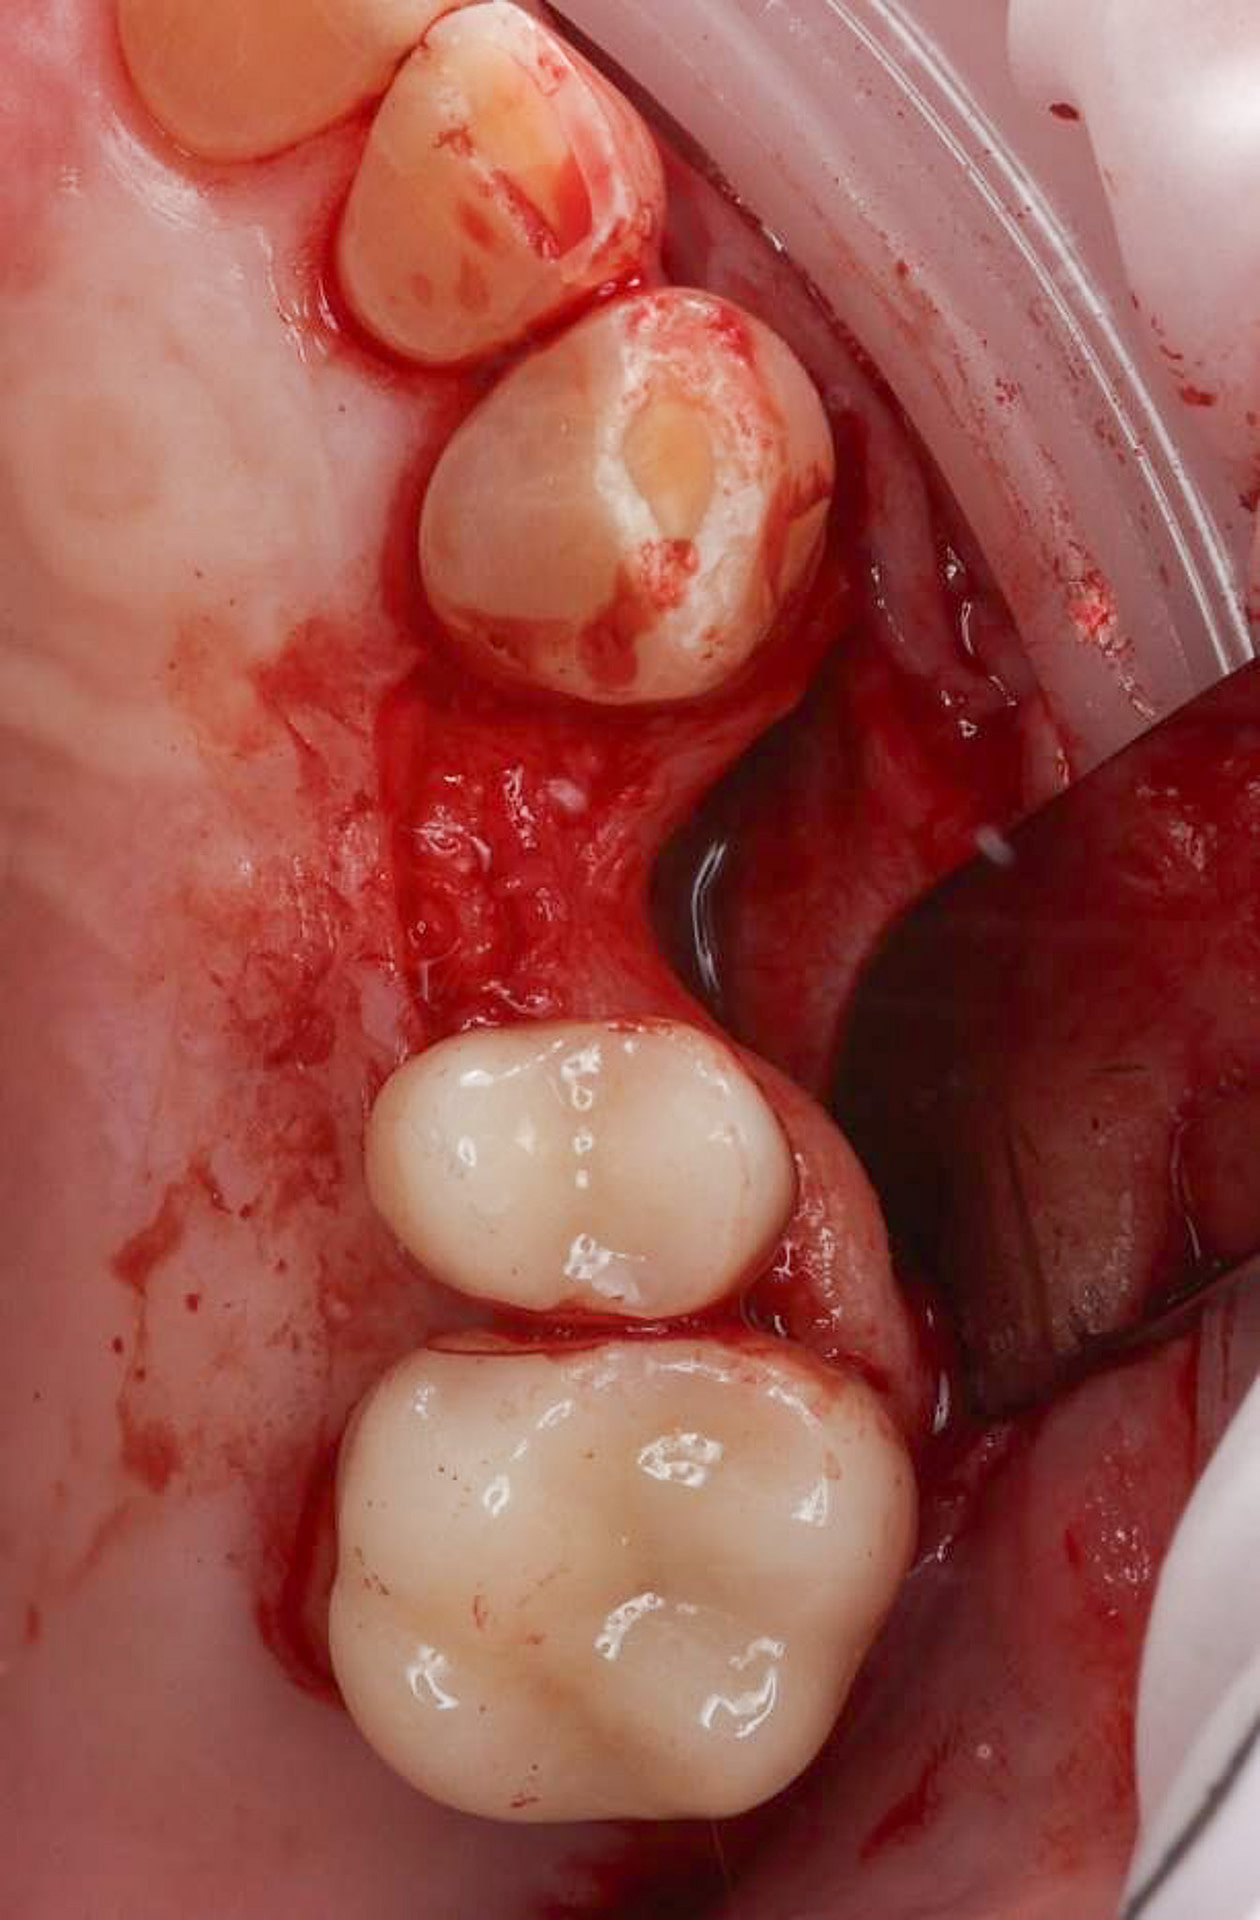
Implant surgery was done under local anaesthetic. Surgical guide fit check. Full thickness mucoperiosteal flap raise with no relieving incisions. The full extent of buccal defect in 24 site can be visualised.

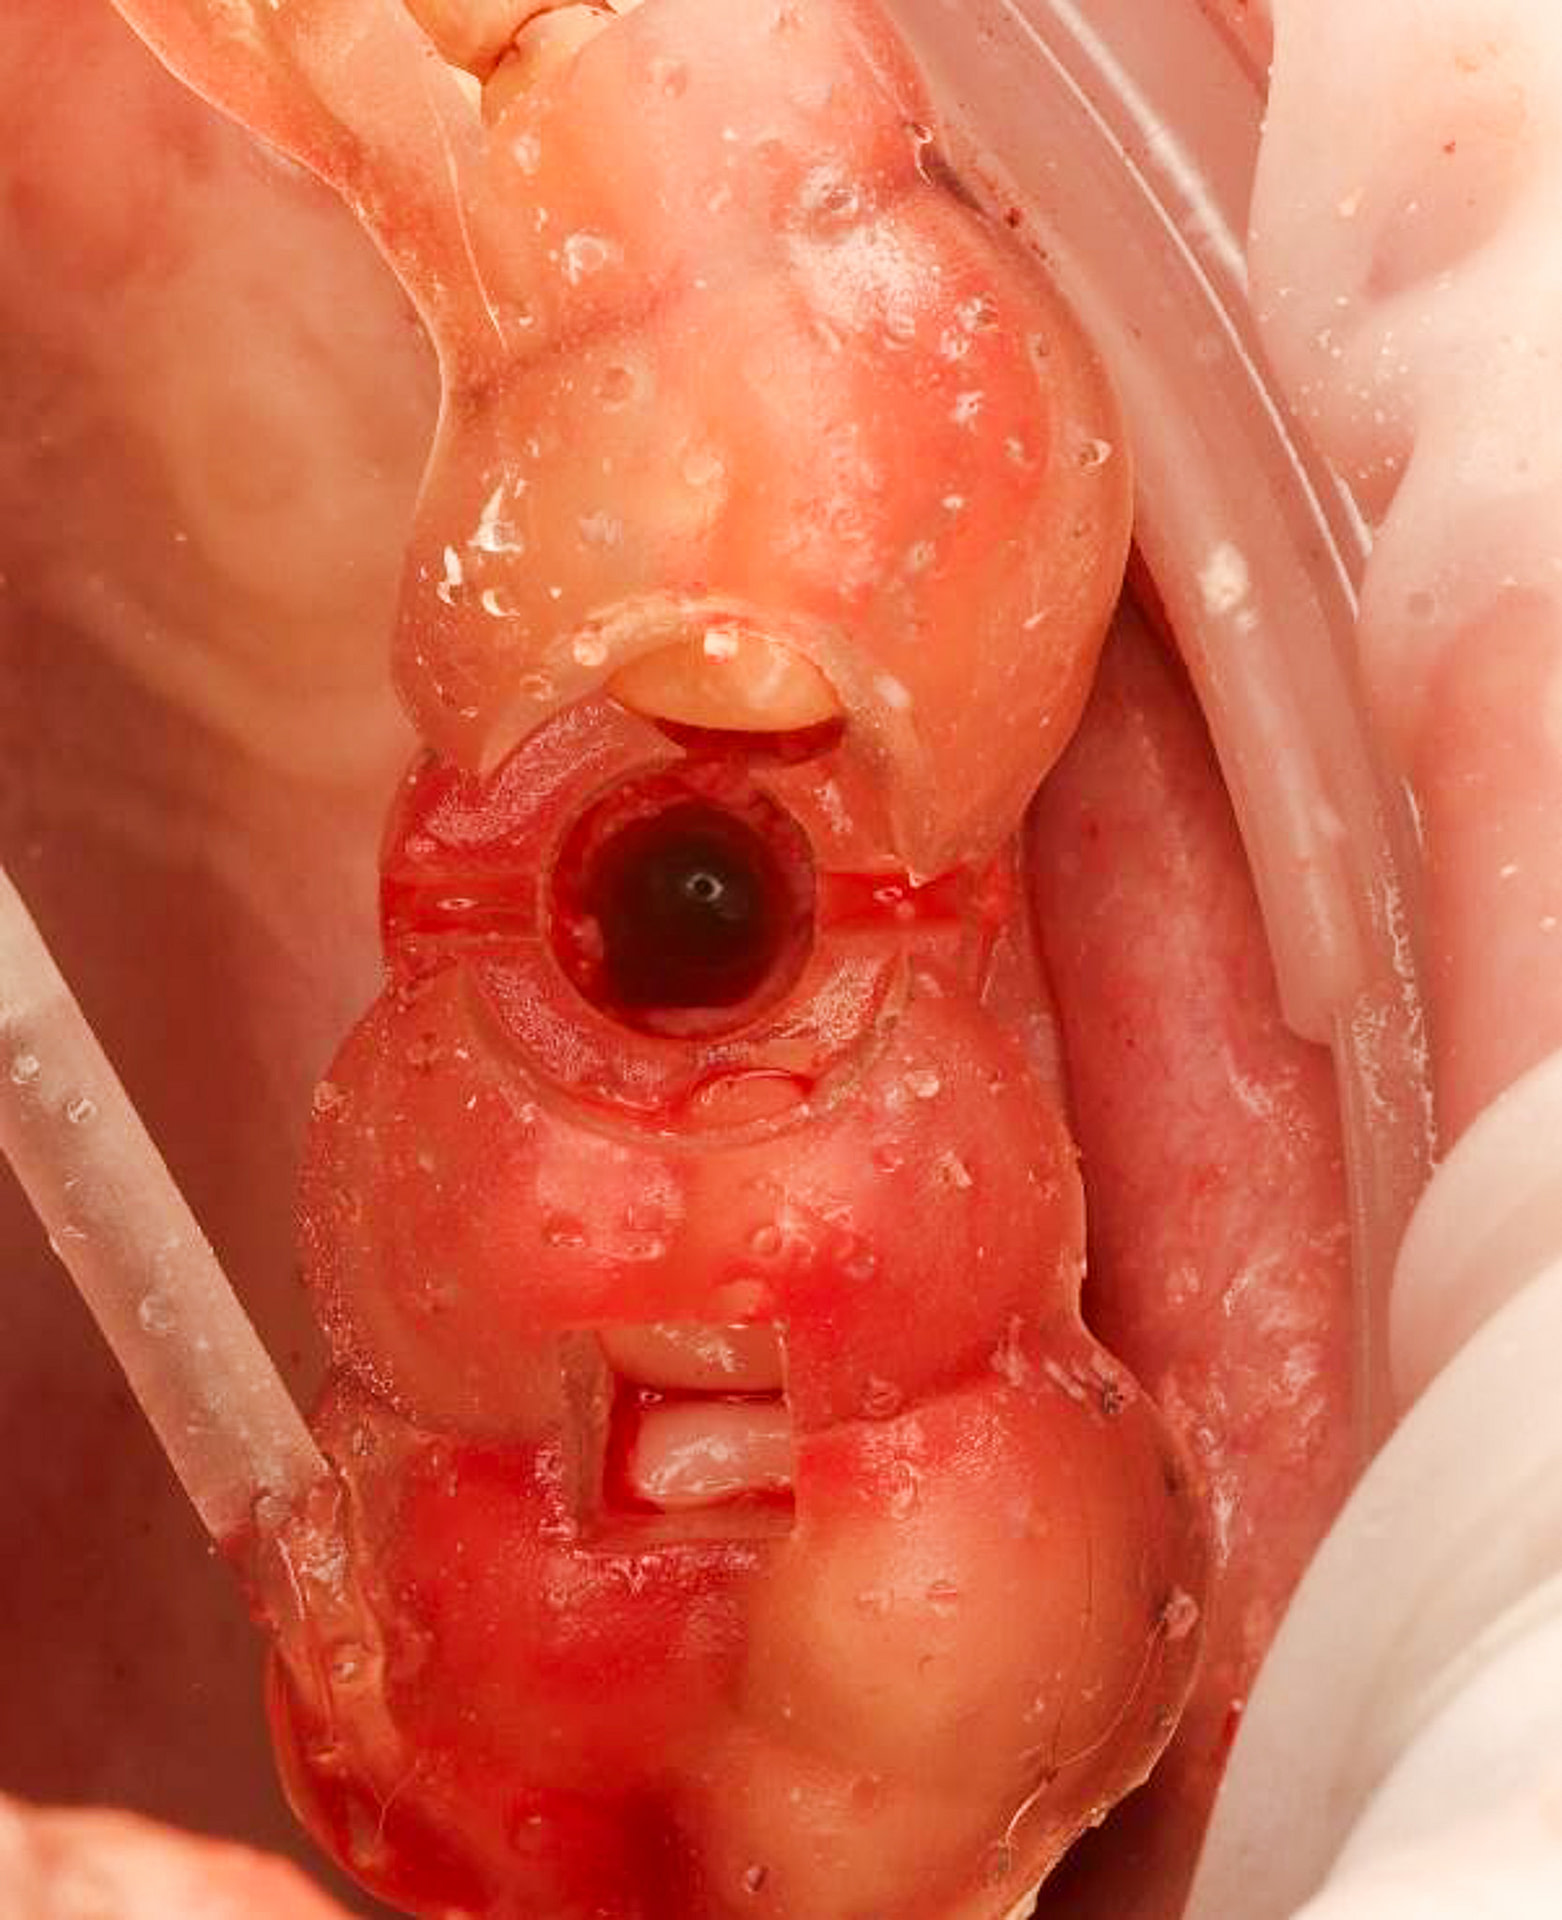
The Osstem OneGuide kit is used with a fully guided osteotomy and implant placement.
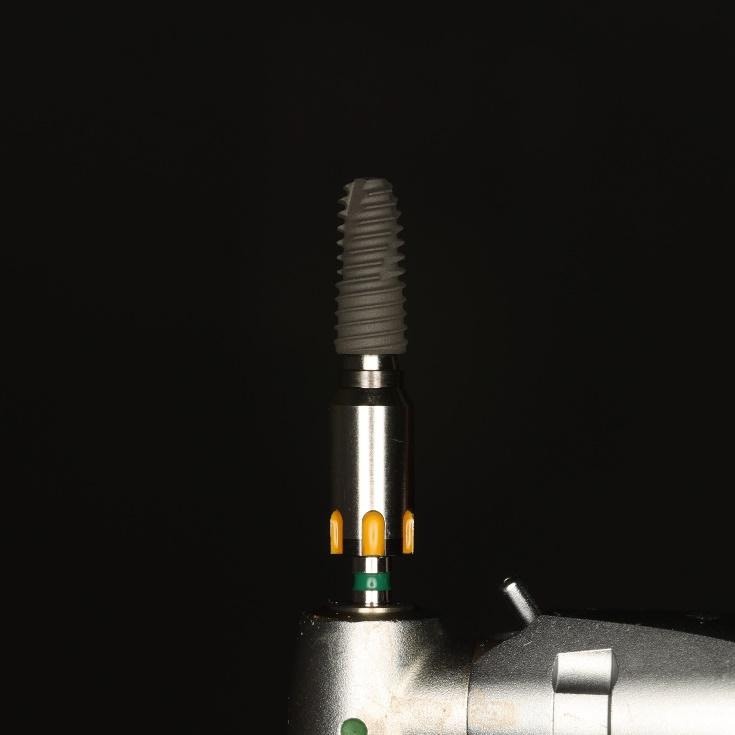
Osstem TSIII D4 x H10mm implant on NoMount driver.
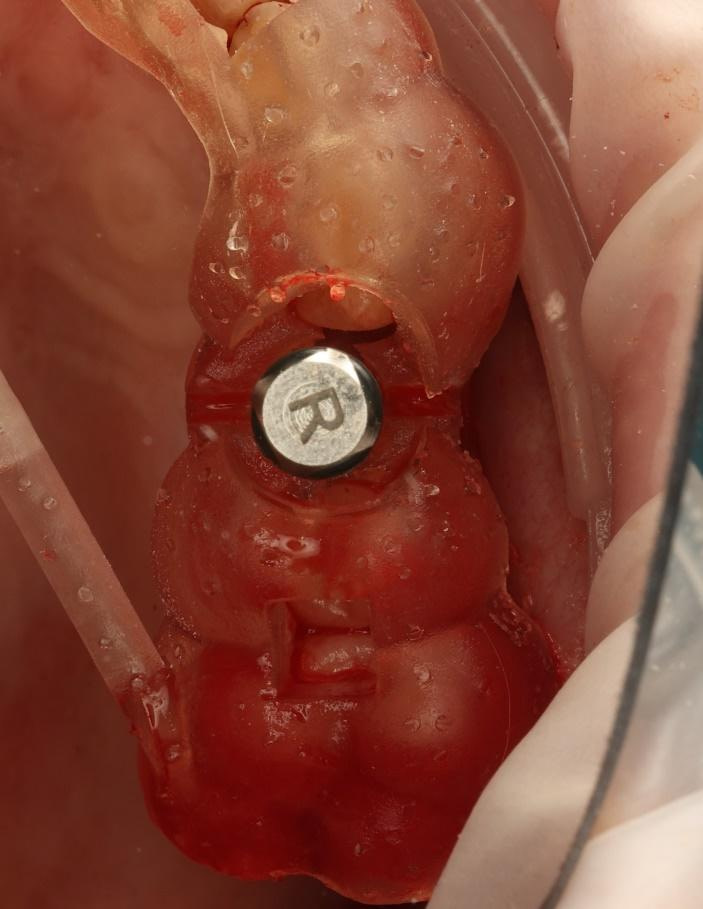
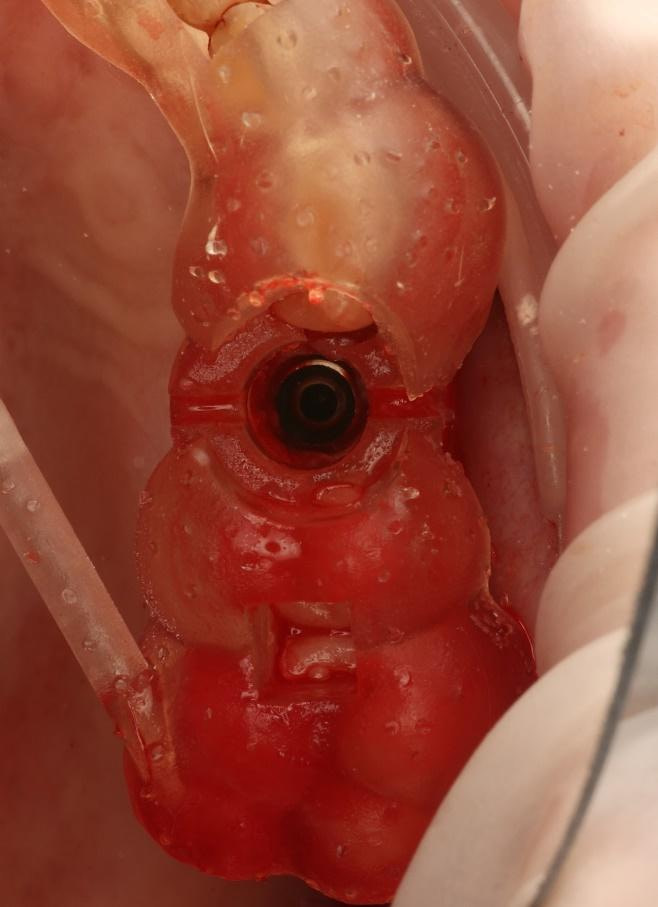
Implant inserted using a motorised driver. Finished placement with a torque wrench. Final torque > 40Ncm.
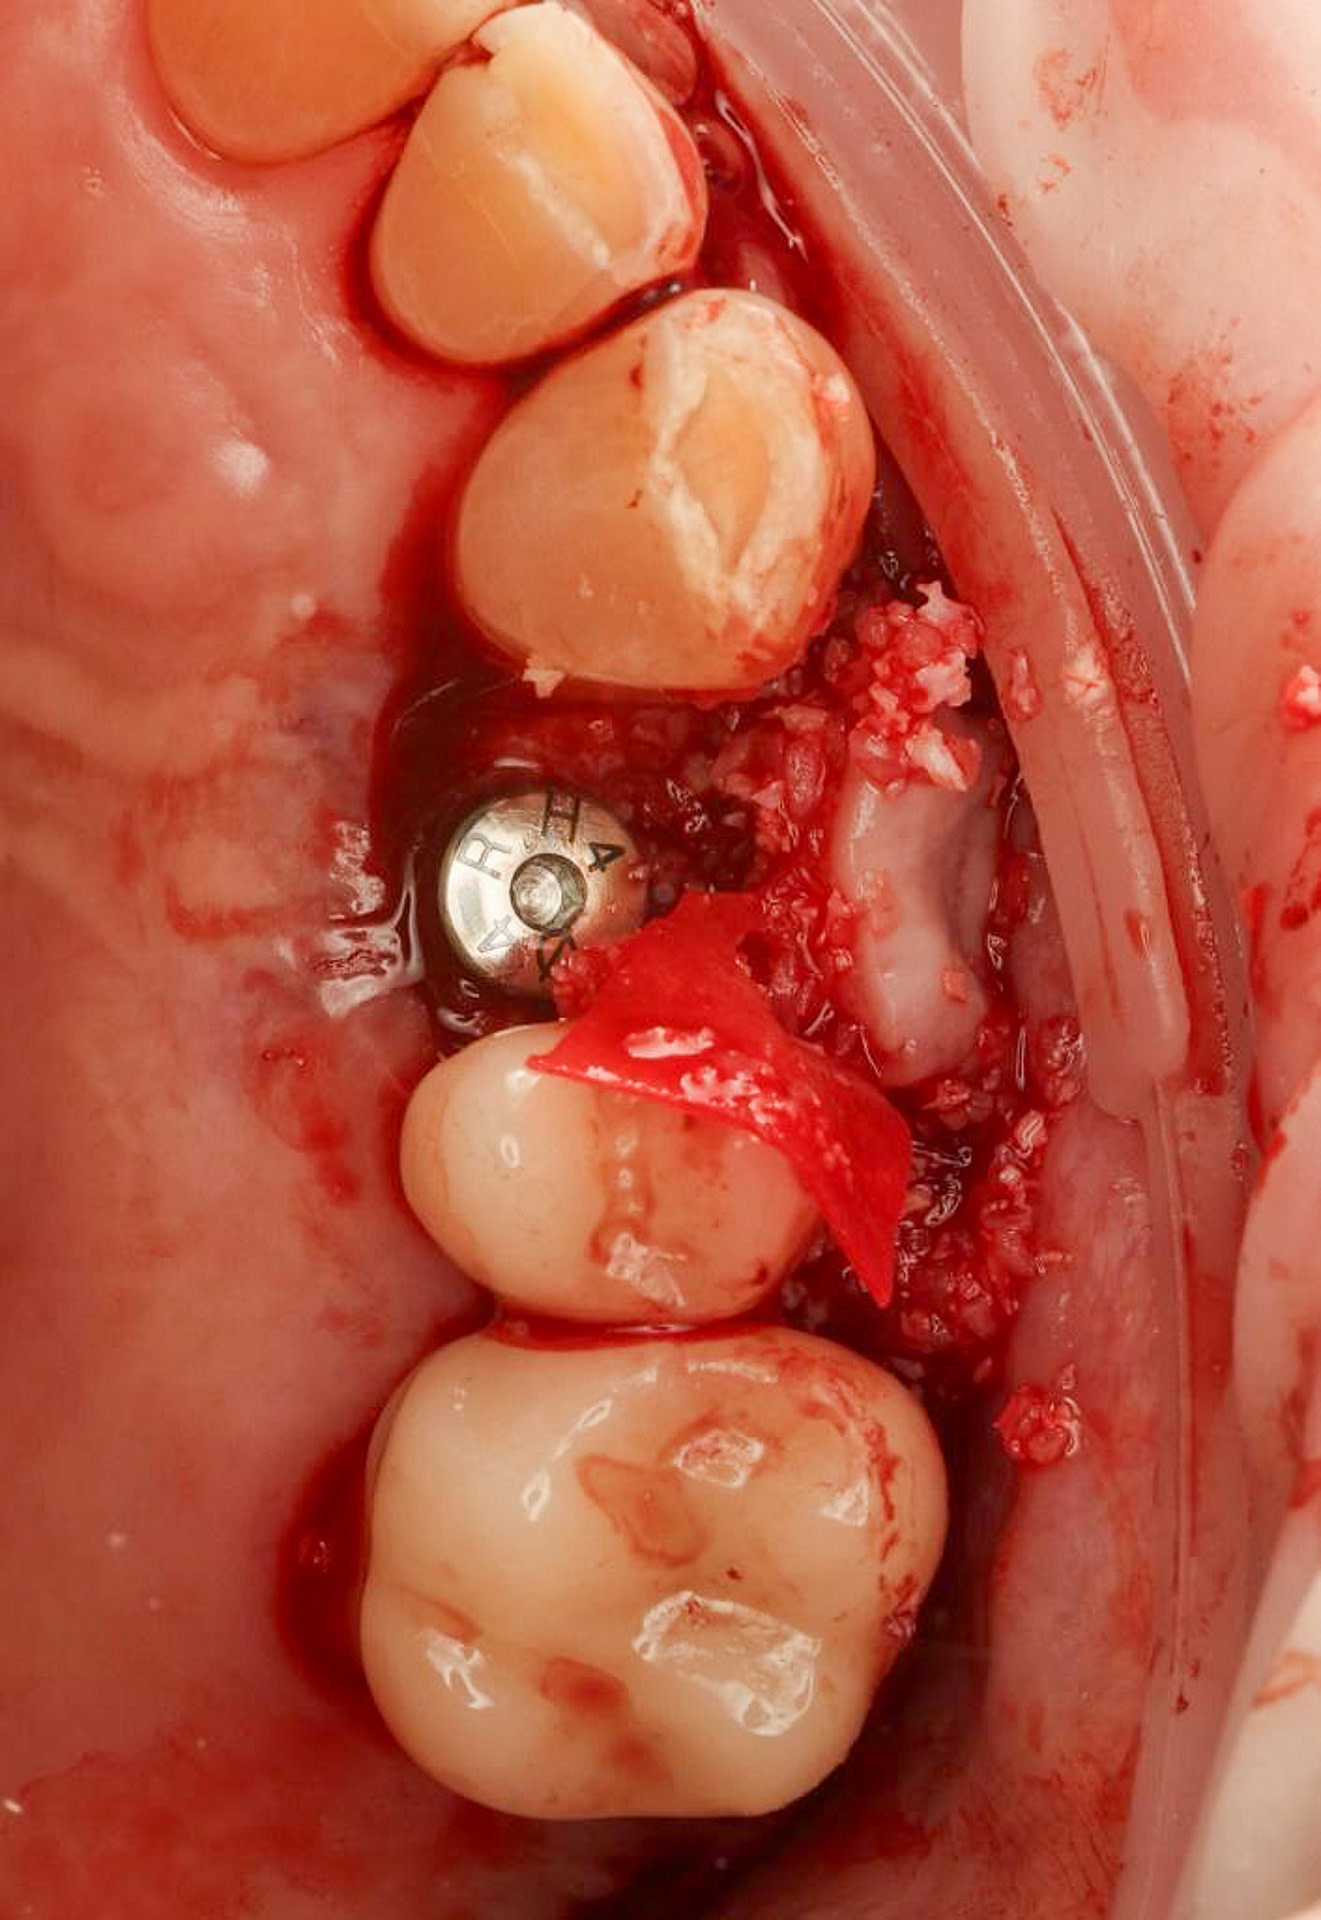
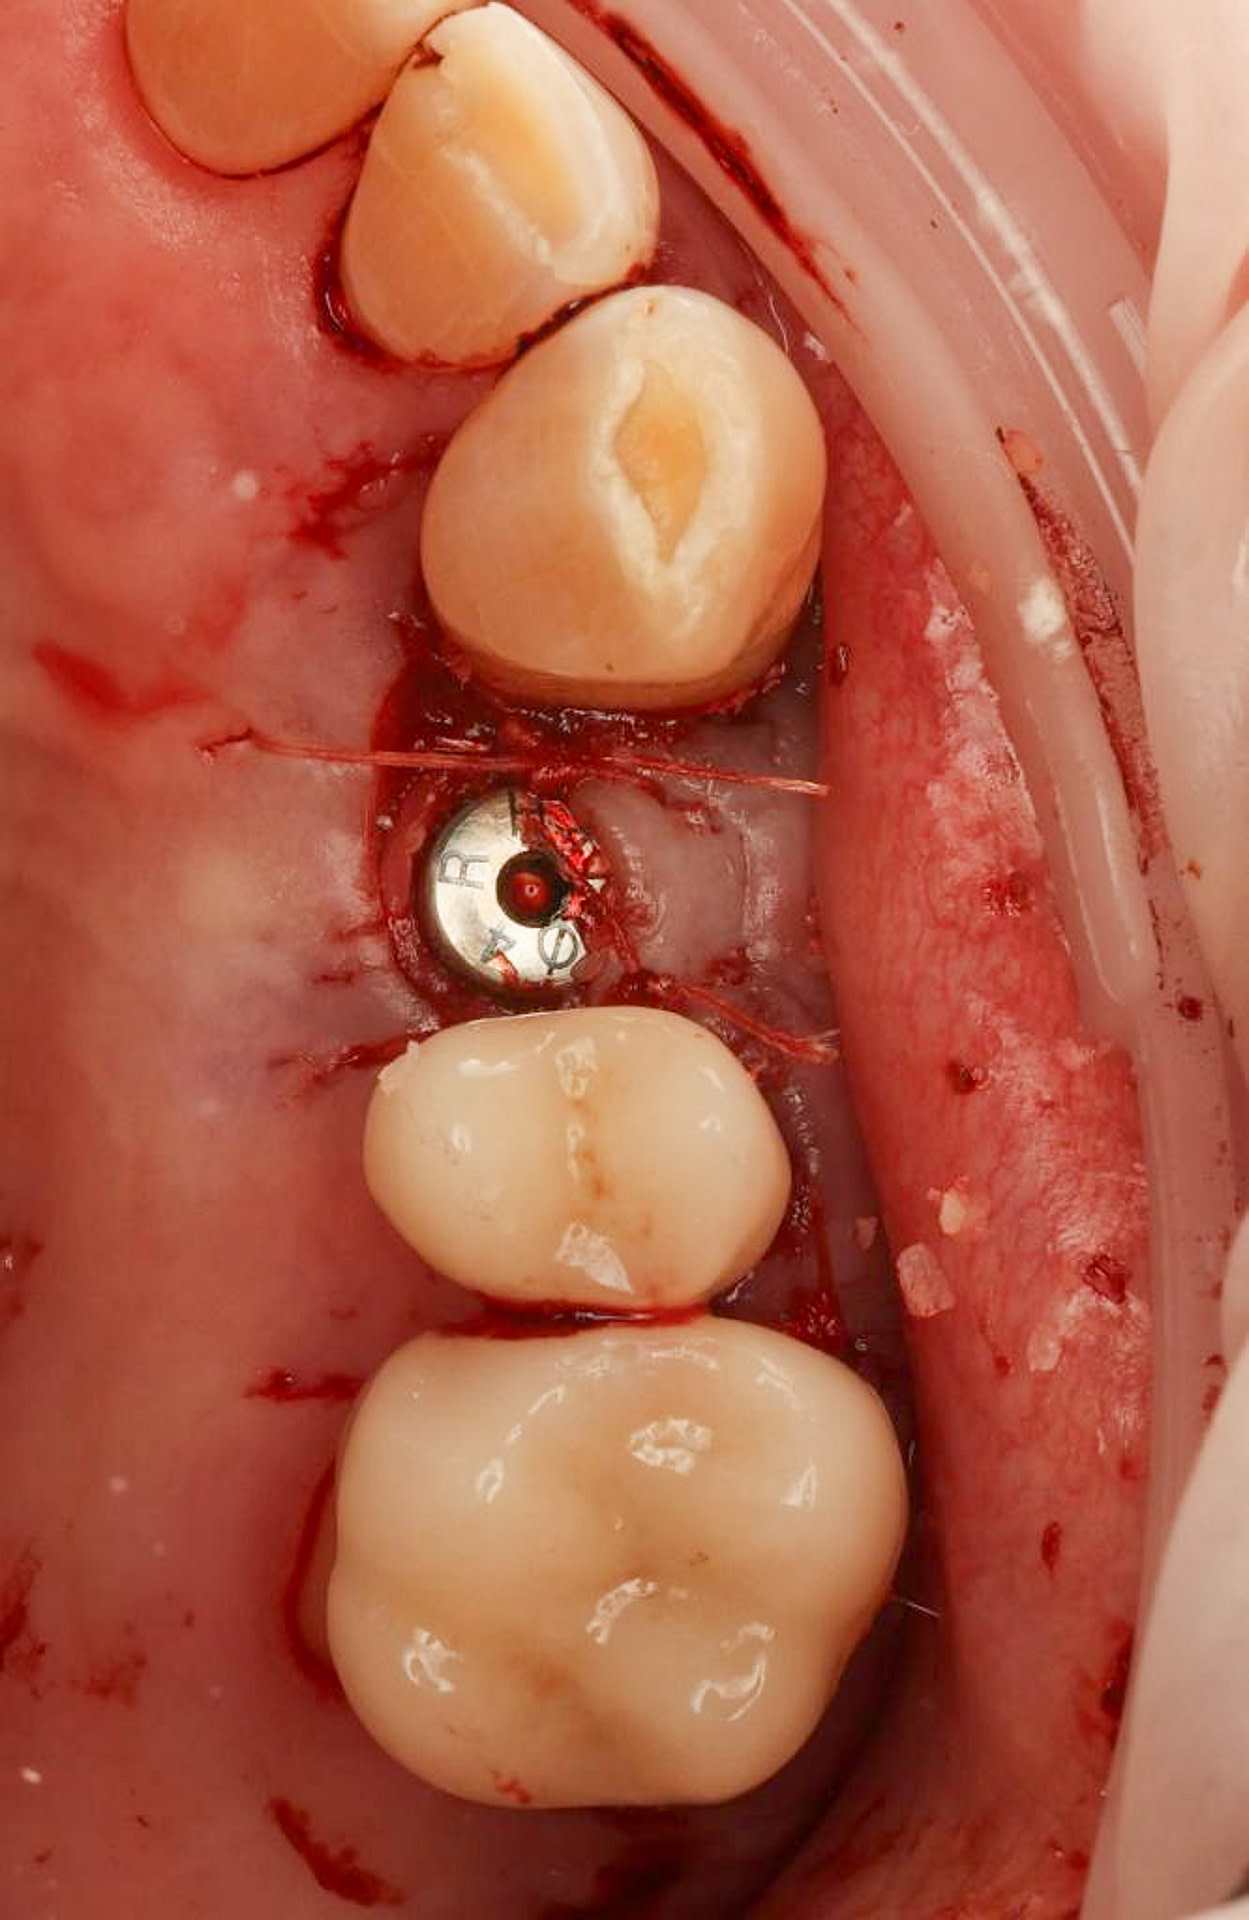
A 50:50 mix of xenograft/allograft particulate bone graft was used to augment the buccal defect. The collagen membrane was secured using a healing abutment with the ‘poncho’ technique. Simple interrupted sutures were used using resorbable Polyglactin 4-0.

Restorative Phase

Following the successful surgical placement of the implant, the focus shifted to the restorative phase of the treatment.

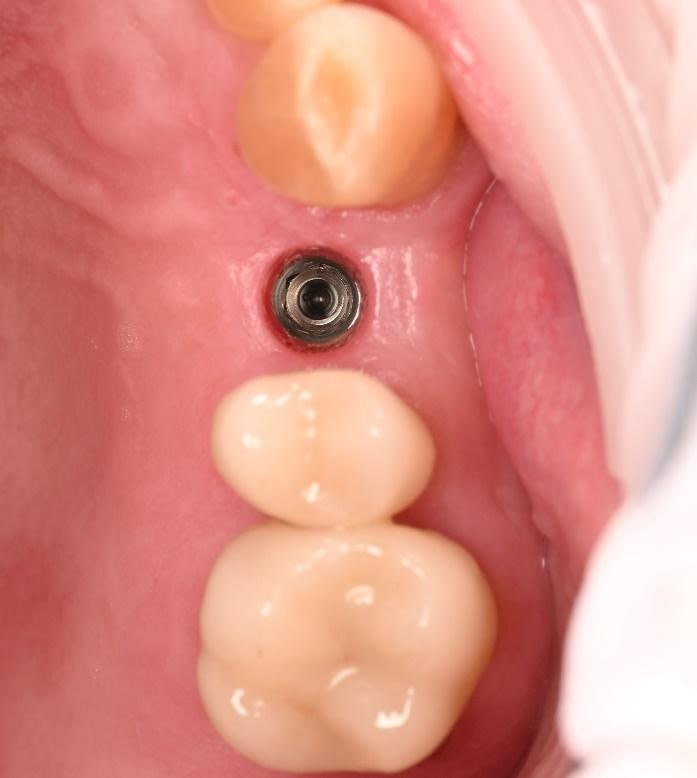
Three months after the implant surgery, a thorough post-operative assessment revealed excellent healing and implant stability.

Digital impressions were captured using the TRIOS 4 intraoral scanner, and the implant-supported crown was designed using 3Shape Design Studio. 

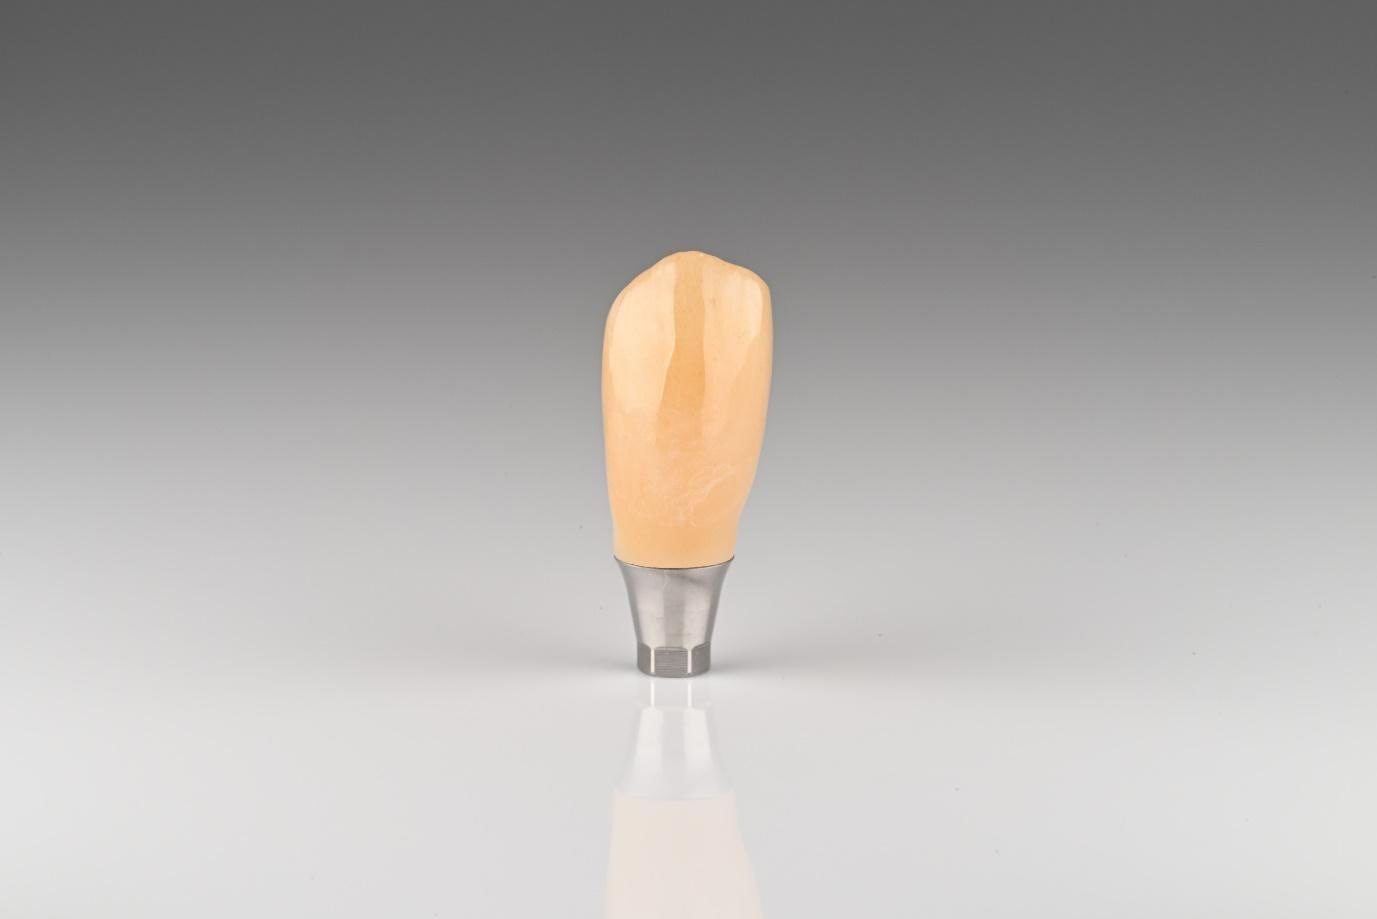
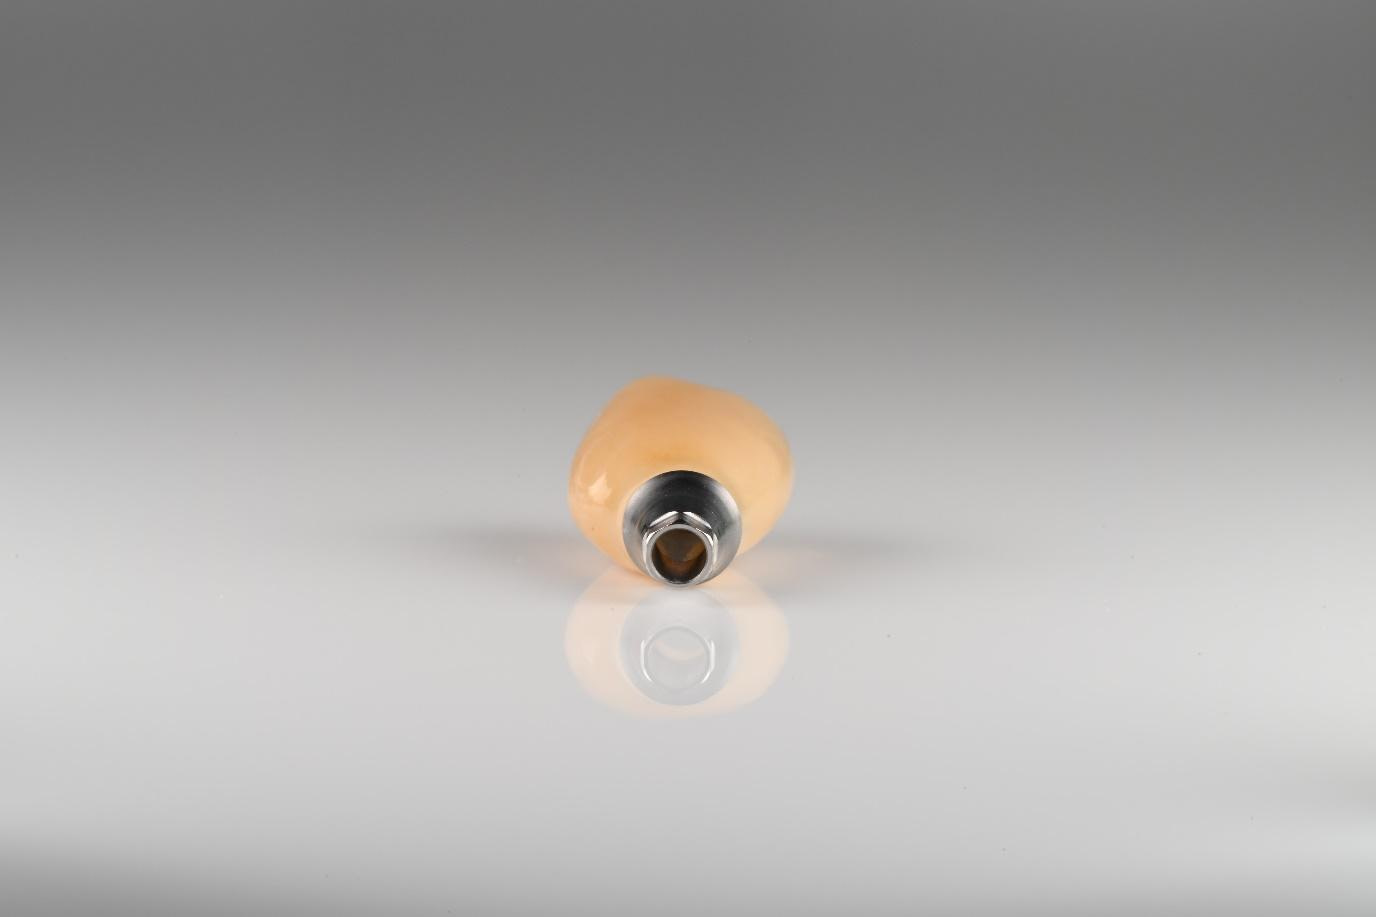
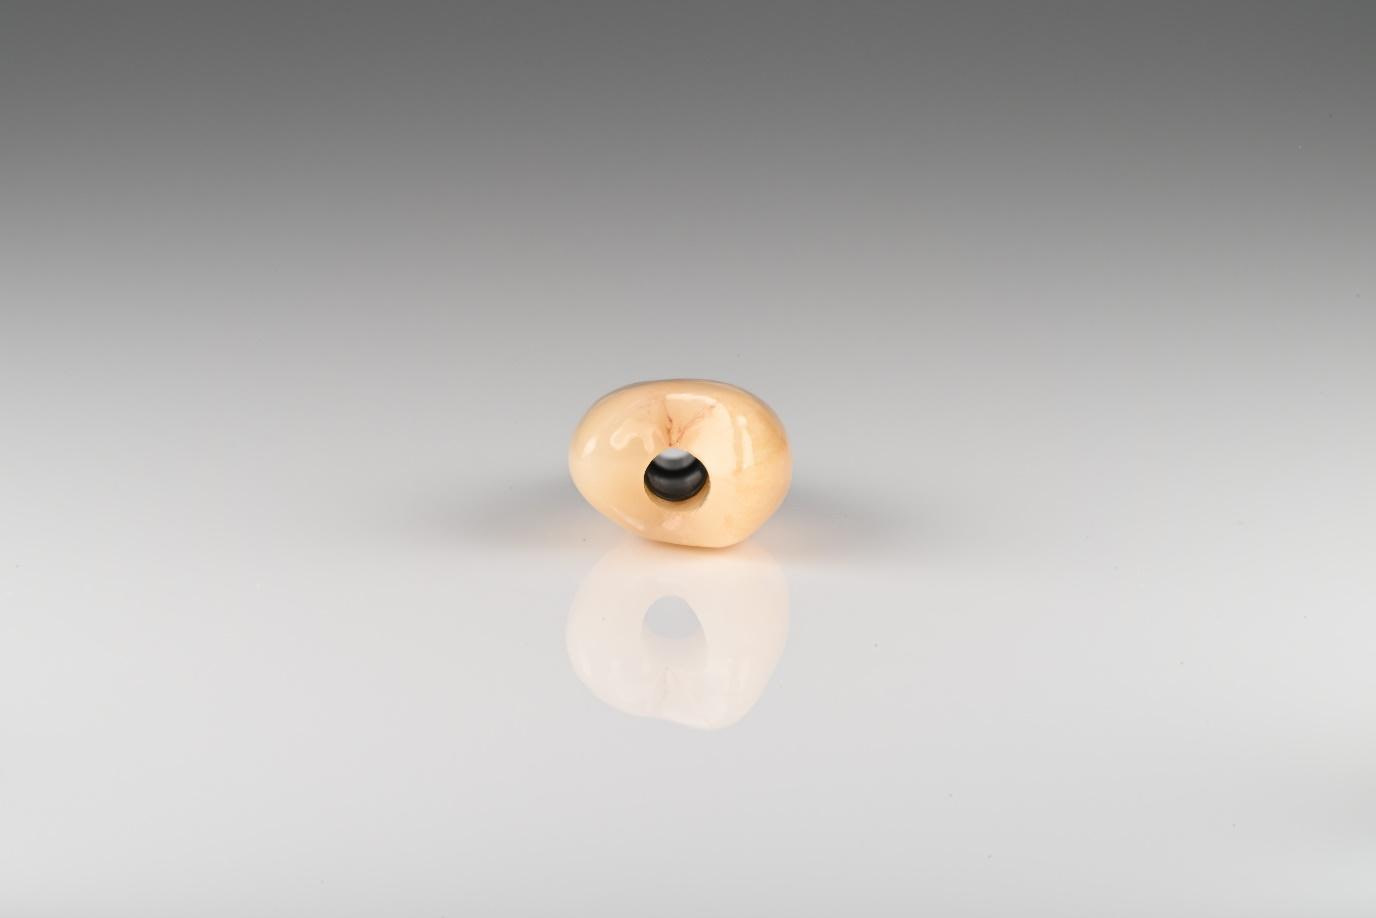
The crown was milled from a high-strength, multilayered zirconia and hand-finished to achieve a lifelike appearance. 

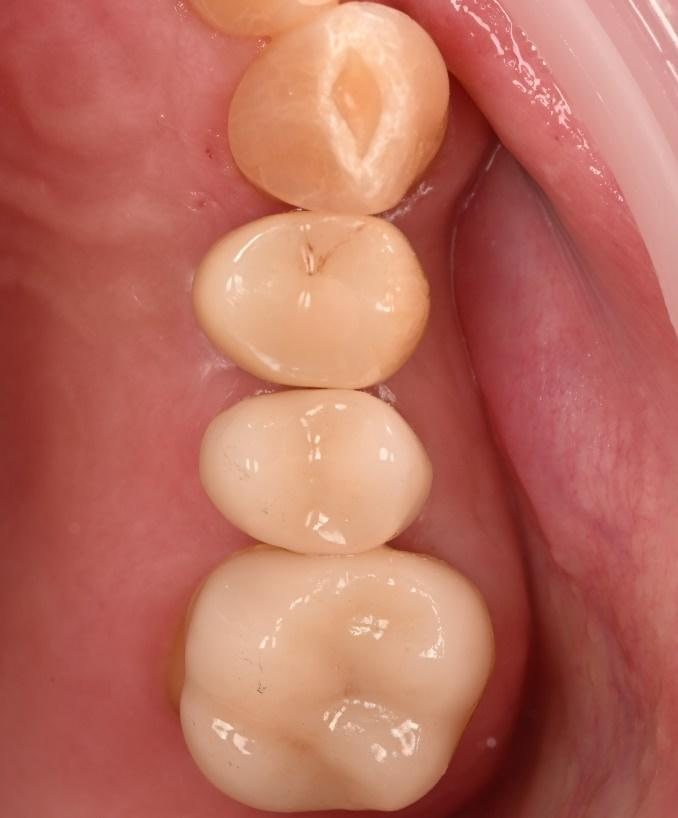
At the final appointment, the crown was securely attached to the implant, resulting in a beautiful, natural-looking restoration.
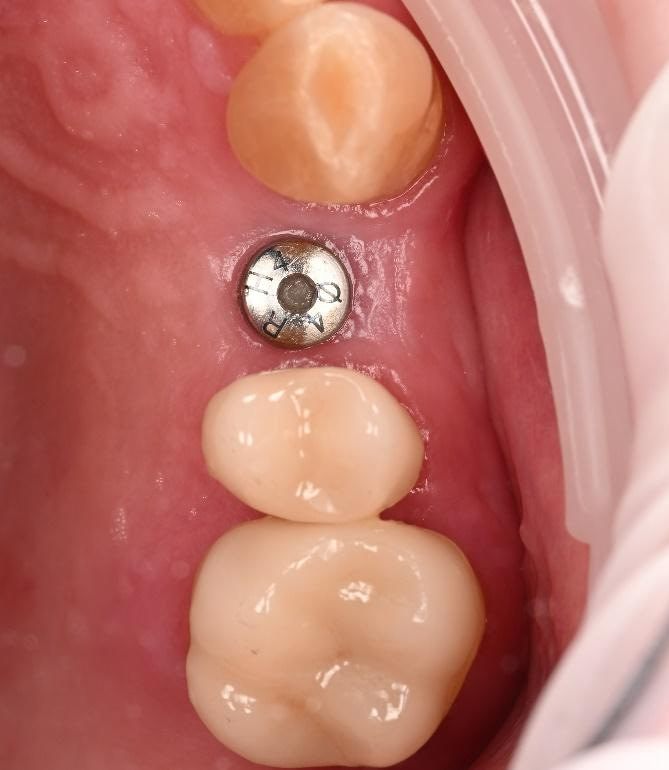
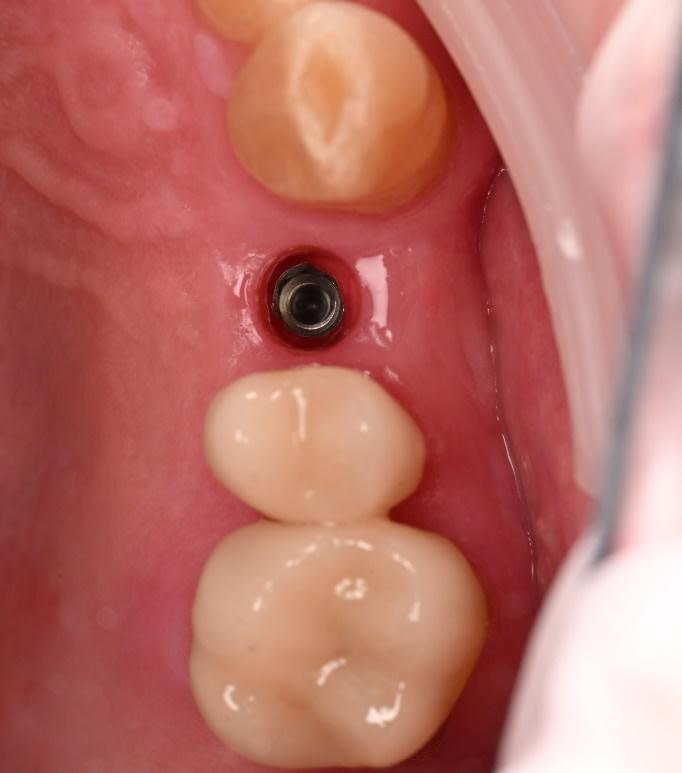
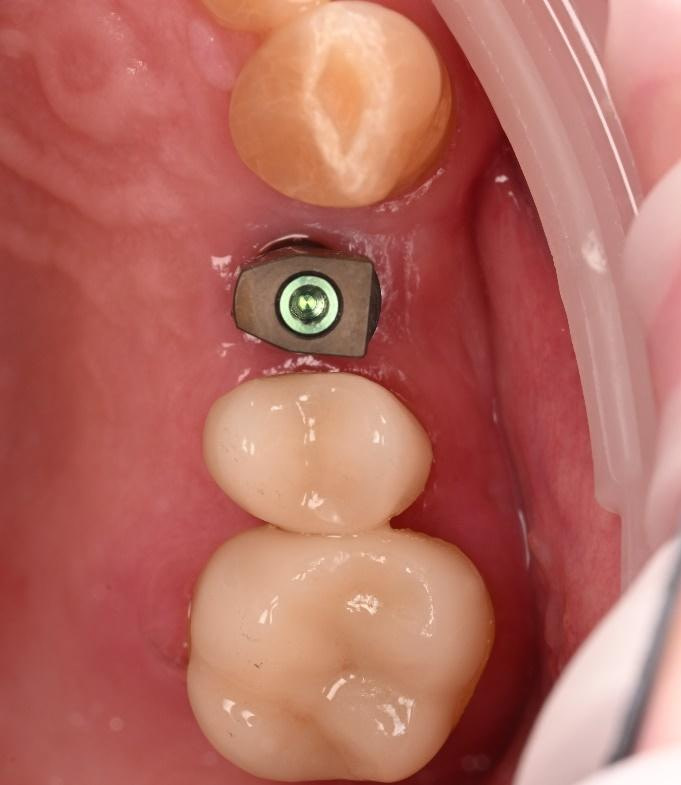
3 months after implant placement. An excellent volume of buccal contour was observed. 
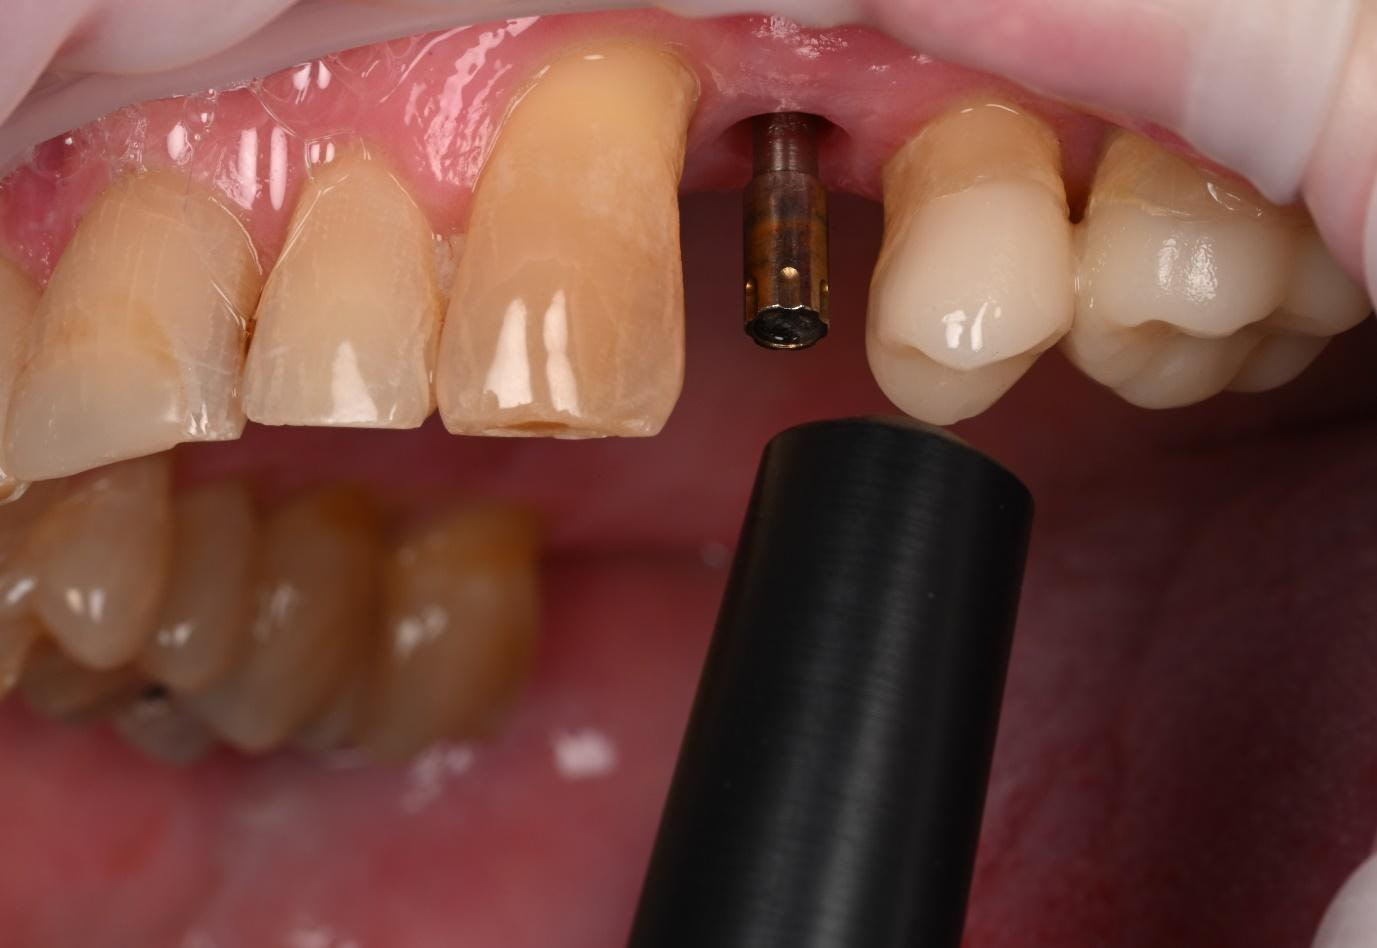
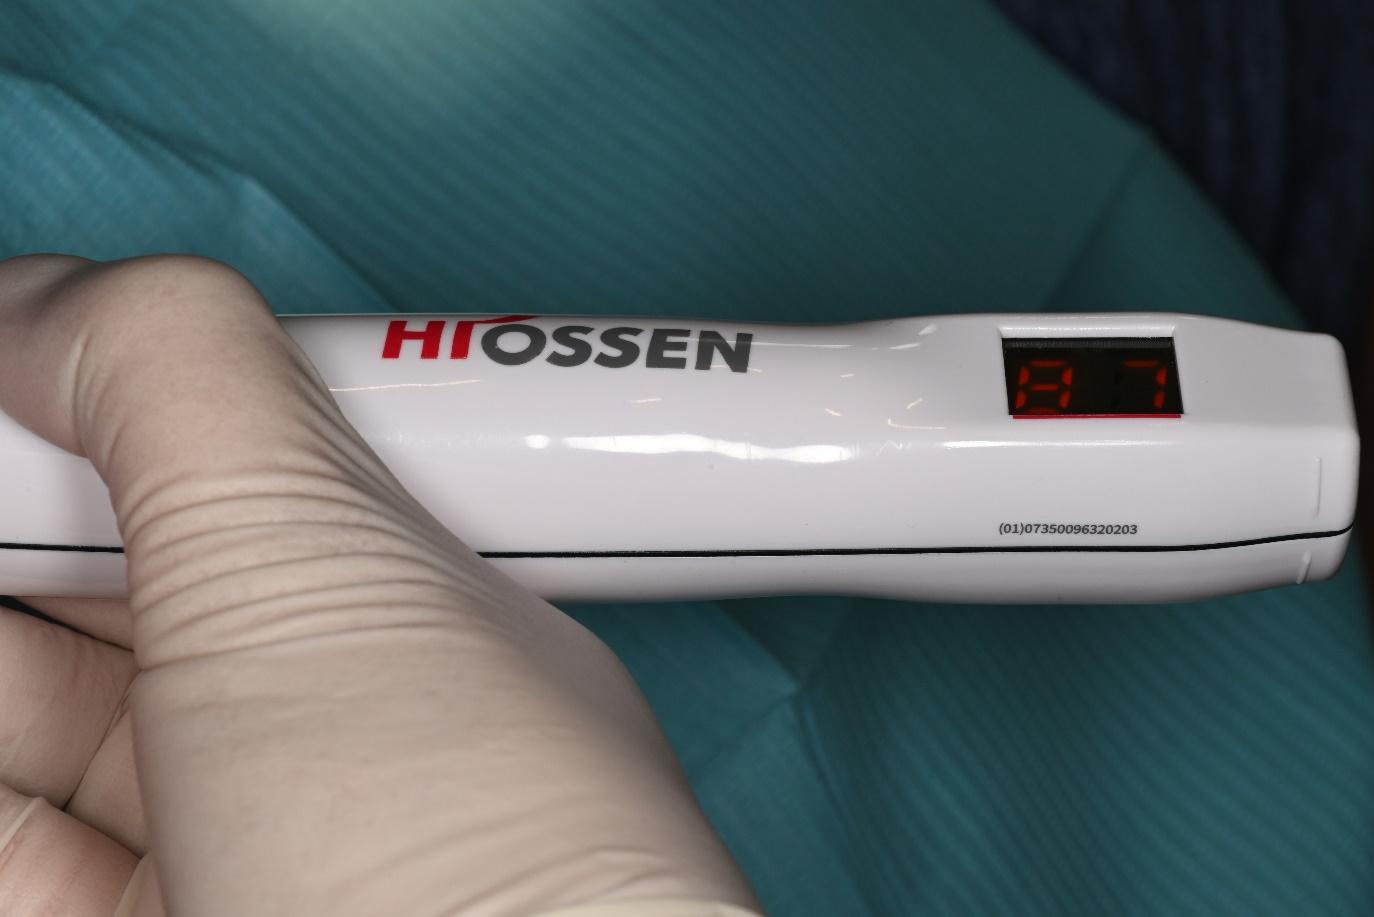
Osstell Smartpeg hand tightened onto the implant. Hiossen IS3 ISQ Monitor with a reading of 87 indicated excellent implant stability and integration.
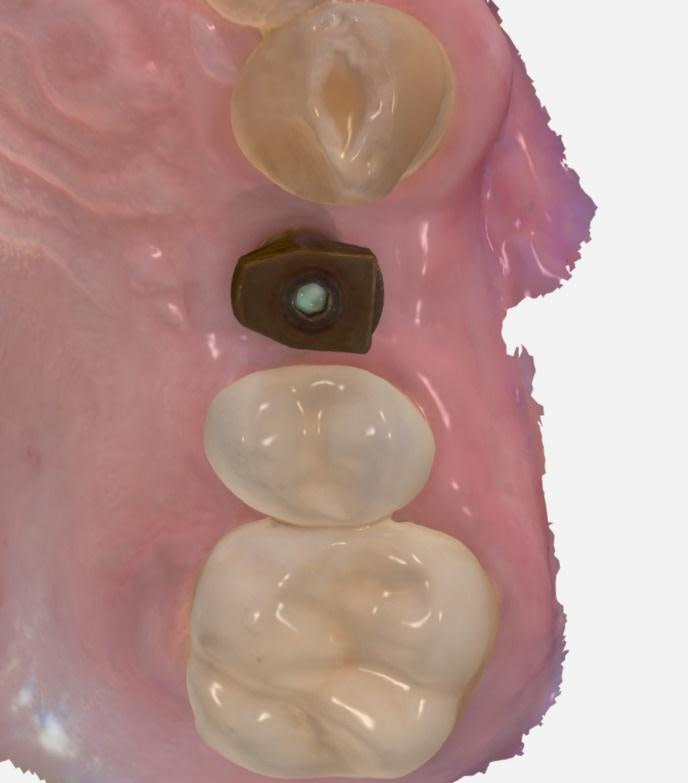
Osstem scan body is attached to the implant, and the Trios 4 Move wireless intraoral scanner is used for upper jaw, scan body, lower jaw, and bite scans.
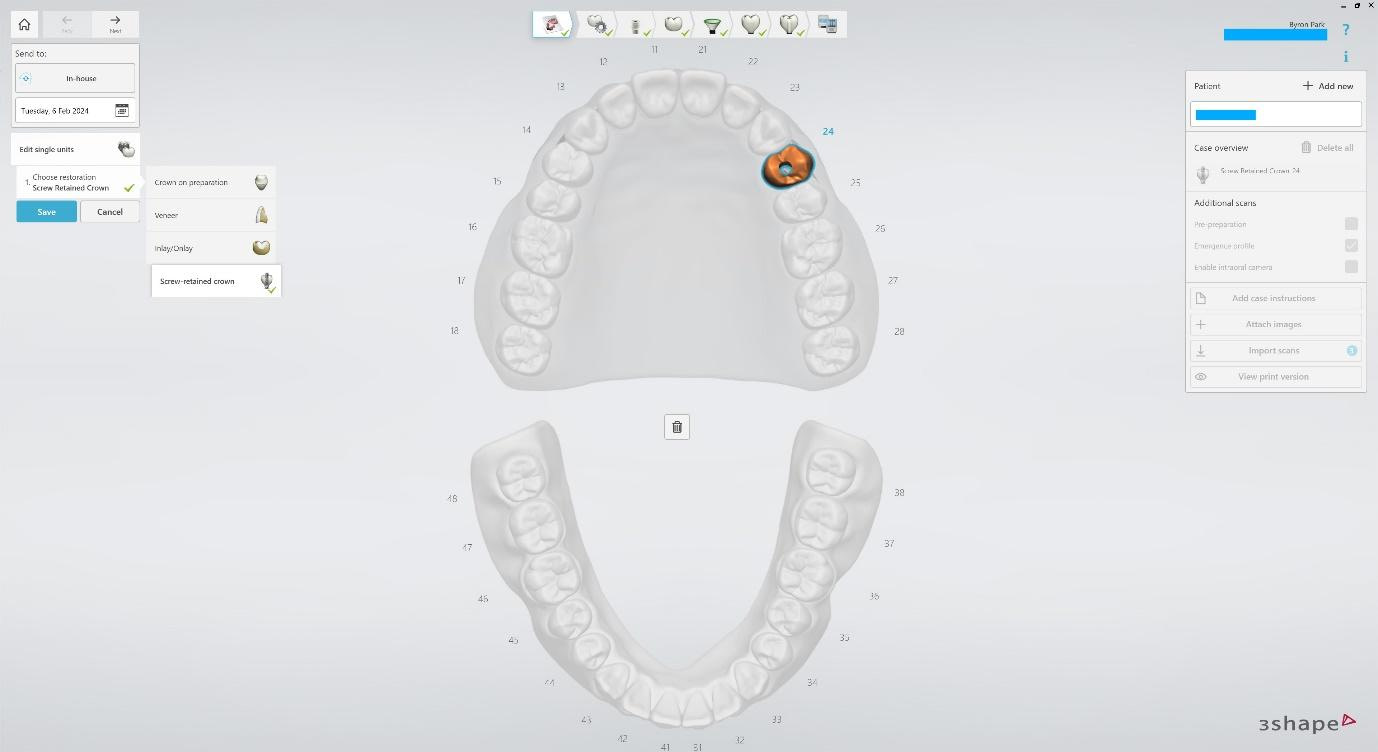
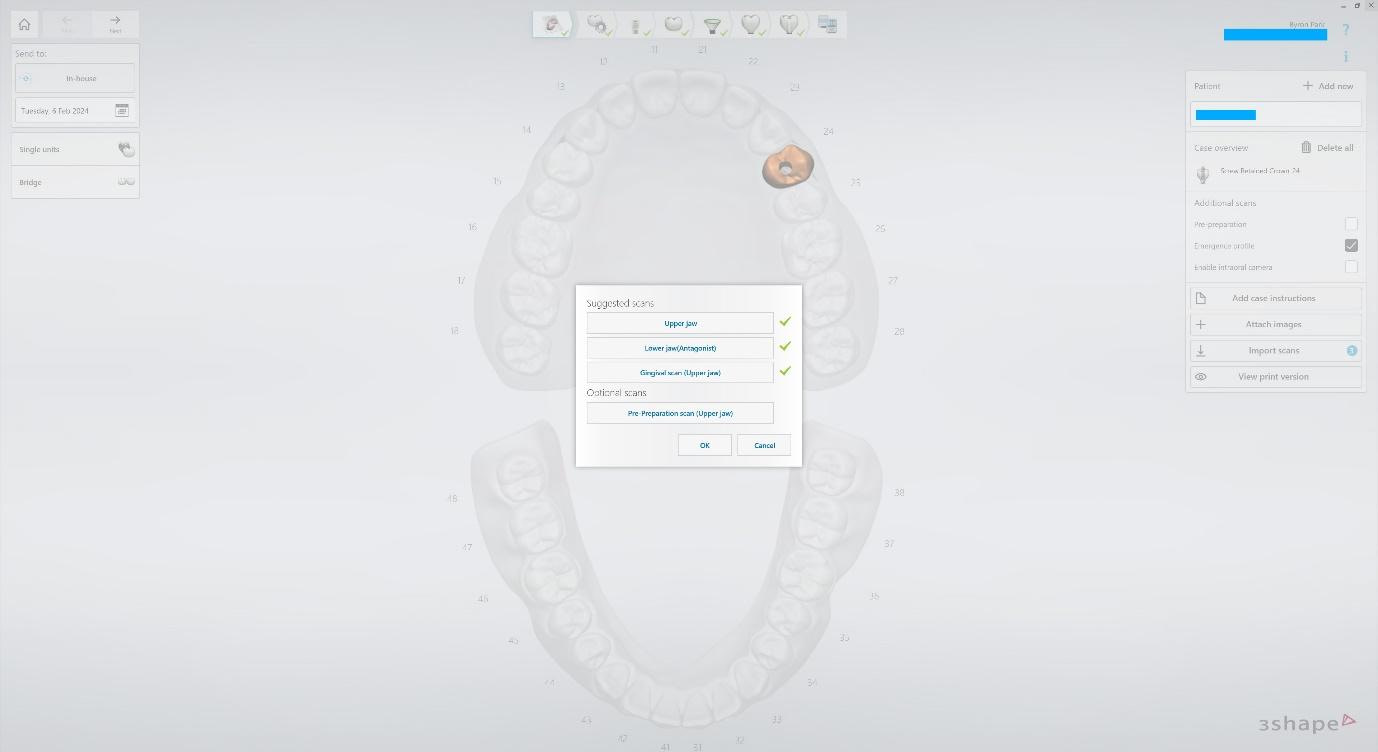
Create a New Case in Trios Design Studio. Select a Single unit, Screw-retained crown. Import intraoral scans.

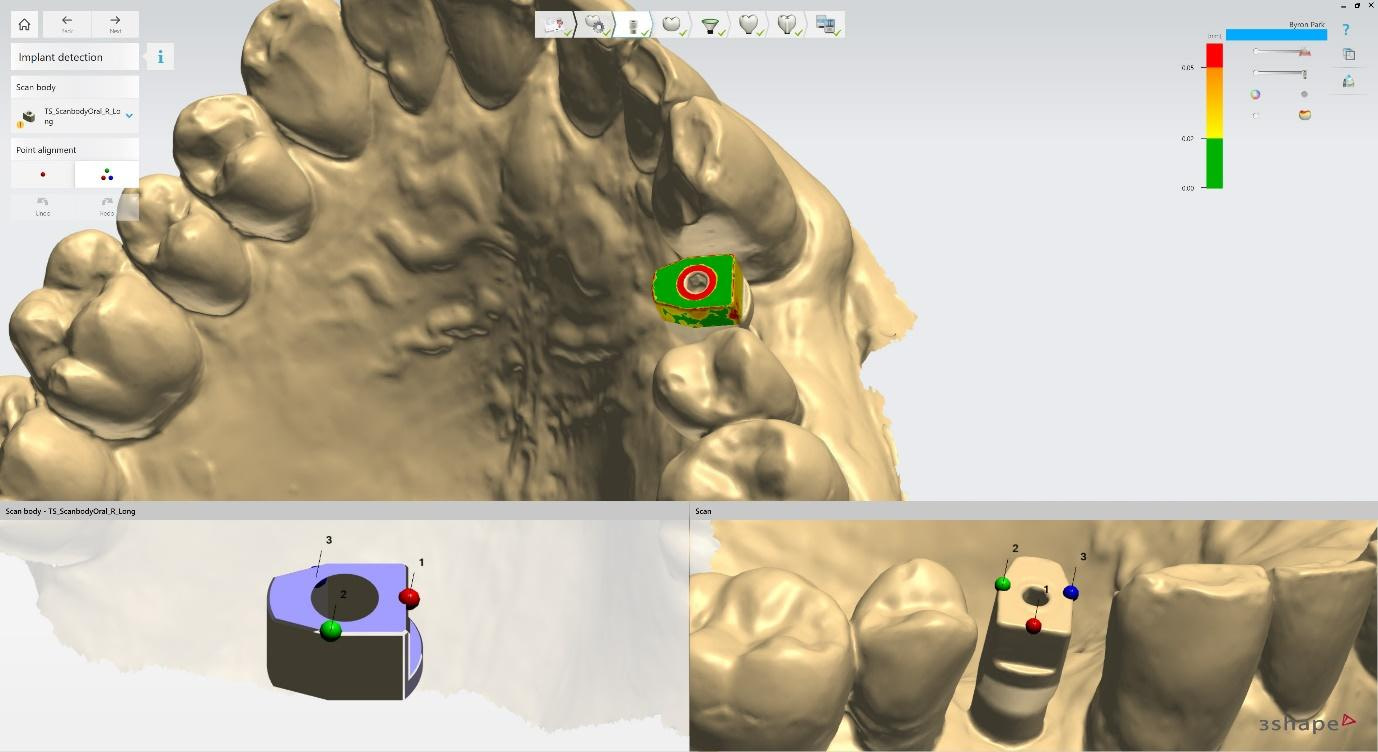
Implant detection matches the scan body in the intraoral scan with the digital library. A colour scale is given to show the accuracy of the matching (Green is good).
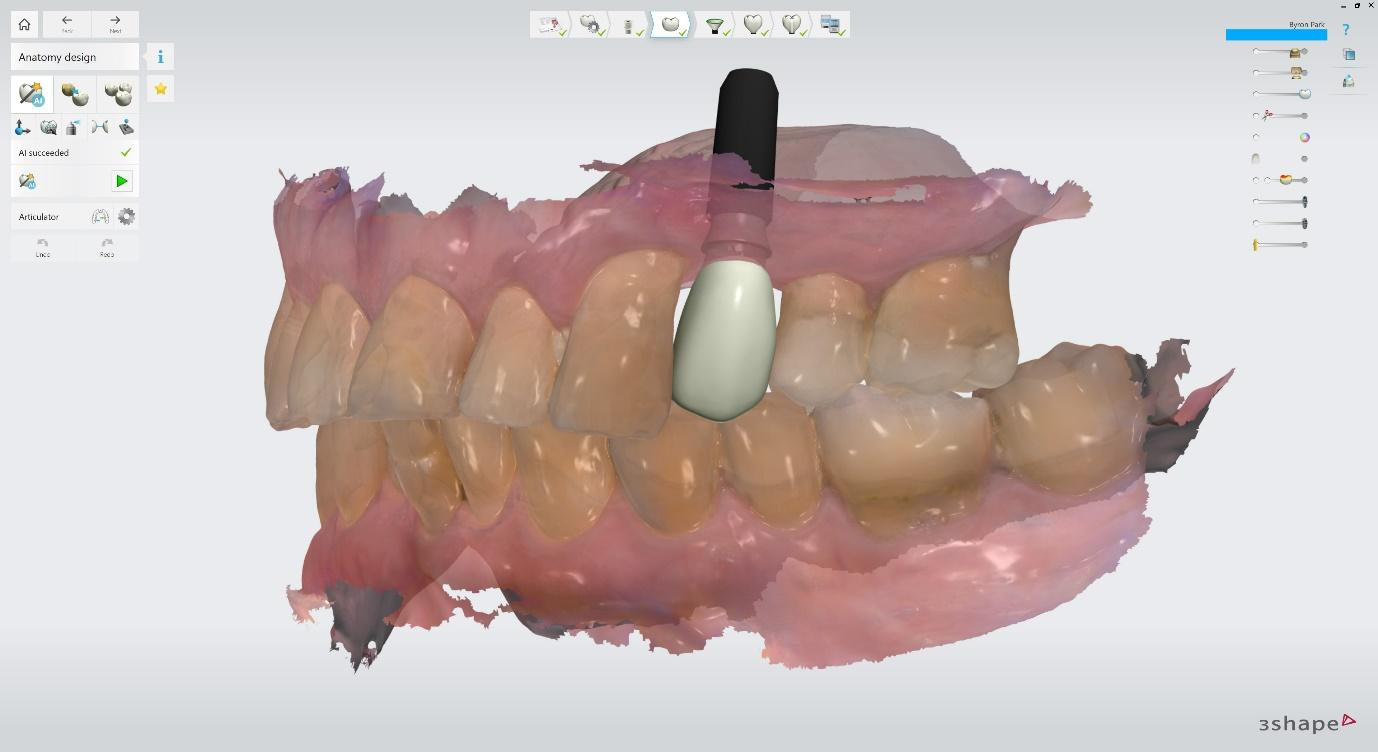
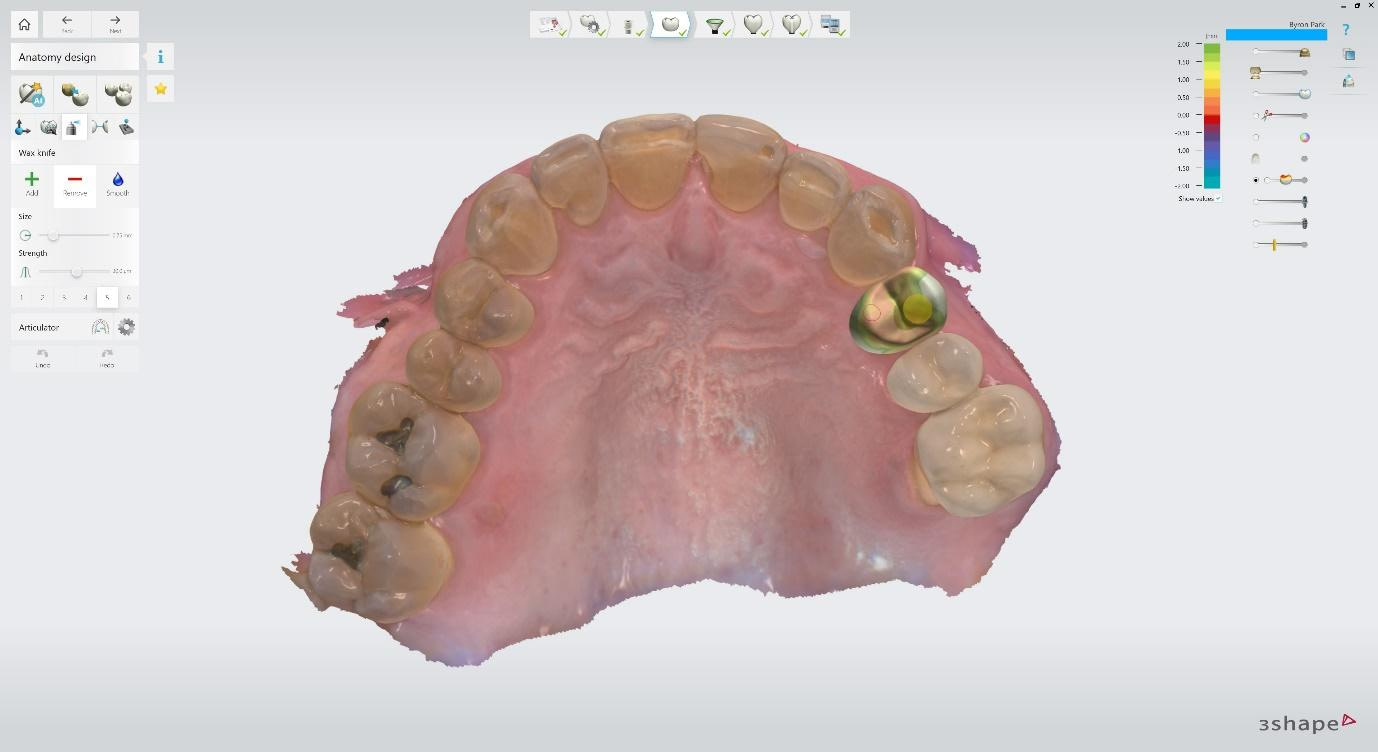
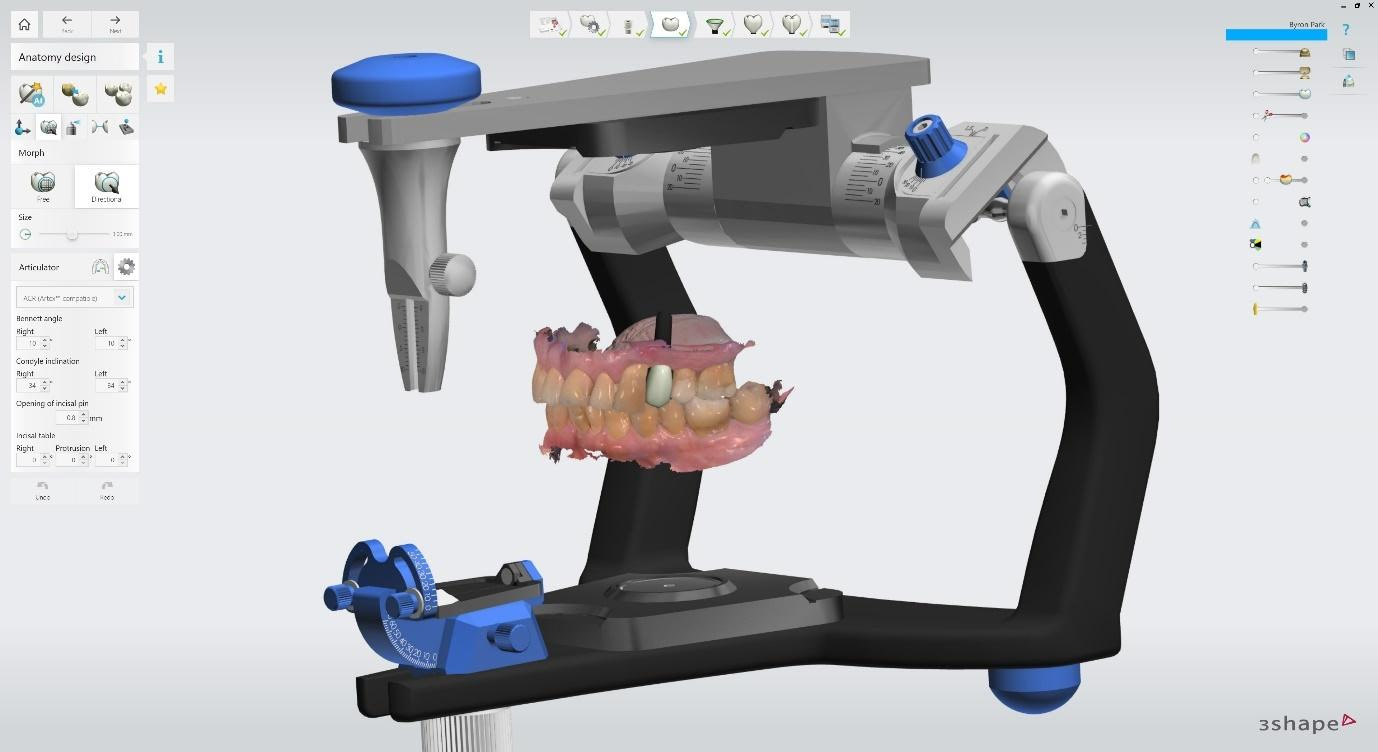
Anatomy design can be sped up with AI design. You can also copy the anatomy of another tooth present in the intraoral scan or select a tooth design from available libraries. Transform, Morph, and Wax knife tools adjust the anatomy. You can visualise and set adjacent and opposing contact distances.
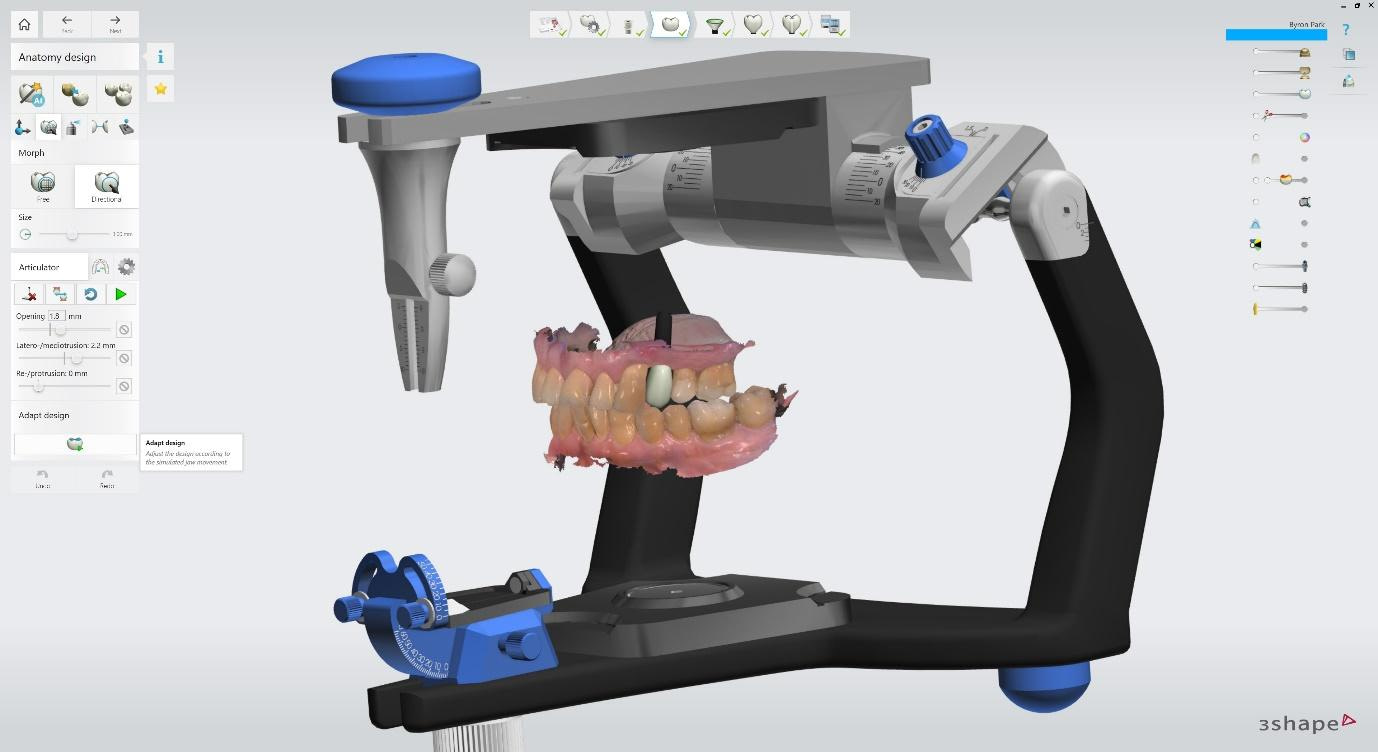
Dynamic Virtual Articulator allows you to adjust articulator angles and movements. This helps to ensure canine guidance is respected and ensures no premature contacts and non-working side interferences.
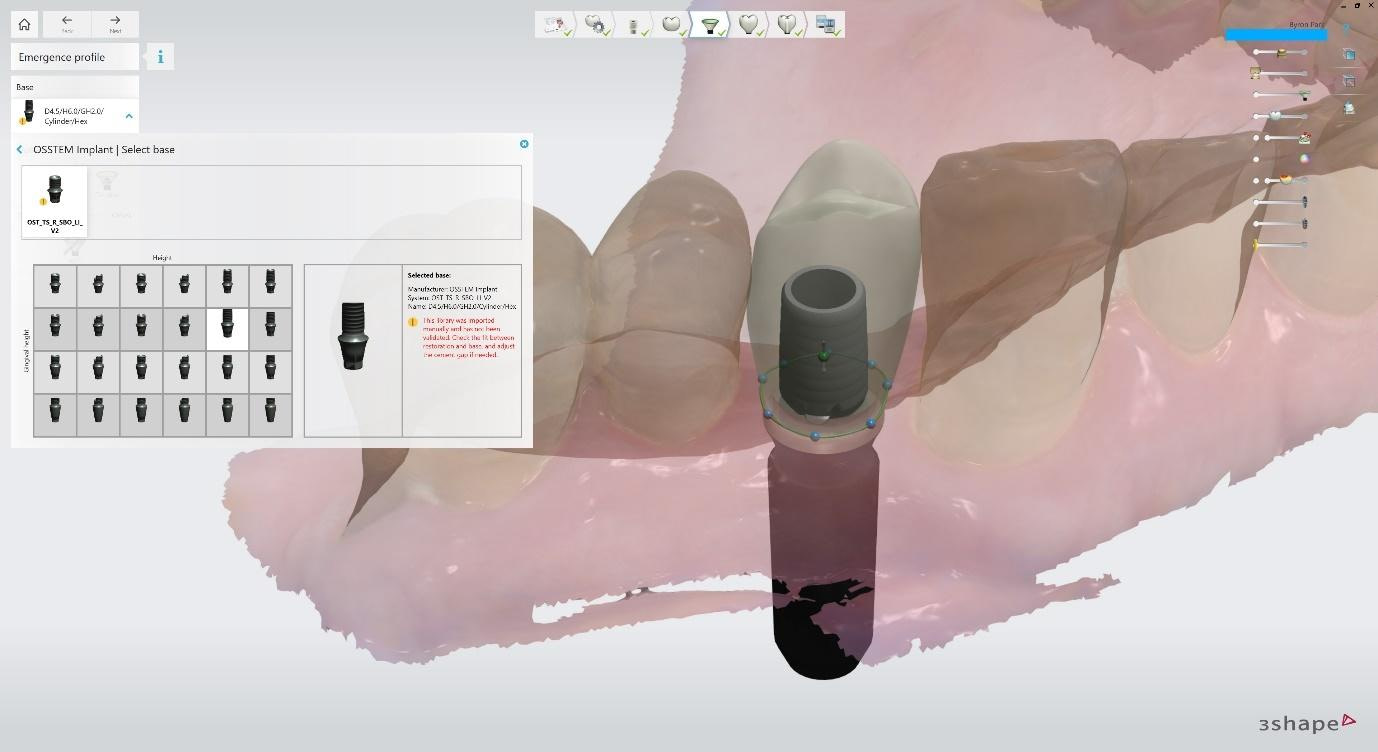
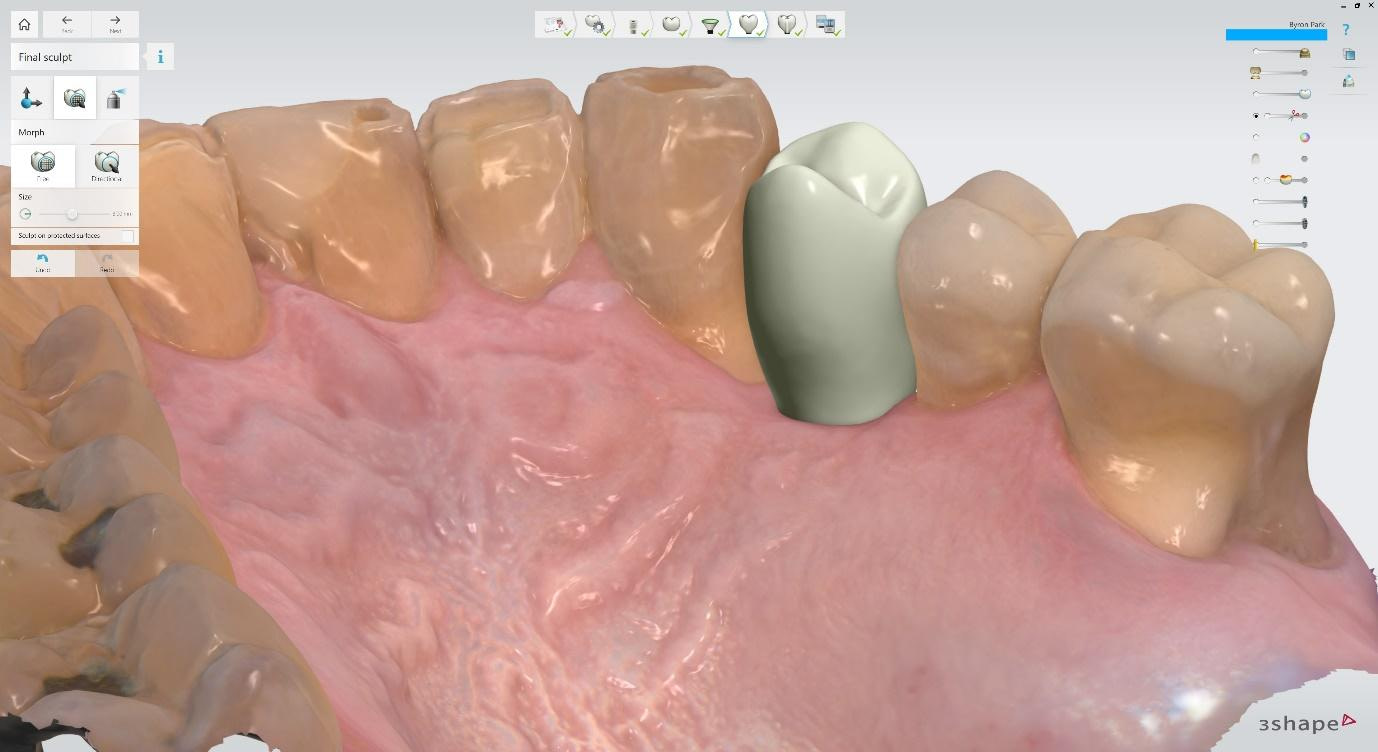
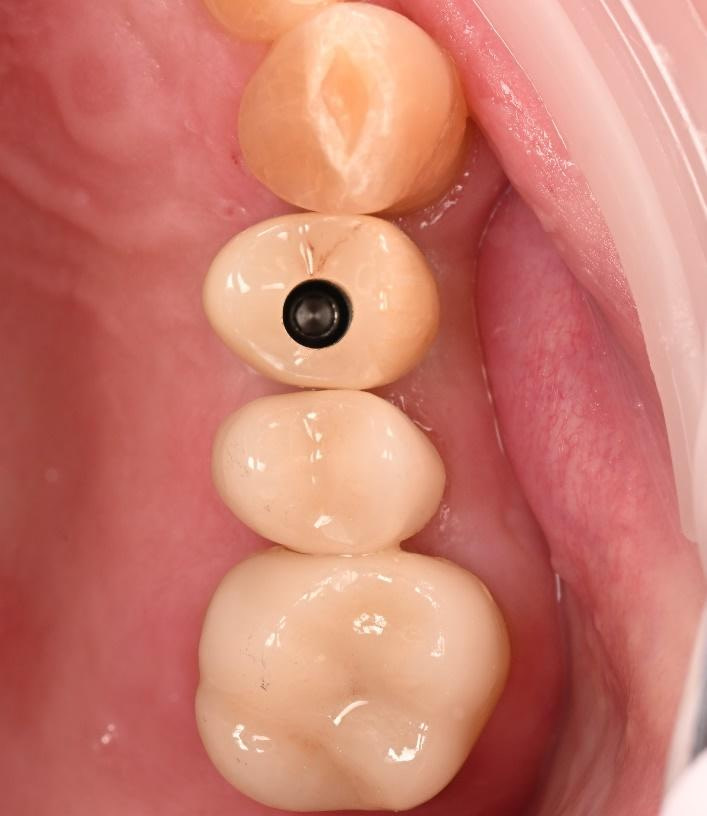
Select Ti base from the library of options. In this case, I selected an engaging (hex) Ti base with a height of 6mm and a gingival height of 2mm. This is to ensure that the margin where the zirconia meets the Ti base will be subgingival, and there will be no visible metal. The crown is given a final sculpt to contour the transition from the emergence profile to the rest of the crown.
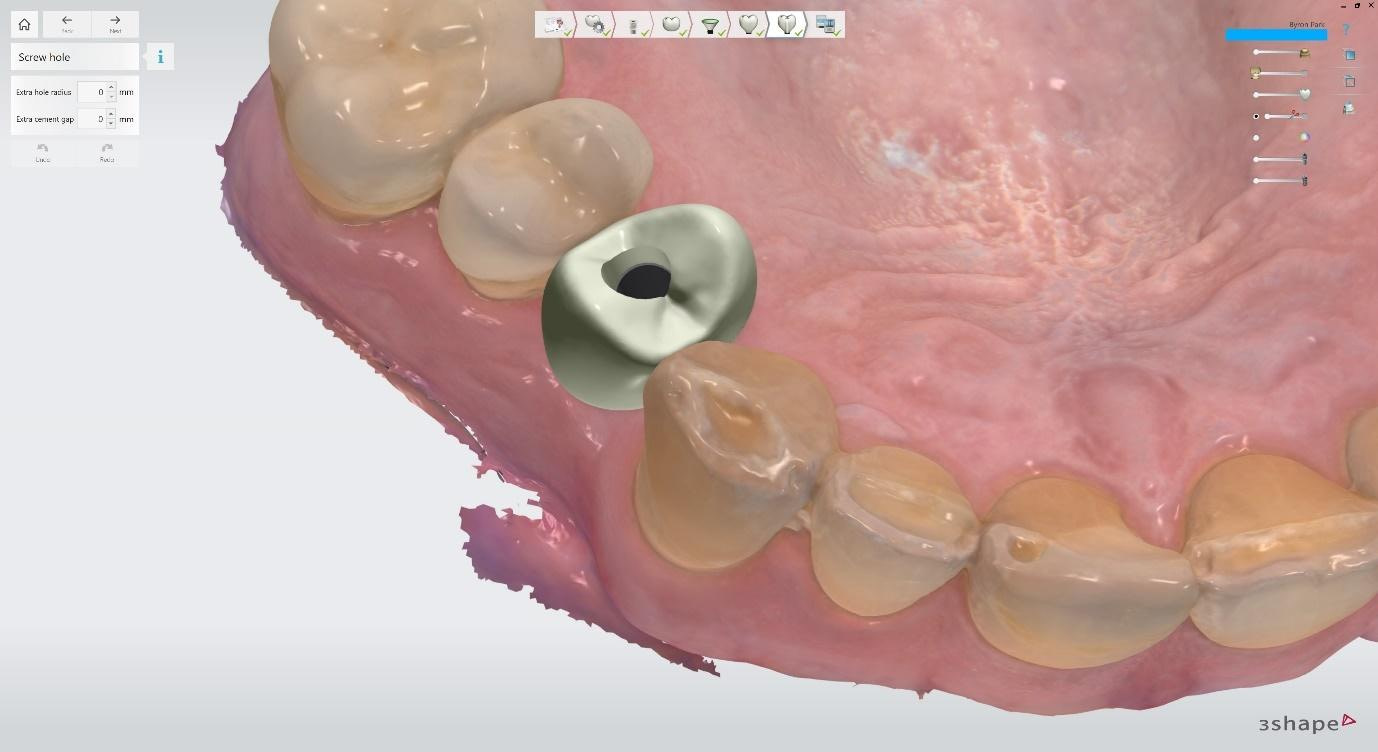
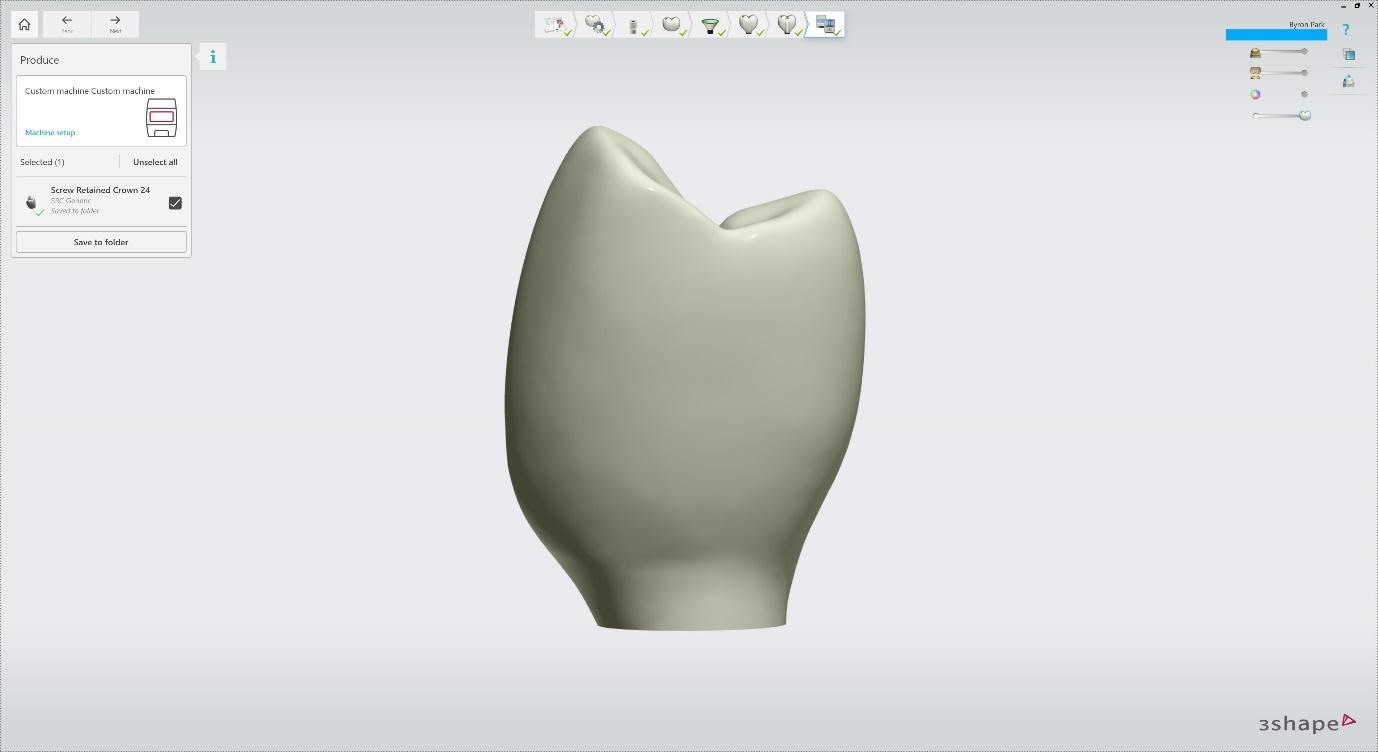
I did not alter the screw hole further, but an extra hole radius or cement gap can be added if needed. From there, an STL file is produced. This is saved and used to mill the designed crown out of multilayered zirconia.
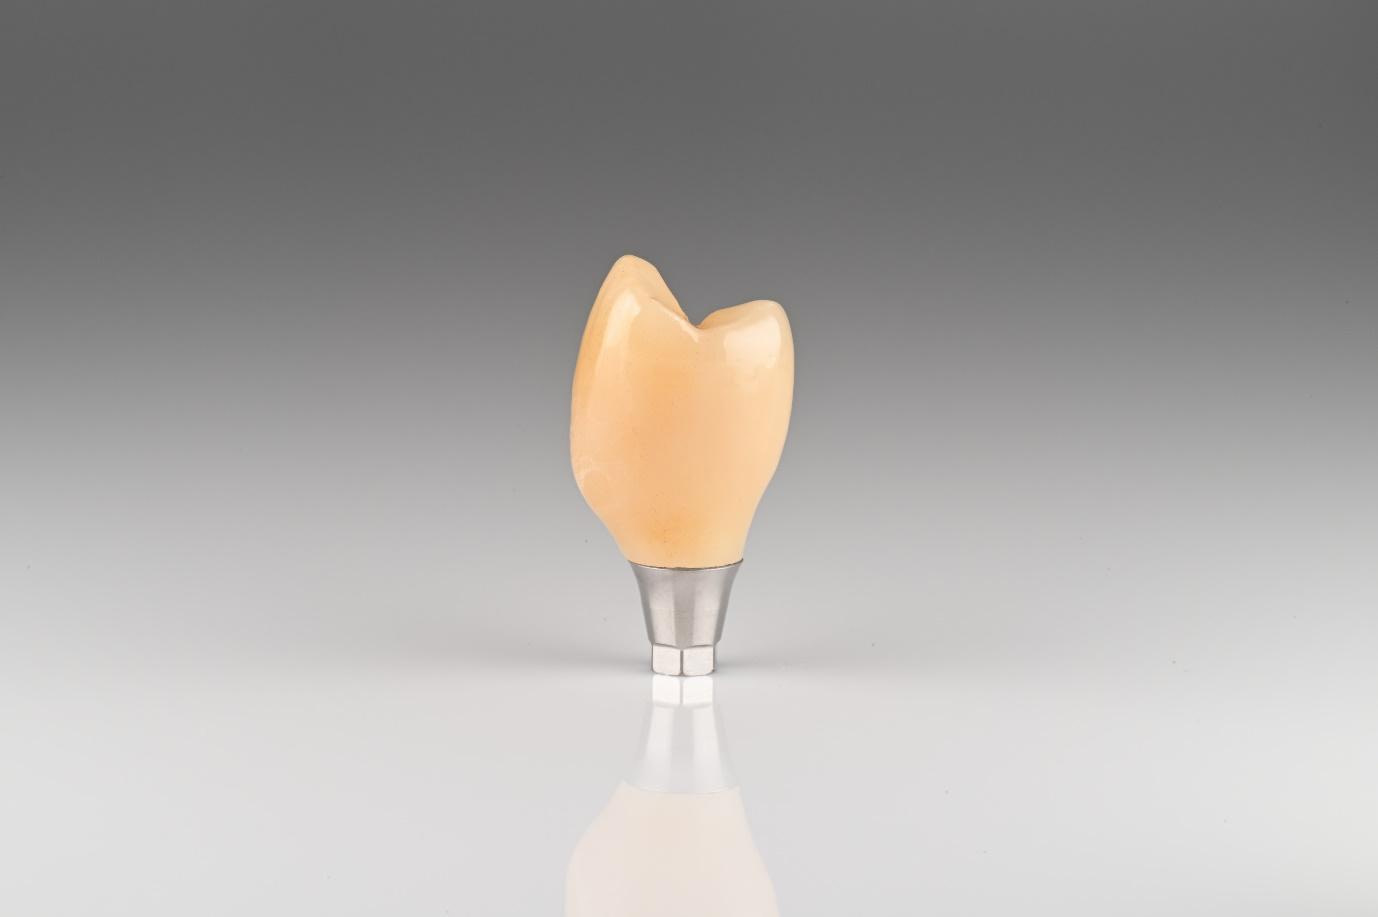
Crown is milled, sintered, stained, glazed, and cemented to the Ti base. Dental technician Yang Heum Cho completed this at iDD Dental Lab. Armann Girrbach Zolid FX Multilayer zirconia used.
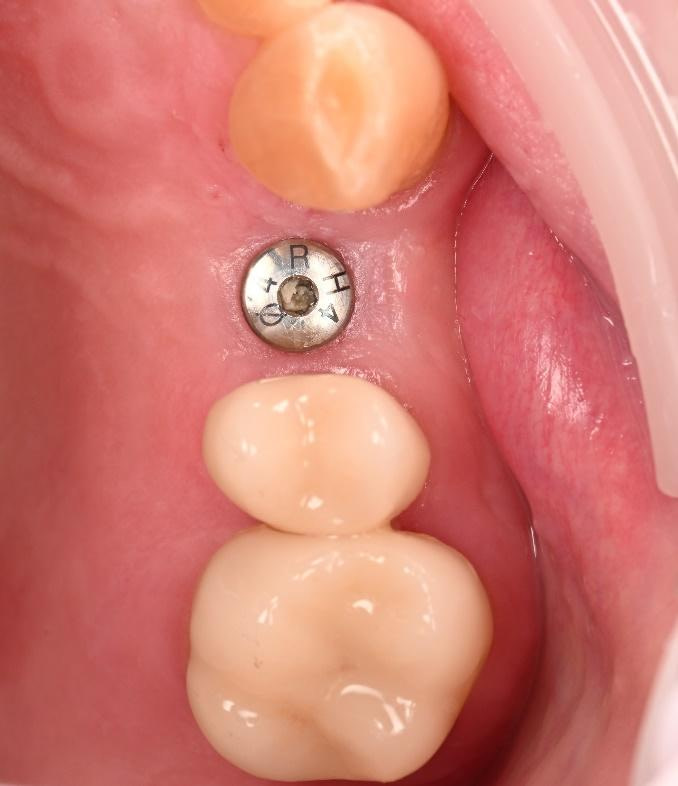
The healing abutment was removed, and excellent tissue health was observed.
The implant crown was inserted, and the abutment screw was tightened to 30Ncm with a torque wrench. PTFE tape, Clearfil ceramic primer, and Shofu Beautifil Injectable composite resin are used to fill the screw channel.
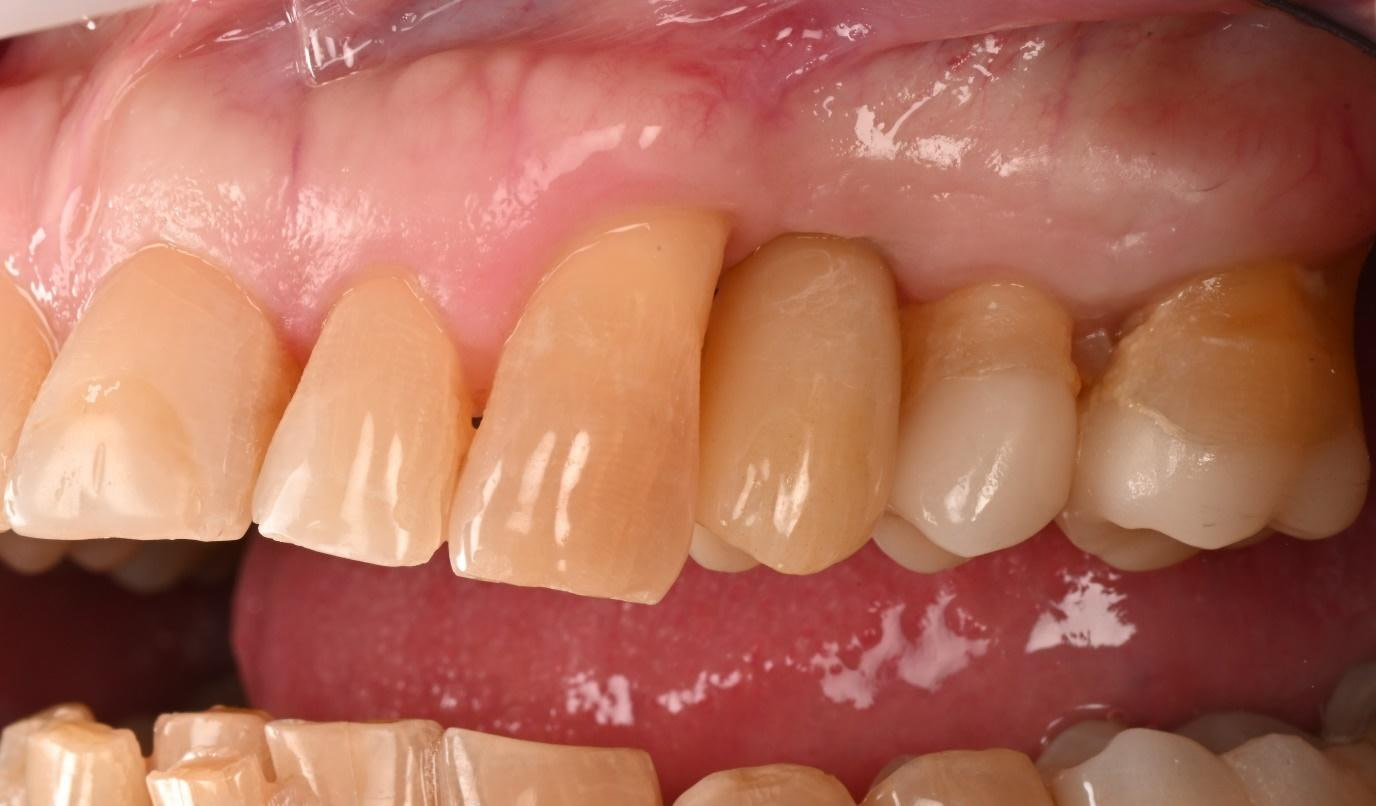
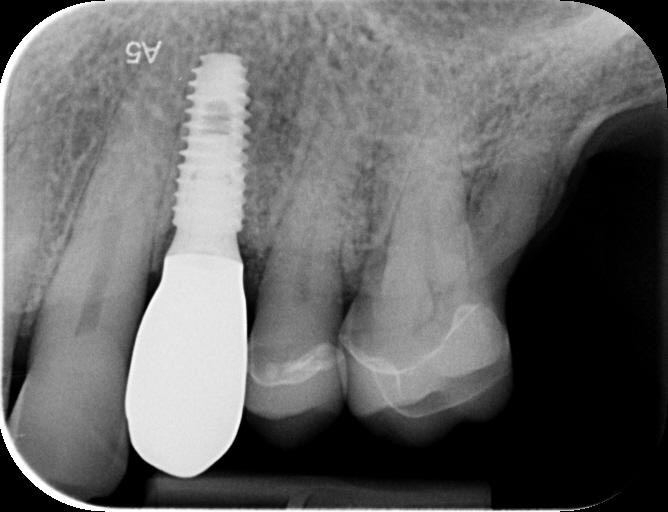
The buccal photo shows an excellent shade match of the crown and buccal contour of the soft tissue. A final PA radiograph was taken to check that the crown was fully seated and as a post-operative treatment record.

Treatment Outcomes

The successful completion of the implant treatment was evaluated based on aesthetics, function, and patient satisfaction. 

The implant-supported crown seamlessly integrated with the patient's natural dentition, and the patient reported excellent comfort and function. 

A radiographic assessment confirmed the proper integration and positioning of the implant.

The successful treatment outcome can be attributed to digital dentistry: planning, precise execution, and patient-centered approach facilitated by the digital workflow. 

By leveraging advanced technologies like 3Shape TRIOS, Implant Studio, and TRIOS Design Studio, I delivered a high-quality, customized implant-supported restoration that met the patient's functional, aesthetic, and emotional needs.

Discussion and Conclusion

The case study highlights the numerous advantages of the digital workflow in implant dentistry, particularly when compared to traditional analog methods.

Integrating advanced technologies, such as 3Shape TRIOS and TRIOS Design Studio, has revolutionized how dental professionals plan, execute, and deliver implant treatments, offering unparalleled accuracy, precision, and efficiency.

The digital workflow streamlines the entire implant treatment process, reducing the time and effort required for each stage.

 Digital technologies automate and standardize many processes, reducing the potential for human error and ensuring consistent, high-quality results. Moreover, the improved communication and collaboration enabled by digital files promote better coordination, faster decision-making, and a more cohesive treatment approach.

This case study demonstrates the remarkable potential of digital dentistry in revolutionizing implant treatment. By leveraging the power of 3Shape software and the digital workflow, I successfully planned and executed a complex implant case, achieving exceptional results in aesthetics, function, and patient satisfaction.

The successful outcome of this case underscores the future implications of digital dentistry in transforming the field of implant treatment. As digital technologies evolve and become more widely adopted, dental professionals will be empowered to deliver increasingly predictable, efficient, and patient-centered care.

As the dental profession continues to embrace the digital revolution, practitioners must stay informed about the latest advancements and best practices in digital dentistry. This case study serves as an invitation for readers to explore the world of digital implant dentistry and actively seek opportunities to integrate digital technologies into their own practices.

In summary, this case study demonstrates the transformative power of digital dentistry in implant treatment, highlighting the benefits of accuracy, precision, efficiency, and patient-centered care.

As the dental profession continues to evolve, the adoption of digital workflows will become increasingly critical for delivering optimal treatment outcomes and improving the lives of patients worldwide.
Read More
3D Printing, CAD/CAM, Clinical Cases, Ivoclar, Workflows

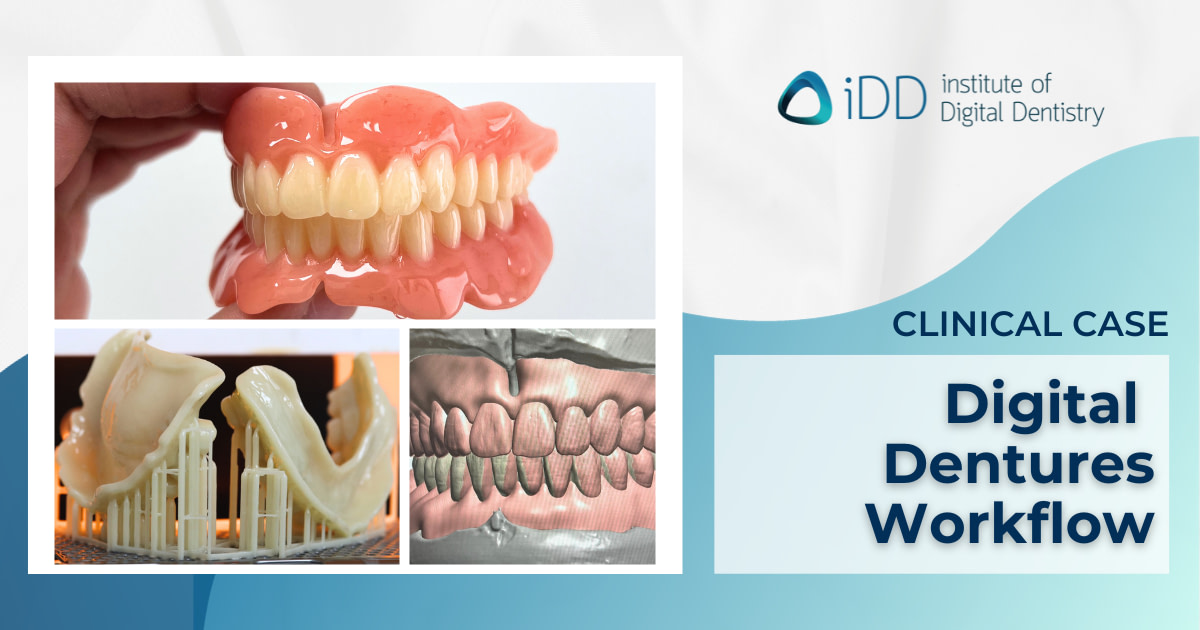
Embracing the Digital Denture Workflow to Manufacture Digital Dentures

The rise of technology, computer-aided design and manufacturing, 3D printing, and even AI is having a massive impact on our workflows as dental professionals. 

This evolution has made for some magnificent achievements in the past couple of years, especially when considering denture workflows in dentistry.

If you asked me a few years ago, I was totally not a fan of digital dentures. 

In most cases, these were when 3D printed and milling dentures had become available. I felt there was more work to be done on material science, denture manufacturing processes, and final denture aesthetics to produce a denture of comparable quality to those made traditionally. 

This changed for the better when I was introduced to Ivoclar’s Ivotion earlier this year. And let me tell you, I don’t think I could ever go back! 

I’d like to reflect on one of my recent clinical cases, as it truly showcased the positive change in my practice since digitizing my workflow. 

About the author 

Akruti Tataria (CDT)

Akruti is a Clinical Dental Technician currently working in Wellington, New Zealand. She completed her Bachelor of Dental Technology with Distinction (2016) and a Postgraduate Diploma in Clinical Dental Technology (2017) at the University of Otago. Akruti is also the President of the New Zealand Institute of Dental Technologists and an Independent Advisor to the Health and Disabilities Commissioner of New Zealand. Akruti is passionate about making oral health care more accessible and advancements in digital dentistry. She has been heavily involved with iDD Lab as a full-time clinical dental tech. This allows her to have real-world experience of all the benefits and challenges of digital workflows through own patients.

Clinical Case - Established Complete Full Arch Dentures

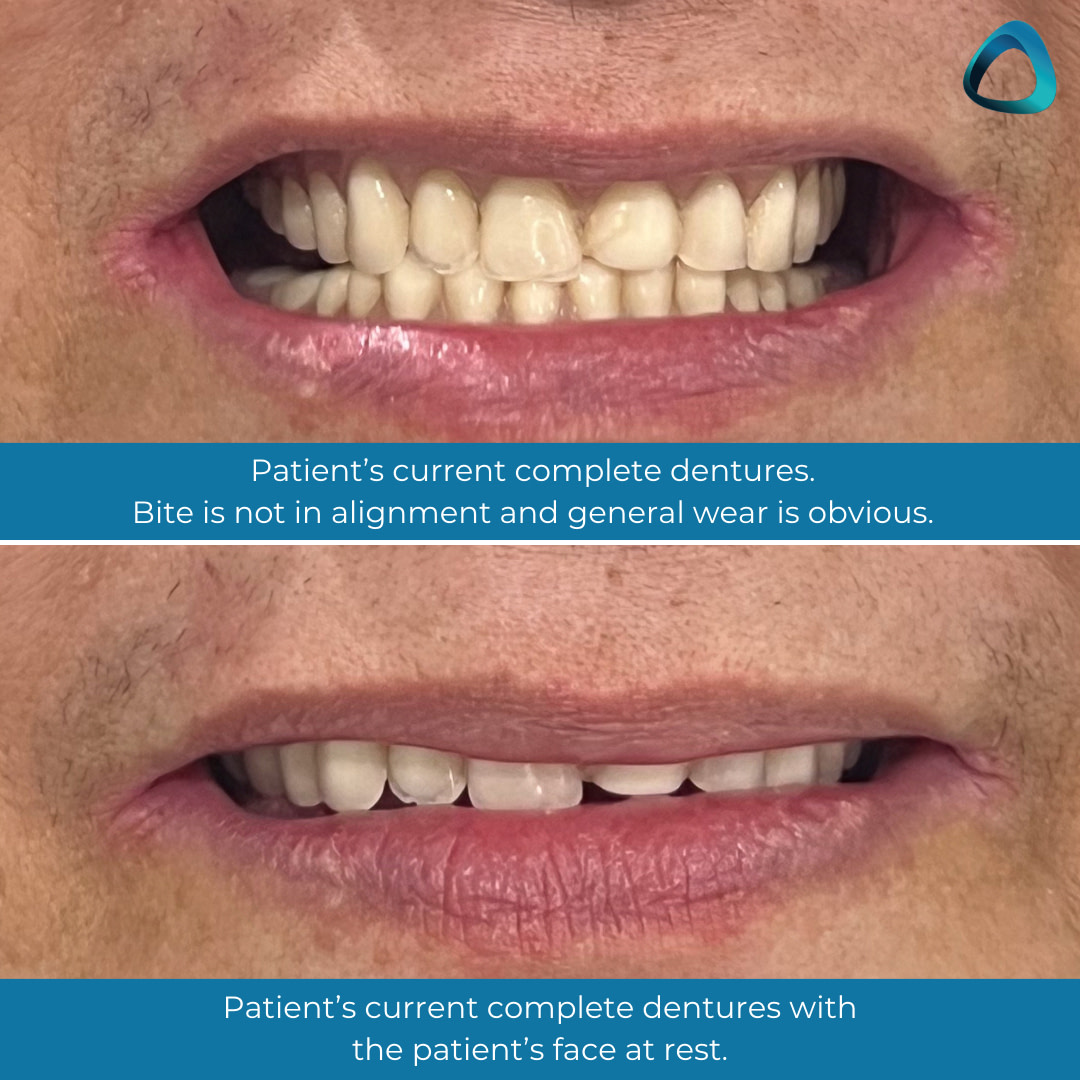
A 65-year-old patient presented with complete dentures that were  made in a rural city in New Zealand almost 30 years ago. As is common to see for this timeframe, these dentures were excessively worn, stained, ill-fitting, and causing ulcerations in both upper and lower labial sulcus areas. 

To my surprise, the patient had been ‘managing fine’ and the only major concern was the denture aesthetics! 

Another reminder of how dynamic the jaw is and just how adaptive patients can be when they are emotionally attached to their dentures. 

Another thing that was noted was the loss of mandibular bone height due to being edentulous for a long time. This was one thing that raised concerns. 

With this in mind, I formulated a treatment plan to utilize the dimensions of the current lower denture base and shorten the extensions. This was a holistic approach to compromise, to keep emotional attachment yet still provide a new, well-fitting denture. 

The maxillary denture posed no challenges thanks to the palate, a well-formed bulbous residual ridge, and the reduced suction in the existing denture, which motivated the patient to consider new dentures.

The digital denture workflow for this case can be broken down into 3 parts:

  • Scanning and 3D printing - Scanning models and bite blocks. We use  3Shape’s E-series lab scanner (3Shape e-series lab scanner) at iDD Lab to fabricate a try-in, which is 3D printed using the NextDent5100.
  • Try-in - Followed by using a base wash impression that is rescanned and used to redesign the Full/Full denture post-try-in.
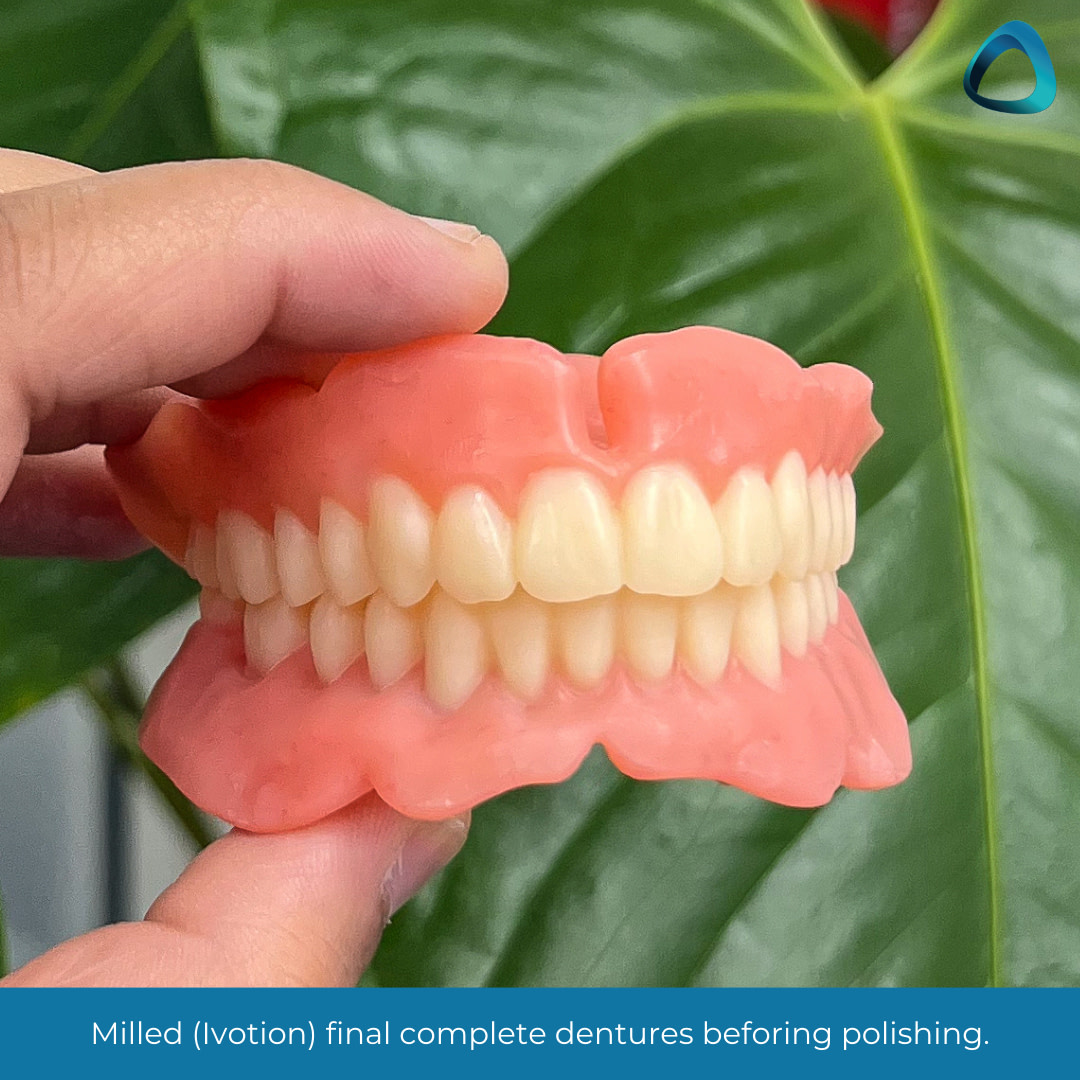
  • Milling - The Full/Full or complete dentures are milled utilizing a PM7 mill by Ivoclar and Ivotion bicolor discs.

These steps are outlined below.

Scanning and 3D Printing

Primary impressions were used to make bite blocks to record the centric bite and determine the vertical dimension. Due to general wear of the dentures, the bite required opening, which meant that we needed to re-establish occlusal vertical dimension. A resting vertical dimension value was taken, and 3mm free-way space was subtracted to ascertain the occlusal vertical dimension.

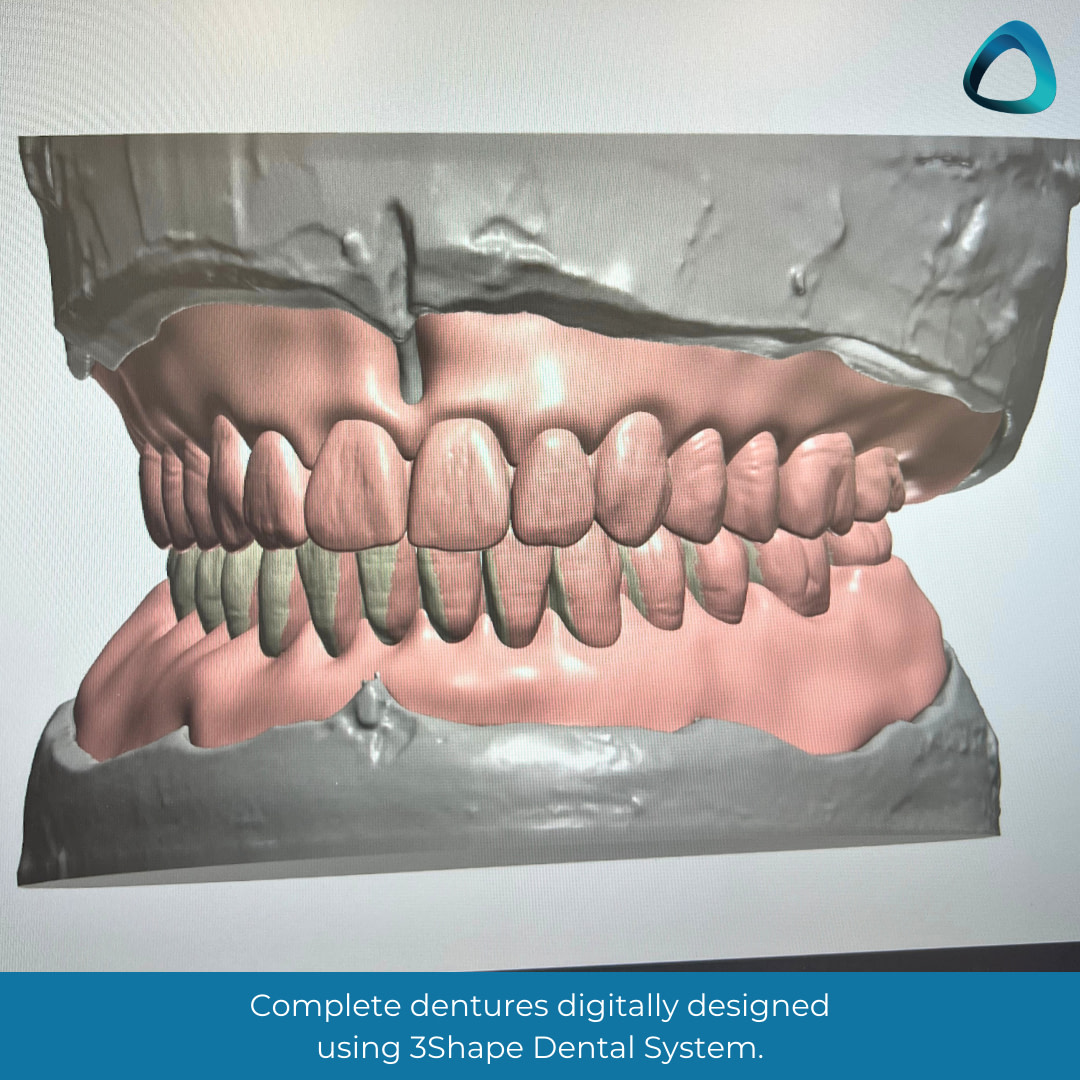
After the bite was established, the 3Shape desktop scanner was used to scan the upper model, lower model, and the wax rims to align both arches into the 3Shape software. The steps in the software were then followed to be able to create an F/F try-in. 

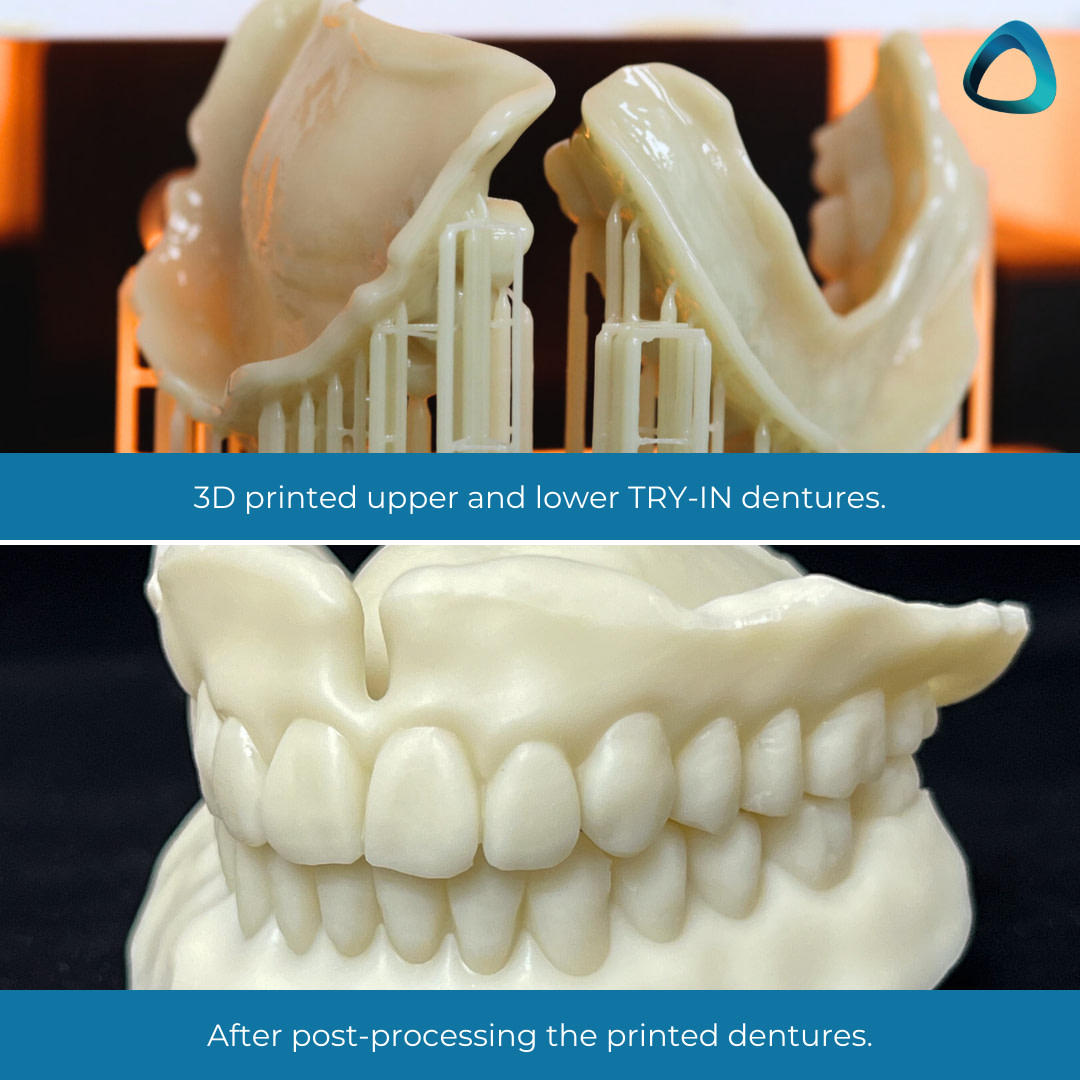
Ivotion CAD designs produce both CAM5 and STL files. The STL files are monoblock, which encompasses the design in one file and allows the output designs to be printed with a 3D printer of your choice - which, in our case, was the NextDent 5100 by 3D Systems. These were set using 3DSprint software and printed on standard quality print settings. 

The limitation of the monoblock for the try-in print is the ability only to produce the print in one color. Ivoclar does offer PMMA try-in discs, which can be milled. However, I have found from experience that 3D-printed try-ins work best for me, in addition to being more cost-efficient.

Another benefit of a 3D-printed try-in is the ability for the patient to take the try-ins home, experience their day-to-day life with dentures, and use them for a given period. This is especially important for cases with a significant vertical dimension opening. 

In this case, the patient took the try-ins home, used them, and returned to the clinic with no complaints after 3 days of use and wanted to proceed with the finish. They reported the lower try-in feeling stable thanks to the new base dimensions and noticed that the teeth had more height than the current dentures - which was to be expected!

Try-in Wash Impression

Wash impressions can be taken using medium-body PVS material, utilizing the closed-mouth impression technique.

These were effectively secondary impressions on which the milled F/F denture would be designed. This time, the wash impressions were scanned instead of scanning models, and the 3D-printed try-in was used as the bite. 

This allowed the F/F denture to be made based on the try-in dimensions and the final milled dentures to mimic the try-in dentures, which the patient accepted exceptionally well. This entire process gives certainty in the end result.

Milling the Complete F/F Dentures

Ivotion offers either a 2-step milling process where the denture base and denture teeth are milled separately and then bonded together OR a bicolor disc that comes with both base and tooth acrylic pre-bonded in one disc. This is called Ivotion.

Ivoclar has performed several studies on the hardness of the 2-step milling process, so based on this research, the bicolor disc was the milling method used for this patient case. 

Using this disc, we performed quarterly, half-yearly, and yearly reviews to test material strength and report on clinical findings of the bicolor material as a long-term complete denture acrylic. 

Bicolor ‘Ivotion’ milled dentures are monolithic - meaning that any anatomical effects, light refraction, and anatomical form come from cutting into the acrylic to characterize the teeth individually. This would be a subtractive method for achieving characterization. 

There are also additive methods of staining the denture teeth or base. However, these stains require a final layer of a clear acrylic coating to help seal the stains. These layers can in time, chip off.

Being a Clinical Dental Technician, you pick which case warrants each method. For this particular case, a subtractive method was used, and the dentures were simply polished. 

Fitting the Milled Denture

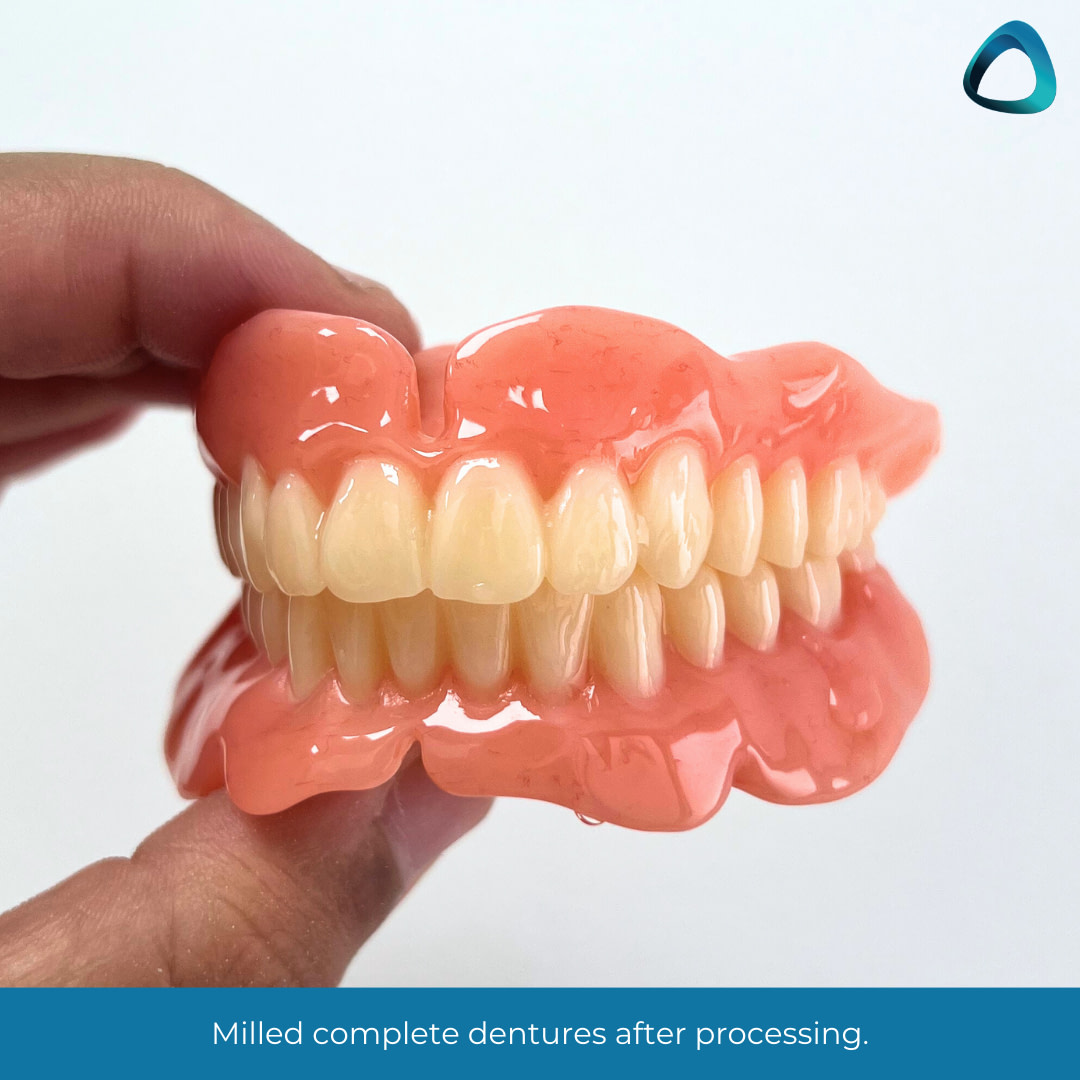
At insert, the dentures fit perfectly. It is a well-researched phenomenon that milled complete dentures offer greater suction than conventional or 3D printed dentures, but to observe this chair-side is magic. 

The patient was thrilled to have a new smile, which we could keep consistently from try-in through to finish. This meant that the patient could see what their dentures would be like in the mouth at try-in and that the final product she received at fit was the same. 

No adjustments were needed as the dentures were comfortable for the patient, and the bite in centric relation was verifiable and constant. 

Following the denture insert, a 24-hour follow-up phone call was made. 

Follow-up Review

The patient reported no discomfort and continued well with her daily life with the dentures. The only note the patient brought up was the mention of feeling ‘more teeth’ in the mouth due to a worn previous F/F. 

At a 1-week review, the patient had no ulcers, the fit was still the same as at insert, the bite was once again verified, and the patient stated she was very satisfied with both upper and lower dentures.

Insights as a Clinical Dental Technician

This case, to me, was evidence of how far digital dentures have come. 

Incorporating it into my daily practice is something I would not have thought was possible a few years ago. Now, it is another tool I have up my sleeve for when a person walks through the door and needs new dentures that mimic their current ones. 

Every patient is different. 

Every clinician is different. 

But with technology like this, the results stay the same - from bite to try-in to finish. Consistency never looked so good.


Do you implement digital dentistry with your edentulous patients?

Let us know in the comments below what your workflow is like.

Read More
Expos, News

Chicago Midwinter Meeting – Lab Day Overview 2023!

The Chicago Midwinter Meeting is one of the premiere dental events in the world, with many companies using this opportunity to show case some of the latest tech in dentistry.

Our friend Anne Koelzer attended the event and wrote about her experience. 

If you attended, let us know what you thought of it in the comments below!

About the Author

Anne Koelzer CDT

Coming from a family of dentists, Anne decided to put her artistic ability to use and opened AMK Dental Laboratory in 2014. Anne built her lab and is a full service laboratory serving in the heartland of Nebraska and in 2018, Anne switched her lab to fully digital. Living in rural Nebraska hasn't stopped Anne from taking advantage of technology, she is able to keep all her rural doctors up to date on the newest dental technology that is available to them and is also able to work with dentists throughout the states to help give their patients the best restorations possible.

There was a lot of excitement coming into Chicago Lab day 2023,  as it's the first lab day since 2020 with no COVID restrictions!  The atmosphere was building as a record number of people were slated to attend - and the companies presenting would surely be feeling the excitement.  They were ready to release and showcase new equipment, software and materials to help revolutionize our always developing dental industry.  As I attended lectures and walked the show room floors, 2 major things jumped out at me, 3D printers and resins. 

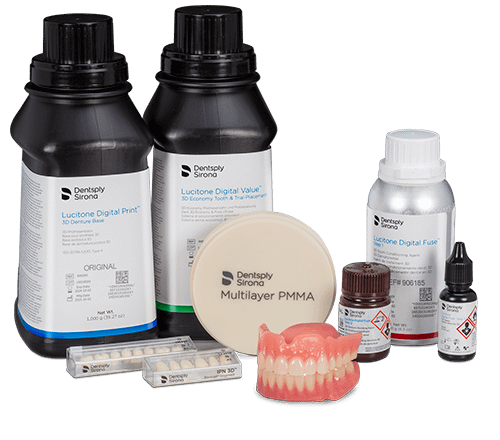
Lucitone Digital Print 

We are all familiar with Dentsply’s famous and dependable Lucitone 199 denture material, well, this resin is now in a 3D print material that is a high impact material. It comes in a base material and they have also been able to get their highly characterized IPN denture teeth into a resin and the tooth library is available in 3shape.  The base material is available in shades light to dark pink and the digital IPN - premium tooth with translucency and esthetic detail expected in premium denture teeth - and lucitone digital value used for economy teeth and for your prototypesf.  Lucitone Digital print can be used in the Carbon, Asiga printers and of course, Primeprint.

On the topic of the Asiga Printers, another great denture base that can be used in the Asiga printer is the Printodent GR-14.2 or Printodent GR-14.2 denture HI denture base.  This resin is from Pro3Dure Medical, who have burst onto the dental scene with all their high quality dental resins.  

The denture base is a biocompatible high impact resin that has outstanding chemical/physical properties and low viscosity to allow for an efficient printing process and easy cleaning.  This denture base is strong and beautiful at the same time and the shades of the resins are very realistic and the rest of their resins are some of most premium products in the dental field, especially their GR-22 Flex material.  This is a biocompatible resin for splints and nightguards.  

The Asiga printer isn’t the only printer that can print the Pro3Dure materials.  The Prusa Medical One printer is an ultra-fast 3D printer  that delivers a high production of detailed and precise prints.  This printer and its post processing unit are very affordable and great for dental offices and dental labs. This printer is in cooperation with Pro3Dure and can print all of their resins and is open to 3rd party materials. 

CPD-100 3D Printer by Aidite

The CPD-100 is a new 3D printer from the company Aidite! This company is well known for its zirconia and now it seems they are making their way into the printer market. A sign of the times. This printer is said to be specifically developed and designed for dental prosthodontics and implants. 

Prusa Medical One 3D Printer and the Pro3dure resins

This company started out as a medical company and moved into dentistry in 2019.  The printer is a great desktop printer, that seems super sturdy and has very little issues.  It supports all the Pro3dure resins. One of my favorite materials I use from these guys are the Thermeo nightguard material and the Printodent GR-22 Flex material.  I just tested out their high impact denture resin and it is a great 3D printed base resin

Stratasys J3 and J5 3D printer

One of the coolest printer that I saw at lab day was Stratasys J5 DentaJet. It's a compact, lab- friendly environment and multi- material printer that is like having 3 different printers in one.  You can have a rigid dental model, a surgical guide or a castable material all in one print.  The most interesting feature of the printer is that, you can print a multi colored single rigid denture. This technology is revolutionizing digital dentures and 3D printing all in one.

DS Core 

Dentsply Sirona’s cloud base platform allows for doctors to automatically have their intraoral scans, CBCT scans and with an open system any other patient data can be added to their file on “the cloud”.  This also allows them to send even more information to labs so they can better provide the dentist and patient with the best product.  The dentist will also be able to select their lab that they want to send their cases to. DS Core is essentially the new connect case portal for both dentists and labs once it is all finished with a lot more options for both clinicians and labs. Nice to see Dentsply finally offering a cloud solution!

Smile Line Optishade

A camera that you hook up to your phone and then take a picture of a tooth. Once the picture is taken it will shade match the rest of the teeth and give you a recipe of how to build the tooth, what shade of material to use and what shades of glaze to use. Neat!

And thats some of our top picks! 

As you can see digital dentistry and especially printing is dominating almost every conference / trade show. Is is an exciting time for the industry! 

Leave your comments or questions below 🙂

Read More
3D Printing

The Uses of 3D Printed Restorations in a Dental Practice

3D printing is the next big thing to happen in dentistry. 

And it's not hard to see why. 

3D printing allows you to take complete control of your clinical workflow, save massive amounts of money on your lab bill and offer a variety of treatments for your patients. 

And when you consider that companies like Sprintray are making it easier than ever to implement 3D printing crowns and bridges in your clinic, it's clear that the sky is the limit for 3D printing.

Dr Wally Rene wrote an excellent FB post about how he uses 3D printing in his clinic, and allowed us to share it below. 

Enjoy!

About the Author

Dr Wally Rene

Dr. Renne left an academic position as full Professor and Assistant Dean of Innovation and Digital Dentistry at the Medical University of South Carolina to start a training center in Charleston South Carolina called The MOD Institute. He has won several national and regional teaching awards for his efforts both pre-clinically and clinically. He is passionate about 3D printing in dentistry with has over 20 printers in his clinic including FDM, SLA, DLP, LCD and SLF. He is also active in dental research and has published several studies on scan accuracy and milling accuracy using various systems.

We need to have an open honest discussion about 3D printed restorations. I have been printing definitive inlay, onlay, veneers and crowns for the past 28 months or so. I have just over 1000 restorations (mostly veneers, implant crowns and partial coverage onlays) and have had 2 fractures and no debonds in this time.

More importantly we have dramatically increased the quality of care for our patients. I will explain my reasoning for adopting these and some limitations as well. 

Please let me take a moment to explain the difference between these materials, direct resin and milled resin like Tetric CAD, Cerasmart and the dreaded Lava Ultimate. I'd like to show you how I use these restorations in my dental clinic.

Printed Restorations for Conservative Partial Coverage

Printed restorations are a way to do conservative indirect quadrants of inlays and onlays. A major upgrade to larger direct resins. Direct resins are great in certain indications however when they get large they become technique sensitive and are quite poor as a restorative solution.

“Every time you add another surface to a direct resin, failure rate increases by 30-40%” (1). We also know from a recent systematic review and Meta analysis that indirect onlay restorations made of resin perform with the same success as ceramic, both dramatically better compared to direct resin(2).

Two of the main reasons direct resins perform poorly is they have a poor degree of polymerization with around a 50% methacrylate conversion (3) and when they are cured in a tooth a large amount of force is placed on the tooth and adhesive layer due to polymerization shrinkage stress(4).

Contrastingly, printed resins when properly cured can have up to 95% degree of polymerization (5) which explains the better wear characteristics (6,7,8) and we know indirect resins like printed restorations reduce shrinkage stress imparted on the tooth to almost zero(4).

It is a travesty in the USA that only 6% of dentist treatment plan inlays and onlays. This is largely due to cost of lab bills, difficulty temping and large cost of mills to make this single visit.

Our patients deserve options.

In Latin America, Europe and Asia more partial coverage indirect restorations are done then full coverage crowns. Not everything should be a filling or a crown, with nothing in between. I believe 3D printing will bring more conservative partial coverage to mainstream dentistry. It is certainly my favorite use of these printed restorations.

Based off of this and other evidence and following my printed restorations over time I charge the same for a printed onlay or inlay as I do for a ceramic onlay and inlay. I am confident this is a great indication for these restorations.

NOTE: You have to understand adhesive dentistry and partial coverage preparation for these to be nice.

Printed Implant Crowns

Another major application for me is implant crowns. Philosophically making implant crowns out of a polymer resin makes sense because implants lack a PDL space and the ability to absorb impact (9-17).

This is opposite to the trend of making implant crowns out of zirconia. Natural teeth wear and are dynamic. Zirconia doesn’t wear at all, it is the immovable rock in the mouth. This can lead to hyper occlusion over time that may potentially result in implant failure (18-20).

We have high level of evidence that shows that 50% of all implant crowns next to a natural tooth end up with an open contact(21).

With printed, you can simply unscrew the crown, sandblast the contact,  add resin and cure. Milled composite was promised as an ideal material in these indications but failed through debonding.

Interestingly, composite crowns on implants manufactured using packable composite manufactured by Bicon as the integrated abutment crown have great clinical success(22). This is because milled resin in contrast to direct resin and printed resin is completely devoid of free methacrylate to bond to and they suffer from debonding (23).

Studies show the bond to printed resin is not only tenacious but actually increases over time (24).

Based off this and other evidence and my clincial knowledge, I charge the same for a printed implant crown as I do for a ceramic implant crown.

NOTE: you have to understand how to finish and bond the printed restorations for them to be nice solutions.

Printed Veneers

I love this application and use it almost daily in my practice as a lower cost alternative to ceramic. I still do plenty of ceramic veneers but printing has enabled me to do more conservative veneers on patients that normally wouldn’t have been able to afford veneers.

I no longer do direct resin veneers.  I charge half the cost for a printed veneer as I do for ceramic. They take me half the time to do. I do them single visit because 10 veneers can be printed in 10 minutes.

NOTE: You have to know how to properly finish them or they look bad and don’t hold up.

Reduced Crown Cost

Lastly I use them as a lower cost crown.

Theoretically you could charge full price with the new (ADA) code update. But for my practice I offer them at a lower cost. This comes in handy for me when treating low income patients or even high income patients that need phased treatment.

For example with full mouth reconstructions, often I will do one arch in zirconia and the other in printed to buy them 5 or so years to slowly convert the remaining units to zirconia or emax.

This enables me to still do both arches and not have to compromise occlusion by treatment of one arch only.  Studies show that when opposing zirconia printed teeth wear less then even premium carded denture teeth.

References - further reading!

  1. Opdam NJ, van de Sande FH, Bronkhorst E, Cenci MS, Bottenberg P, Pallesen U, Gaengler P, Lindberg A, Huysmans MC, van Dijken JW. Longevity of posterior composite restorations: a systematic review and meta-analysis. J Dent Res. 2014 Oct;93(10):943-9. doi: 10.1177/0022034514544217. Epub 2014 Jul 21. PMID: 25048250; PMCID: PMC4293707.
  2. Bustamante-Hernández N, Montiel-Company JM, Bellot-Arcís C, Mañes-Ferrer JF, Solá-Ruíz MF, Agustín-Panadero R, Fernández-Estevan L. Clinical Behavior of Ceramic, Hybrid and Composite Onlays. A Systematic Review and Meta-Analysis. Int J Environ Res Public Health. 2020 Oct 19;17(20):7582. doi: 10.3390/ijerph17207582. PMID: 33086485; PMCID: PMC7589045.
  3. David C, Cuevas-Suárez CE, de Cardoso GC, Isolan CP, de Moraes RR, da Rosa W, Münchow EA, da Silva AF. Characterization of Contemporary Conventional, Bulk-fill, and Self-adhesive Resin Composite Materials. Oper Dent. 2022 Jul 1;47(4):392-402. doi: 10.2341/21-063-L. PMID: 35917238.
  4. Dejak B, Młotkowski A. A comparison of stresses in molar teeth restored with inlays and direct restorations, including polymerization shrinkage of composite resin and tooth loading during mastication. Dent Mater. 2015 Mar;31(3):e77-87. doi: 10.1016/j.dental.2014.11.016. Epub 2014 Dec 24. PMID: 25544104.
  5. Lee SY, Lim JH, Kim D, Lee DH, Kim SG, Kim JE. Evaluation of the color stability of 3D printed resin according to the oxygen inhibition effect and temperature difference in the post-polymerization process. J Mech Behav Biomed Mater. 2022 Oct 23;136:105537.
  6. Myagmar G, Lee JH, Ahn JS, Yeo IL, Yoon HI, Han JS. Wear of 3D printed and CAD/CAM milled interim resin materials after chewing simulation. J Adv Prosthodont. 2021 Jun;13(3):144-151.
  7. Gad MM, Alalawi H, Akhtar S, Al-Ghamdi R, Alghamdi R, Al-Jefri A, Al-Qarni FD. Strength and Wear Behavior of Three-Dimensional Printed and Prefabricated Denture Teeth: An In Vitro Comparative Analysis. Eur J Dent. 2023 Jan 20. doi: 10.1055/s-0042-1759885. Epub ahead of print. PMID: 36669653.
  8. Pham DM, Gonzalez MD, Ontiveros JC, Kasper FK, Frey GN, Belles DM. Wear Resistance of 3D Printed and Prefabricated Denture Teeth Opposing Zirconia. J Prosthodont. 2021 Dec;30(9):804-810. doi: 10.1111/jopr.13339. Epub 2021 Feb 11. PMID: 33486808.
  9. Boff LL, Oderich E, Cardoso AC, Magne P. Fatigue resistance and failure mode of adhesively restored custom metal-composite resin premolar implant abutments. Int J Oral Maxillofac Implants. 2014 Mar-Apr;29(2):364-73. doi: 10.11607/jomi.2836. PMID: 24683562.
  10. Bonfante EA, Suzuki M, Lubelski W, Thompson VP, de Carvalho RM, Witek L, Coelho PG. Abutment design for implant-supported indirect composite molar crowns: reliability and fractography. J Prosthodont. 2012 Dec;21(8):596-603. doi: 10.1111/j.1532-849X.2012.00872.x. Epub 2012 Jun 1. PMID: 22672650.
  11. Rosentritt M, Schneider-Feyrer S, Behr M, Preis V. In Vitro Shock Absorption Tests on Implant-Supported Crowns: Influence of Crown Materials and Luting Agents. Int J Oral Maxillofac Implants. 2018 January/February;33(1):116–122. doi: 10.11607/jomi.5463. Epub 2017 May 18. PMID: 28518187.
  12. Cantó-Navés O, Medina-Galvez R, Marimon X, Ferrer M, Figueras-Álvarez Ó, Cabratosa-Termes J. A 3D Finite Element Analysis Model of Single Implant-Supported Prosthesis under Dynamic Impact Loading for Evaluation of Stress in the Crown, Abutment and Cortical Bone Using Different Rehabilitation Materials. Materials (Basel). 2021 Jun 24;14(13):3519. doi: 10.3390/ma14133519. PMID: 34202625; PMCID: PMC8269525.
  13. Karaer O, Yamaguchi S, Imazato S, Terzioglu H. In Silico Finite Element Analysis of Implant-Supported CAD-CAM Resin Composite Crowns. J Prosthodont. 2022 May 4. doi: 10.1111/jopr.13531. Epub ahead of print. PMID: 35509150.
  14. Taguchi K, Komine F, Fushiki R, Blatz MB, Kamio S, Matsumura H. Fracture resistance of single-tooth implant-supported zirconia-based indirect composite-layered molar restorations. Clin Oral Implants Res. 2014 Aug;25(8):983-91. doi: 10.1111/clr.12199. Epub 2013 Jun 3. PMID: 23730807
  15. Elsayed A, Yazigi C, Kern M, Chaar MS. Mechanical behavior of nano-hybrid composite in comparison to lithium disilicate as posterior cement-retained implant-supported crowns restoring different abutments. Dent Mater. 2021 Aug;37(8):e435-e442. doi: 10.1016/j.dental.2021.03.015. Epub 2021 Apr 17. PMID: 33875247.
  16. Bijjargi S, Chowdhary R. Stress dissipation in the bone through various crown materials of dental implant restoration: a 2-D finite element analysis. J Investig Clin Dent. 2013 Aug;4(3):172-7. doi: 10.1111/j.2041-1626.2012.00149.x. Epub 2012 Nov 21. PMID: 23172842.
  17. Magne P, Silva M, Oderich E, Boff LL, Enciso R. Damping behavior of implant-supported restorations. Clin Oral Implants Res. 2013 Feb;24(2):143-8. doi: 10.1111/j.1600-0501.2011.02311.x. Epub 2011 Oct 3. PMID: 22092518.
  18. Bertolini MM, Del Bel Cury AA, Pizzoloto L, Acapa IRH, Shibli JA, Bordin D. Does traumatic occlusal forces lead to peri-implant bone loss? A systematic review. Braz Oral Res. 2019 Sep 30;33(suppl 1):e069. doi: 10.1590/1807-3107bor-2019.vol33.0069. PMID: 31576953.
  19. Di Fiore A, Montagner M, Sivolella S, Stellini E, Yilmaz B, Brunello G. Peri-Implant Bone Loss and Overload: A Systematic Review Focusing on Occlusal Analysis through Digital and Analogic Methods. J Clin Med. 2022 Aug 17;11(16):4812. doi: 10.3390/jcm11164812. PMID: 36013048; PMCID: PMC9409652.
  20. Brune A, Stiesch M, Eisenburger M, Greuling A. The effect of different occlusal contact situations on peri-implant bone stress - A contact finite element analysis of indirect axial loading. Mater Sci Eng C Mater Biol Appl. 2019 Jun;99:367-373. doi: 10.1016/j.msec.2019.01.104. Epub 2019 Jan 30. PMID: 30889710.
  21. Bento VAA, Gomes JML, Lemos CAA, Limirio JPJO, Rosa CDDRD, Pellizzer EP. Prevalence of proximal contact loss between implant-supported prostheses and adjacent natural teeth: A systematic review and meta-analysis. J Prosthet Dent. 2021 Jul 19:S0022-3913(21)00333-4. doi: 10.1016/j.prosdent.2021.05.025. Epub ahead of print. PMID: 34294422.
  22. Urdaneta RA, Marincola M, Weed M, Chuang SK. A screwless and cementless technique for the restoration of single-tooth implants: a retrospective cohort study. J Prosthodont. 2008 Oct;17(7):562-71. doi: 10.1111/j.1532-849X.2008.00343.x. Epub 2008 Aug 26. PMID: 18761575.
  23. Wierichs RJ, Kramer EJ, Reiss B, Schwendicke F, Krois J, Meyer-Lueckel H, Wolf TG. A prospective, multi-center, practice-based cohort study on all-ceramic crowns. Dent Mater. 2021 Aug;37(8):1273-1282. doi: 10.1016/j.dental.2021.04.005. Epub 2021 May 7. PMID: 33972099.
  24. Lankes V, Reymus M, Liebermann A, Stawarczyk B. Bond strength between temporary 3D printable resin and conventional resin composite: influence of cleaning methods and air-abrasion parameters. (Clinical Oral Investigations 2022; doi.org/10.1007/s00784-022-04800-7)


Read More
Intraoral Scanner Reviews, Ivoclar, News

First Impressions of the VivaScan – Ivoclar’s First Ever Intraoral Scanner

The intraoral scanner market is more competitive than it's ever been, and a new player has just entered the arena.

The VivaScan is Ivoclar Vivadent's very first intraoral scanner.

The VivaScan is a standalone IOS that's is said to be easily integrated into your clinical workflow. It's a fairly standard scanner, with plug and play functionality, a lightweight ergonomic design, two tip sizes and an integrated HD camera. 

Note: Our friend Dr Antonino Cacioppo published this on Facebook and allowed us to repost it on our blog. 

About the Author

Dr Antonino Cacioppo

Dr Antonino is a private practitioner in Palermo (Italy) using digital dentistry and in particular with 2D and 3D dental radio diagnostics, in office CAD-CAM systems, 3D printing, digital prostheses and guided implantology.

He is also the author of 17 international publications, co-author and contributor to specialized books, speaker at numerous national and international conferences, and a KOL for multiple companies in the sector (FormLabs, Zeiss, Teethan, DentsplySirona, Oxy Implant, Faro, Medit).

So, safe to say he knows what he's talking about! 

We hope you enjoy the overview, if you'd like to see all the latest intraoral scanner reviews click here!


Background on Ivoclar

Ivoclar is a global leader in innovative materials and processes for dental technology and dentistry. The company is family-owned since it was founded in 1923. The headquarters of Ivoclar are located in Liechtenstein, and the company has over 3,500 employees worldwide.

Ivoclar offers a wide range of products and services for the dental industry, including dental ceramics, digital dentistry solutions, implants, and orthodontic appliances. The company is committed to innovation, quality, and customer satisfaction, and is continuously developing new products and technologies to meet the changing needs of the dental market.

Ivoclar has a global presence, with subsidiaries and distribution partners in over 130 countries. The company has a strong focus on research and development, frequently collaborating with major universities and dental experts around the world.

Their most recent release an intraoral scanner called the Vivascan was launched last year. 

Many of you may realise that this is a cooperation with Planmeca and in-fact is an Emerald S Scanner white labeled.

VivaScan by Ivoclar Overview by Dr Cacioppo

Here is an early insight into the VivaScan, the first intraoral scanner by Ivoclar. A friend gave me the opportunity to test this new scanner and what did I do? I put it in a live course right away!

I also tested it next to 10 other IOS (including the big and most popular ones at the moment) on an implant patient and then tested it on 12 trainees so I could get feedback immediately.... and above all many meshes to analyze.

VivaScan Intraoral Scanner Features

We were all amazed by the result of the tests. Starting with the hardware, which was already seen on Emerald and Emerald S (it’s a project between Planmeca and Ivoclar) it’s very well made, ergonomic, light and balanced.

The scanner tips are interchangeable and heated tips come in two sizes. The two physical buttons allow you to activate certain functions quickly, and if pressed together they activate the 3D gyroscope/mouse.

The hardware feature I like the most is connectivity: USB (C on one side and A on the other). It's self-powered, so no power supply or cable needed - quite similar to Medit.

How the VivaScan by Ivoclar behaves in the mouth

Well firstly, the scan is very fluid on both hard and soft tissues. Absolutely doesn't take double images. No particular issues in the nearby areas (obviously using an appropriate scan strategy) and no particular issues on scan-bodies.

It's incredible on the soft palate: I've never seen a scanner almost reach the corner without any effort and without ever losing its scan stitching!

On the software side of things: everything is very basic. Let’s say that to date it’s an “optical fingerprint”, meaning it just acquires data and makes a digital impression.

There are currently very few tools, however we know, an update is enough to turn everything upside down (let’s just hope that the company understands well what an optical scanner is and what it needs).

The scanner enables very quick rendering and meshes cleaned up nicely. The algorithms - although not great - work well and fluently. Everything is what you would expect from any modern intraoral scanner.

Get The Most Out Of Your Intraoral Scanner

Do you have a scanning strategy?
Intraoral scanning increases your efficiency, even with basic knowledge, but what if you knew the strategy to maximize your accuracy and optimize your time spent?

This course holds the secrets.... and it's FREE!

An unusual feature of the VivaScan

Something that I was quite surprised about - that I hope many other companies take note and implement - is the unlimited acquisition folders and importance placed on user experience.

Essentially, the operator can choose how many upper arch acquisition, how many inferior, how many buccal bites, etc  and place them in the order you like the most.

Unfortunately, to achieve perfection the possibility to "copy" an acquisition from one folder to another is missing.... but as I have already written above all you need is a software update and that can be changed. 

The mesh is fairly dense and well distributed triangles. However, I find them too "uniformed" and with an unreasonable tiling. However, it's important to remember that this project is in its infancy, and a software update is all that's needed to fix many of these issues.

Pros and Cons of the VivaScan by Ivoclar

Here's what I enjoyed about the VivaScan by Ivoclar:

  • Self powered USB cable.
  • Ergonomic and lightweight
  • Multiple “infinite” acquisition folders.

What I didn't like:

  • Preview with dark colors and “noisy” images
  • Lack of valid AI algorithms and active filtering
  • Too uniform triangles

VivaScan by Ivoclar Conclusion

Overall, I think this is a pretty good first effort by Ivoclar. While it definitely needs some work done to it, and a substantial software update, all the makings of a great intraoral scanner are there. 

If the company puts significant time and effort into making this a great scanner, I can see this being a great option for dentists. With that said, it will certainly take a lot of time, effort and money on Ivoclar's part to get this scanner competing with industry heavyweights.


What are your thoughts about the Vivascan? Leave your comments below!


Read More