When I completed my Bachelor of Dental Technology, I was taught that “proper tooth preparation is key to successful restorations.”
And after graduating, my first graduate role as a dental technician was in a CAD/CAM crown and bridge dental lab.
Now let me tell you… I’ve seen my fair share of tooth preps digitally and through PVS impressions, some of which were almost perfect, and some... not so much.
As dentists, you likely spend lots of time and effort on getting your preps “just right” before taking the impression or scanning for dental technicians to come right back with a lab saying: “Please redo impression/scan.”
But what does “just right” really mean when it comes to ideal prep dimensions and form?
One word.
Round.
I know that seems overly simplified, but let me explain why rounded preps are so crucial for both teeth and restorations. This matters for you, the dental technician, the lab, and most importantly, your patient.
Types of Tooth Preps
When creating a tooth preparation, you’ll use different depths, shapes, and margin designs depending on the planned restoration type and materials.
However, the universal goal should incorporate rounded line angles wherever possible.
Here’s a quick overview of common prep types and how to think about ideal contouring:
Crowns

For full-coverage restorations like crowns, preps typically require a 1.5-2mm circumferential reduction. This allows sufficient thickness for the final crown material.
Veneers
Unlike crowns, veneer preps only require a 0.3-0.7mm reduction since porcelain will be layered directly onto the facial surface. Focus on maintaining a rounded, U-shaped margin ending in a light chamfer or butt joint finish line.
Inlays/Onlays

Inlay and onlay preps demand rounded internal line angles within the conservative intracoronal prep to minimize stress points.
No matter the type of prep planned, incorporating rounded walls and transitions will always benefit the final restoration.
The key is choosing instrumentation to support the ideal internal contours matched to appropriate depth cuts and taper.
Common Prep Shapes and Margin Designs
When prepping a tooth, as a dentist, you’ll first decide on the overall shape based on location, planned restoration type, and adjacent teeth contours.
Here are a few options:
Oval
An oval outline is the most conservative and creates natural-looking restorations.
Tapered
Allowing more taper (10-20 degrees) yields greater crown retention.
Square
Blocky preparations provide maximal stiffness but should still exhibit rounded internal line angles.
U-Shaped
Ideal for anterior veneers to conserve incisal edges and proximal contacts. Creates a continuous marginal chamfer for bonding.
Rounded Triangle
Useful for posterior bridge abutments and onlays needing extra resistance and retention.
iDD Tip: Think of a smooth continuity between walls, floor, and margin when prepping any of these shapes.
Margin Designs
The margin design describes the interface transition between the restoration and the tooth. This is what your dental technician will be most concerned about when receiving an impression.

From: Minimal invasive microscopic tooth preparation in esthetic restoration: a specialist consensus
Chamfer
A broad bevel following the gingival contour.
Shoulder
A 90-degree cavosurface angle. A shoulder bevel usually follows a rounded junction.
Butt joint
There is no angular interface; instead, the restoration extends directly from the tooth. A butt joint creates a sealed interface, so bevel lightly.
Feather-Edge
An ultra-conservative fading out of enamel. It is very technique-sensitive, so you will most likely use intense magnification.
Rounded shoulders, chamfers, and butt joints are generally the easiest to implement while still protecting the margin.
The mantra remains the same: rounded, smooth transitions.
So, Why a Rounded Tooth Prep?
When we talk about a “rounded prep,” what exactly does that mean?
Essentially, it refers to creating a tooth preparation with no sharp line angles or corners. All borders should have a smooth, curved transition. Hence, rounded. This applies to both the gingival floor and the walls encircling the prep.
Why Are Rounded Preps Better Biologically?
There are two primary biological benefits to rounding off your preps:
- Reduced stress on the tooth itself
- Healthier gingival response
Let’s explore both of these factors further.
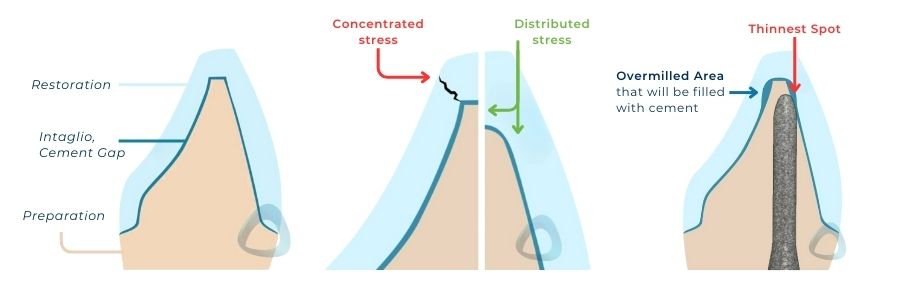
First, enamel and dentin contain microscopic prisms that follow the contours of the tooth. When you create sharp line angles in the tooth structure during prep, these prisms are abruptly severed, creating points of stress concentration. That interferes with the biomechanical integrity of the remaining tooth structure.
Rounded preps, in contrast, do minimal damage to prism orientation and produce lower stress forces. This better preserves the longevity of the tooth.
The second benefit is healthier gums. Sharp prep corners create plaque-retentive areas that can irritate gingival tissues. Rounded preps allow smooth, gradual contours that encourage good oral hygiene and less gingival inflammation.
Clearly, rounding off margins is in the best interest of tooth and gum health.
Learn more about modern tooth preparation and margination in our free online course! Available through our Free Academy.
Why Do Rounded Preps Yield Better Restorations?
There are also quite a few technical reasons why rounded preps facilitate better restorations, including (but not limited to):
- Improved marginal seal & retention
- Reduced marginal chipping & fracture
- Enhanced esthetics
- Increased patient comfort & occlusion
First, rounded preps offer enhanced marginal integrity between the restoration and tooth surface.
Why?
Because there is more surface area for bonding. The longer transition between tooth and restoration also allows for flexibility under occlusal function, preventing cracks or gaps over time.
Next, rounded preps greatly minimize stress forces transferred to restoration margins—restorations placed in sharp-angled preps often chip or fracture at those corners. Gradual contours dampen that force. This explains why both ceramic and composite restorations tend to last longer when preps are nicely rounded.
As for aesthetics, rounded preps prevent unnatural-looking “steps” between tooth structure and restoration material, creating a seamless color and shape transition.
Finally, rounding prep line angles keeps the restoration margin from occlusion and avoids irritating patients’ cheeks or tongues with sharp corners.
That’s a big plus for comfort, so your patients will thank you.
Clearly, properly contoured preps translate to restorations that look good, last longer, and feel comfortable for patients.
How Can I Achieve Rounded Preps?
If you’ve read this far, hopefully you’re convinced of why rounded preps matter!
But what’s the best way to achieve them? Here are some tips:
- Use appropriate burs - oval or U-shaped diamond or carbide burs make rounded preps easier.
- Prep deeper axially - this exposes more circumferential enamel for rounding walls and avoids undermined dentin near margins.
- Bevel enamel margins – beveling creates a butt joint for margins, eliminating line angles. Remember to contour bevels to follow the oval bur shape.
- Use slow speed rotation - high speeds generate heat, pressure, and vibration that end up damaging rounded edges back to sharp corners. So take your time and go slow.
- Magnification & illumination – get close up with dental loupes, indirect vision, and focused lighting. Precision comes from seeing exactly where you’re cutting.
It’s also wise to take impressions, photos, or scans of preps and review their shape closely before finalizing.


Learn more about modern tooth preparation and margination in our free online course! Available through our Free Academy.
Conclusion
While achieving the “perfect” rounded prep takes substantial practice and skill, refining this vital technique is worth refining.
Giving restorations an ideal foundation through properly rounded preps directly translates to improved clinical success and longevity.
Your dental technician and more importantly, your patients, will thank you!

