Digital impressions have come a long way in the last ten years.
While the scanners available continue to get cheaper, faster and more user-friendly, there are some crucial mistakes that are commonly made. Understanding these mistakes and how to avoid them can significantly lower your costs, remakes and frustration. Often the difference between a successful case and a challenging remake is just one or two small, relatively simple adjustments.
We collaborated with Micah Talbert – Chief Operating Officer at Digital Dental Leaders – an all-digital lab in the USA, to make this blog. DDL has received and processed over 200,000 digital scans from a large variety of intraoral scanners, so they have had extensive exposure to common digital workflow mistakes, and how to remedy them.
Is your practice making any of these mistakes?
Mistake # 1: Adjacent contacts that are not parallel and smooth
One of the most common remake issues in most labs is open or light contacts.
A lab can nail everything - the esthetics, fit, shade, occlusion - but a slightly light or open contact means another week or two of waiting, another patient appointment, and more chair time for the doctor seating the remake crown a second time.
While there are a lot of things that could contribute to a light contact, we regularly see this being caused by non-ideal adjacent contacts. Adjacent contacts that are are pin-point, not parallel or are irregularly shaped greatly increases the likelihood of an open contact.
The Solution? Make inspecting and adjusting the adjacent contacts part of your normal workflow.
If the contact is far back in the mouth and difficult to inspect, take a quick scan and inspect the scan. Ensure the adjacent contacts are parallel with the prep and with each other for draw and breadth.
Here are some tips:
- First, adjust with a fine, parallel diamond as if prepping abutments to draw for a bridge. (Ortho teaches that removing up to .25mm of enamel is safe).
- Second, smooth with a fine, parallel, non-criscut carbide for keeping the draw and breadth but cleaning up the micro scratches from the fine diamond.

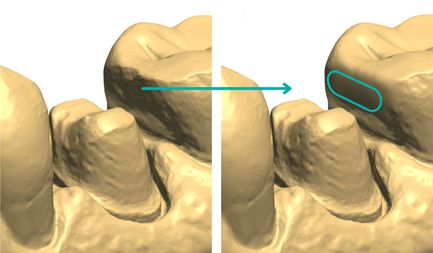
Doing this will allow for better draw, better crown design, and fewer open contact remakes - and all it requires is a couple of minutes spent checking and adjusting before taking the final scan.
Mistake # 2: Insufficient tissue retraction
Being able to clearly identify the margins is one of the most important steps for any restoration.
Some clinics may have had a previous tendency to rely on PVS impressions to push the tissue out of the way. Whatever the reason, this is a very common mistake.
Properly retracting tissue to reveal a clear margin takes some extra time, but it often is the difference between a successful case and a remake - or a non-ideal marginal fit that leads to decay and poor results for the patient.
The Solution? Make sure you do some form of tissue traction - for example pack retraction cord.
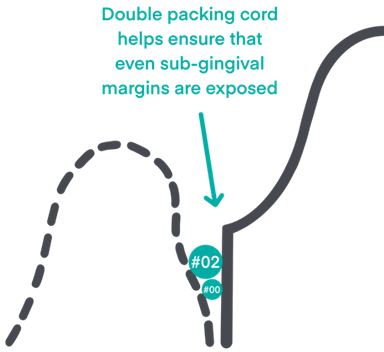
Always evaluate the scan briefly afterwards for marginal clarity. If tissue is obstructing the margin, pack another cord and then scan the area. Whatever you do, it is never recommended to just scan without using some form of gingival retraction. Even if you have a consertivate high margin prep line, it is often equi- or sub- ginigval in the interproximal areas.

Mistake # 3: A poorly designed preparation
Design and engineering win out over chemistry.
A well-designed preparation will outlast a poorly designed one that depends on adhesion from cementation. A poorly designed preparation will often lead to premature fracture as well.
Undercuts on the preparation can create seating issues. A feather edge margin can lead to fracture, and sharp edges on the prep compromise material strength.
The Solution? a well-designed preparation.
- Parallel walls
- The goal is to have nearly parallel walls; be careful of undercuts!
- Taper the walls between 4° and 8°.
- Chamfer shoulder margin (in most cases)
- This gives the crown a “shelf” to sit on that is much more structurally sound
- Reduces the chances of premature fracture

- Rounded edges
- Sharp edges on the preparation create design challenges and compromise material strength.

Mistake # 4: Incorrect Bite
A compromised bite makes it very difficult to design the proper occlusion.
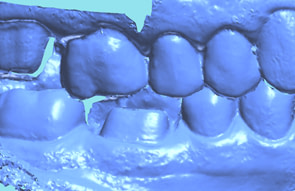
Scanners will sometimes snap the bite into place early making it appear that you’ve collected all the bite data you need. However, the bite will sometimes render incorrectly with minimal data, so capturing a complete bite scan with a little more data will make it far less likely there will be issues determining the bite during design.
The Solution? Take a full bite scan - or even better a bite on both sides.
- Finish the scan pattern rather than stopping early when the scanner snaps the bite into place.
- Verify the bite is correct by examining the scan after the case renders
Mistake # 5: Overscanning
Often a clinician will assume that the more data they can capture, the better.
However, every time you go back over a previously scanned area, you are adding more layers of data. The scanner software then tries to collate that data and come up with an average final result - which may or may not be accurate. This can lead to incorrect contacts, wrong occlusion or other issues in design.
The solution? Look up your scanner’s recommended scan pattern, and stick to it.
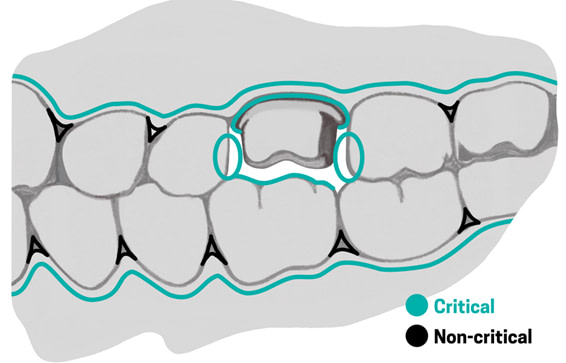
Understand critical scan areas (like the prep, adjacent contacts, etc) and slow down a bit when capturing those so you don’t have to go back over them multiple times.
Remember that it’s likely better to have a slightly incomplete scan than to have to go back over it multiple times trying to capture some tiny areas that weren’t captured the first time.
In Summary - Common Digital Impressions Mistakes and Solutions
- Mistake: Adjacent contacts that are not parallel, smooth, and broad
- Solution: Inspect and adjust contacts before your final scan on every case
- Mistake: Insufficient tissue retraction
- Solution: Pack retraction cord (double if you need to), inspect scanned margin before sending
- Mistake: A poorly designed preparation
- Solution:Shoulder margin, no undercuts, near-parallel walls, no sharp edges
- Mistake: Incorrect Bite
- Solution: Take a complete bite scan and check the bite after it renders
- Mistake: Overscanning
- Solution: Know and follow your scanner’s scan pattern. Understand the difference between critical and non-critical scan areas
Success in digital impressions ultimately comes down to attention to detail and following proven protocols. The five most common mistakes - inadequate adjacent contact preparation, insufficient tissue retraction, poor preparation design, incomplete bite registration, and overscanning - are all preventable with proper technique and workflow adjustments.
By taking a few extra minutes to inspect and adjust adjacent contacts, ensuring clear margins through proper tissue retraction, following established preparation guidelines, capturing complete bite data, and adhering to recommended scan patterns, clinicians can dramatically reduce remakes, increase efficiency, and improve patient outcomes.
The key is making these quality control steps part of your standard digital impression workflow rather than optional extras, transforming potential frustrations into consistent clinical successes.


I would like to take some classes
Check out our online courses here – https://instituteofdigitaldentistry.com/bundles/
What are you interested in?