When you start doing in-house milled restorations, it can be very stressful.
What is the best way to achieve an aesthetic restoration and one that fits perfectly without having to adjust contacts?
There are two main ways to process a milled restoration’s surface: mechanical polishing or staining and glazing.
Both these techniques have pros and cons, and in this article, we'll help you better understand what's best for your requirements.
Surface finishing
Surface finishing may involve polishing or staining and glazing and is the last step when processing your CAD/CAM restoration before cementation. This process will give your restoration a high-shine appearance, which is desirable for aesthetic and hygienic reasons.
A smooth restoration is essential. Bacteria doesn't adhere to a smooth surface nearly as much as a rough surface, and it is also easier to clean for your patient. On top of that, your restoration will have better long-term color stability as it doesn’t stain as much and won't collect plaque.
After all, surface micro-roughness is why composite fillings and acrylic dentures change over time – these materials are quite porous, and this surface porosity can only be somewhat polished. The surface finishing methods we will describe in this article apply to any dental ceramic material, as the core principles are identical across the entire industry.
Effect of Surface Finishing on Enamel Wear
But how does the choice of surface finishing affect the opposing teeth?
Many studies have been conducted regarding the enamel wear caused by dental ceramics in their polished and glazed form.
Most studies, such as this study from 2014, concluded that “wear of enamel opposing adjusted lithium disilicate and zirconia decreased following polishing [...] It is preferable to polish zirconia and lithium disilicate after adjustment to make them wear compatible with enamel.” Additionally, “veneering of zirconia and lithium disilicate should be avoided in areas of occlusal contact to prevent enamel wear.”
A similar study from 2013 focusing solely on zirconia came to a similar conclusion: polished zirconia is generally more wear-friendly to opposing teeth than glazed zirconia.
A study from 2016 came to the same idea, stating that “glazed materials are rougher than polished materials even when the glaze is applied to a polished material, causing notable wear” of the opposing enamel.
Interestingly, an in vitro study from 2019 came to quite a different conclusion: “glazed zirconia caused less wear on the antagonist compared to no finish and polished zirconia. In addition, no significant difference was found in the amount of antagonist wear for polished and control groups.”
So there seem to be some mixed messages going on, but for the most part, the industry agrees that polishing is generally better than glazing for the opposing dentition, especially if the glaze layer is adjusted. I will let you do further research if you wish and make the decision for yourself and your patients.
Polishing
Any dental material can be polished - metal, ceramic, acrylic, etc. The longest and oldest clinical studies back up the polishing method.
As mentioned before, the core principles when polishing any material is mostly the same, whether or not you’re polishing e.max for your final restoration or a Telio CAD to temporize your prep.
Mechanical polishing requires the sequential use of various polishers of different grit or coarseness, usually three levels – hard, medium, and soft.
The hardest, coarsest polisher is used to smooth the surface and remove any sprue remnants, as it removes the most material.
Medium and soft polishers refine this further until the desired finish is achieved.
For high-shine results, after polishing, you need to buffer the restoration. Buffing uses a diamond polishing paste (many dental companies sell this) with a bristle brush wheel or wool wheel.

An example of a zirconia polishing kit with a polishing paste as offered by the DiaShine company.
It’s crucial to use these polishers in the correct order, as using a medium polisher after a softer one would just roughen the smoother surface.

Refer to our online courses on Milling, Processing and Finishing Restorations where we cover both, polishing and glazing, the tools and workflows, benefits and application.
Some clinicians may find polishing easier as it is less technically demanding than staining and glazing. Keep in mind that it still requires patience because you need to ensure that every surface (except for the intaglio) is polished meticulously. This can take more time than glazing if done properly.
Typically the occlusal surface is trickier to polish. Fissures are notoriously difficult to reach with most polishers; flame-shaped polishers (or spiral wheels) are necessary.
The pointy tip of these polishers blunts very quickly, and you need to either replace them or keep sharpening them to a point using fine sandpaper, for example.
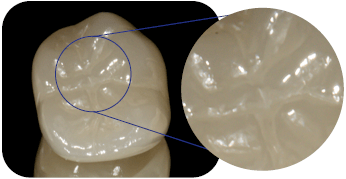
A polished multi-layered zirconia crown. In the occlusal close-up, you can see inadequately polished fissures that may get stained over time.
Using the correct polishers for each material is essential to polish it successfully. Harder materials are not necessarily harder to polish. Although zirconia is notoriously challenging to polish in the mouth to a high standard before cementation, it can be quite a straightfoward task outside the mouth if you use the correct tools.
It’s important to realize that when polishing, you are removing some material from the surface of the restoration. Be careful when polishing the occlusal and interproximal contact areas and around the margin.
Overzealous polishing of contact areas can result in open contacts, for example. Softer materials, like pre-crystallized silicate-based or resin-based ceramics, can easily become over-polished.
Additionally, temporary PMMA materials can burn if too much pressure is applied, which complicates the polishing process and might even result in warpage.
The biggest issue with polishing is poor aesthetics compared to good staining and glazing. CAD/CAM restorations are milled from monolithic blocks, but natural crowns are not monolithic – there is a color gradient, varying translucency, staining, enamel cracks, etc. Multilayered CAD/CAM blocks are available nowadays, and they might provide the color gradient and even the translucency gradient, but that’s usually not enough to make a crown look natural.
That said, polished partial coverage restorations such as inlays and onlays can blend seamlessly within the natural tooth structure when high-translucency ceramics are used (see below).
Mechanical polishing is generally recommended for posterior teeth only.

While the Tetric CAD inlays (37 and 34) were polished only, the IPS e.max CAD crowns were stained and glazed. Same-day case by Dr. Ahmad Al-Hassiny.
Glazing
Another method that will give your restorations a smooth and shiny finish is glazing, usually accompanied with staining or characterisation.
These terms are not interchangeable: glaze is a low-fusing glass liquid/paste applied all over restorations and produces a transparent, shiny layer.
Whereas stains are various pigments used to characterize the otherwise monolithic restorations.
Various glazing and staining kits are available nowadays, for example, IPS Ivocolor Starter Kit by Ivoclar or Universal Stain & Glaze Kit by Dentsply Sirona. Additionally, MiYo Esthetic System by Jensen Dental includes self-glazing stains which don’t require a separate transparent glaze.

Stain and glaze kits come in a wide range of colors to help you match the monolithic ceramic crowns to the existing natural teeth.
These kits are generally compatible with multiple types of ceramics. We find that you can use any dental stain and glaze kit for any ceramic kind, given that it can withstand high firing temperatures.
Therefore, resin-based hybrid ceramics (e.g., Cerasmart, Enamic, Tetric CAD, etc.) are incapable of being processed this way due to their high resin content. They are vaporized if placed in a ceramic furnace and are therefore characterized using light-cured glaze and stains (e.g., Lite Art by Shofu or Optiglaze Colour).
The stains (or shades) give a ceramic restoration its natural look. While layered restorations mirror natural tooth structures from within, stains imitate colors on the surface. With proper training and practice, it is possible to match a restoration to the rest of the dentition seamlessly.
We regularly do this for our same-day e.max crowns and larger cosmetic cases.
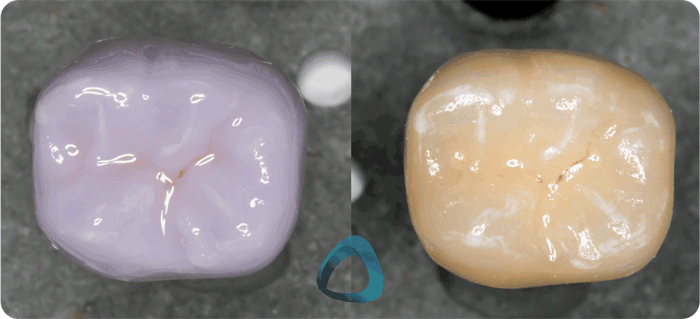
E.max CAD stained and glazed in its pre-crystallized state (left) and the same crown after one firing cycle (right). Staining and glazing like this takes around 10 mins prior firing.
Compared to polishing, staining is much more challenging to get right. When you first start, your first few restorations will likely look very ugly, as you will generally overdo it with stains or barely add anything at all.
Keep at it! You just need to learn a few basics to achieve a nice, natural-looking result. For example, blue-colored stains can help you imitate enamel translucency, which all dental ceramics struggle with.
Dentine shades can help you match the restoration with the adjacent teeth, darken it a bit, but never lighten it. Don’t expect it to change the final shade completely, that comes from within the ceramic.
It is still essential for the aesthetic success of the restoration to choose the right block shade as it is the core color, hue, and value.
Check out our Comprehensive guide to characterizing monolithic restorations where we provide you with illustrated step-by-step tutorials on achieving natural looking restorations, both crown and bridges. We also cover surface texture enhancement!
Unlike polishing, glazing and staining doesn’t remove material at all - it adds some. This additional layer is usually so thin that with the correct occlusal and interproximal contact relief values set in your CAD software, any adjustments before cementing are rarely necessary.
Keep in mind if you place a very thick layer of glaze on the interproximal contacts, not only will this look terrible, but it will also inhibit proper seating of the restoration.
The biggest concern regarding glazing is that it can eventually wear off, which is most likely to occur on the occlusal aspect, while it tends to be long-lasting on less functional surfaces.
The ceramic underneath the glaze layer is much rougher, and these rough patches are prone to staining and discoloration. You can always polish these spots without needing to remove the restoration, as the worn glaze doesn't (realistically) compromise the restoration's function.

Sign up to our Online Courses and learn how to process ceramic materials here!
Hybrid Approach
You can also combine these techniques: glaze and stain the entire restoration but leave out the occlusal stops. You can still stain the other parts of the occlusion, such as the deeper fissures and parts of the cusps that do not come in contact with the antagonist at any point of various jaw movements.
As we discussed, the parts of the tooth contacting the antagonists are then polished.
This will allow you to achieve high aesthetic results and minimize the chance of chipping and enamel wear (as per studies mentioned above).
This is arguably the most technique-sensitive approach that might require you to print/pour and mount models and is, therefore, unsuitable for most same-day chairside workflows.
Conclusion
Both methods - polishing or staining and glazing - have their place and use in material processing and dental ceramics. The method you use mainly depends on personal preference – more technical-oriented clinicians might have better results with polishing. At the same time, artistic hands will achieve incredibly aesthetic results with staining and glazing.
In the case of anterior restorations, monolithic, polished-only surfaces are rarely indicated, as natural teeth are not monolithic. Natural teeth vary in transparency, color, and staining, which is something even a multi-layered ceramic block cannot provide on its own.
Therefore, for posterior restorations (especially inlays and onlays), feel free to polish only, while for anterior restorations, you will need to improve your staining and glazing skills.